Introduction
From all the tasks that a telecommunication professional has, one of the most important is the RF Design.
Mainly because this task results in physical changes in the network, by modifying or adding new sites and/or equipment.
Based on the settings (and needs) of the current network, several areas - from Planning to Marketing and Optimization - may require changes to the these settings, that will define the future of the network.

Once defined the area of the new sites, another extremely important task is the collection of candidate points, ie points close to the places defined as ideal, and can have a New Site Deployed.
And that part of the project is what we call the ‘Site Survey’ - also with other common variations such as ‘RF Survey’, ‘RF Site Survey’ or ‘Wireless Survey’.
Note: For simplicity, from now on in this tutorial we’ll refer to as just ‘Site Survey’.
If we don’t run it properly - like choosing ‘bad’ points - the worst consequences range from an overall bad system performance (compared to what it could be), to cases where we need more sites/equipment to meet the requirements of the same region. In other words, implies in loss of CAPEX, OPEX and Poor Network Quality!
It’s more than enough to try to run it in a best possible way, no?
Unfortunately, this is a kind of task that can’t be learned from theory, and its success depends heavily on the experience of his executioners. In addition, there too little specific reference material on this subject available.
Therefore, we’ll now try to share some of the best practices of it, as a step by step guide. As always we’ll be following the Hunter Methodology to organize all of our work procedures.
So let’s go?
Before the Survey
As in any task to be performed, the ‘Site Survey’ should be first of all well-planned, so that its execution, as best as possible.
Therefore, it is advisable to follow some basic procedures, or some tasks that are common and necessary: a pre-analysis before any ‘Site Survey’.
Before heading to the ‘Site Survey’ region, it is extremely important to make a complete analysis of that region. For this, all available resources should be used: Aerial Photos, Google Earth, Maps, etc…
Important: Always take the printed data with you: the areas of interest highlighted, with a longer zoom and a smaller one, especially in the focus area.
Equipment
The first important input comes from Planning, where we define the equipment to be installed. It’s important to emphasize that it is necessary to know the characteristics of the equipment, and how they can be installed.
Knowing for example their dimensions, if they can be installed on the top of towers, how many antennas are needed, will it be a BTS or Booster/Repeater, etc..
Predictions
From the definition of equipment, we then spent some time on theoretical calculations, where we’ll set the location for our site.
For this, we must use Signal Propagation Prediction tools. These tools, when properly adjusted, give us a very close notion to what we can achieve. Of course not accurately predictions do not reflects exactly what will be achieved in practice, but serve as an excellent ‘reference’.
A well-adjusted prediction tool is one that brings results close to what we find when collect data, as in ‘Drive Tests’. This adjustment can be done through the use of different ‘Propagation Models’ for different areas (urban, suburban, etc. …).
The better the resolution of your bases, the greater the accuracy. However, the processor uses more resources, and takes longer to run. For a fairly good approximation, we recommend that you use at least a resolution of 30 meters, available for free download at NASA website.
Other features such as ‘Building Heights’ - ie, the heights of existing buildings also greatly improve the accuracy of the result, but are more difficult - and expensive - to obtain.
But remember that regardless of their ‘reliability’ of the predictions, the most important is the ‘comparison’ between the candidate points. That is, even if the prediction tool does not provide perfect results just as real, is always valid to use it at least for ‘comparisons’ among the predictions of candidate points.
Drive Tests
Another excellent way to check for new items is the analysis of ‘Drive Test’.
In an ideal world, if it were possible to have a detailed ‘Drive Test’ in the entire interest area, we’d have no need for prediction tools, as we would have a true and complete coverage knowledge, thus knowing where it needs to be improved.
Unfortunately, it is not possible for many reasons, but we can use the already available ‘Drive Tests’ as a supplement to the analysis - even to validate the results obtained with the prediction.
Therefore it is important to have quick and easy access to Drive Tests processed data, for example using files already processed in Mapinfo and/or Google Earth.
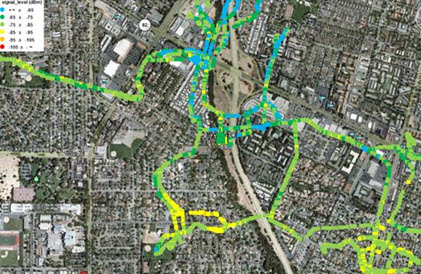
Open Drive Tests available in the region of interest and take a time to save a few more images, which can be very useful in the field - so print it.
Once the analysis is done (Prediction, ‘Drive Test’, and others that are possible) we can start the process of ‘Site Survey’.
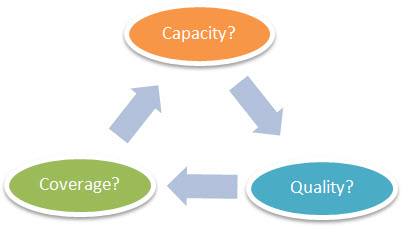
What is the Purpose?
When someone asks you to run a ‘Site Survey’, the purpose of it is already known, or in other words, the need for improvements that led to the deployment process of this new site:
- Quality
- Coverage
- Capacity
While the ‘Site Survey’ should always try to meet all purposes, one always stands out, or it have more priority and this should be taken into account when running it.
In other words: for example, if the goal is to increase coverage, you should look for a place with the best sight in all directions of interest. But if the goal is capacity, focus on that, and look for points that will solve this problem.
Concepts
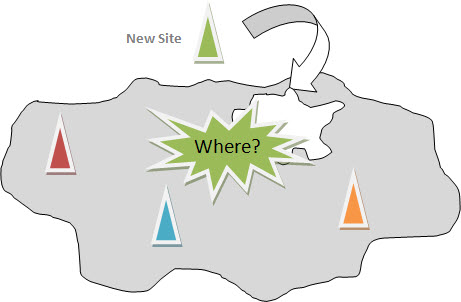
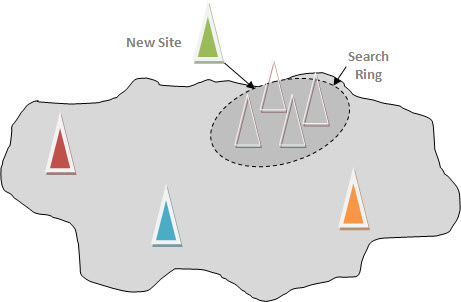
The basic concepts of the ‘Site Survey’ are very simple, and it is worth only noting is intended for you to indicate one or more points as possible candidates.
These points candidates must be within a region known as ‘Search Ring’. Although the name suggests, this polygon can be any shape, even a square.
Such points are recorded in a proper report, following the processes and documents of each company, and should also rank some priority for each point (the best for the worst indicated).
This is because, maybe the first indicated point has a problem, as an owner that don’t want to rent, transmission problems, unavailability of infrastructure, etc..
Moreover, the more points allow a better margin for trading in the area responsible for this engagement.
To avoid these problems, it is interesting that the ‘Site Survey’ be conducted togheter with the areas of RF, Transmission, and Infrastructure, Contract and other that apply. We know however that it is always almost impossible, so it is up to the professional who carries out, alert to all these aspects.
For example, if you work in the RF area, and running it alone, why do not note the name and telephone number of the owners of each point? Your colleagues from Contract area say Thank You, not to mention that the process will be streamlined.
What equipment to bring with?
Generally we notice the importance of something only when we need it - but don’t have it available!
This applies also to the ‘Site Survey’. Imagine arriving at a remote location over 100 km from any urban center, and realize you forgot to buy new batteries for the camera! This can be very frustrating - not to mention one that is ‘suffering’ and unnecessary work!
So we can at least make sure to bring as much equipment as they apply to the kind of ‘Site Survey’ to be done!
There is not a mandatory rule about what equipment to take, but here’s a little ‘Check List’ with the main equipment desired and/or necessary. As always, everything depends on your need - like the ‘Survey’ type, Region, etc..
GPS: for location coordinates. In GPS you can also enter the points of your network sites and use them as a reference, especially in rural locations.
- Camera: for photos.
- Batteries: for the Camera.
- Keys and Locks Secrets: for both your company and competitors, when their sites can be shared (let’s talk about this later).
- Binoculars: to view other distant points, such as possible transmission sites.
- Compass: orientation of azimuths.
- Phones with Test Mode enabled: to check the signal.
- Proper Climbing Equipment: if you need to climb a tower.
- Small Notepad: for quick notes, that fits in your pocket.
- Template printed with key data to be collected: Use one sheet for each candidate, to record all relevant and necessary information.
As mentioned, this list is not complete, as you may have other more specific equipment according to your needs, you can extend it as according to your needs.
Photos
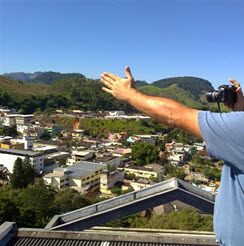
Now running the ‘Site Survey’, a very important part is referring to taking Photos.
Remember that when you are at field, you have a clear vision and complete understanding of the region. However, when you come back to the office, the situation changed dramatically.
It gets worse if you are gathering photos from several ‘Site Surveys’. You run a serious risk of forgetting the reference for some photos, wasting your work, and worse, degrading the quality of the final analysis and reports.
When you take panoramic shots, it is important to know the orientation of each photo.
To achieve this in the field, first, with the compass, identify where the North is (0 degrees). And make markings on the floor as possible - in the dust of the ground, with a stone, etc..

So when you take the photos, just follow the guidelines. Mark down the positions from 0 degrees to 360 degrees divided by 45 to 45 degrees, and take photos.
Another good tip is to always take pictures of reference, when you began and ended a sequence - for example as shown above.

When shooting, also remember to leave only a ‘small’ part of Sky appearing. Remember that what matters is the area of interest - you will not want to get to the office and realize that more than half of the photos useful area is the Sky!
See for example the two photos below. Were taken in the same direction, only the second did not bother to lower the Sky.

It is easy to see which one gives us more information, don’t you agree? Although it seems obvious, it’s a mistake many people do when taking their first ‘Site Surveys’ photos.
Overview
It is also common to some beginner designers the problem of ‘Limited Vision’.
At the region of interest, they are directed to a point where the project’s goal is ‘reached’. And stop there!
No matter how good the analysis in the office, nothing replaces field verification. However, this check should be done as long as possible.
Suppose for example you are looking for points on the tops of buildings for a given project. From below (street level), you find some possible candidates, and climbs one of them.
From the top of this building, you see a good vision to cover the region, and decides that this is the point indicated - without going the other buildings!
So don’t do it - do not be ‘lazy’: go to ‘all’ buildings! Often, points that seem to provide the ‘same’ coverage happens to be better than others when you have a broader view of what they all can provide.
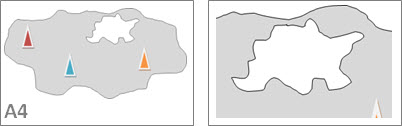
Avoiding the ‘Limited Vision’ you have another way of viewing the site: the ‘Big Picture’.
In ‘Search Ring’ as shown below, with only two buildings as candidates, which one would you put as most suitable?
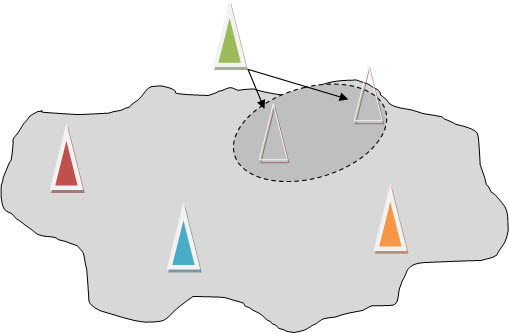
Simply looking at the picture, choose the point closest to the center - and not that far away from the area of interest.
Of course, the figure is illustrative, and various other factors must be taken into account in this decision, but in general, not having a limited vision, and get a macro view always helps to get the best result.
Site Sharing
An increasingly common issue today is the sharing of infrastructure between operators. This sharing includes antennas.
There are companies that specialize in ‘Site Sharing’, ie companies that have their own infrastructure (such as Towers) and provide for those have interest, via rental payment for example.
It is interesting to know beforehand all the possible points of share, eg by plotting these points in Google Earth, getting a clearer picture of which site can be useful for a project - you zoom to the new site region, and see available options.
Moreover, it is necessary to know the premises for sharing that your company have. That is, the priority you need to know:
- Choose to share in the first place, whenever possible, in order to speed up the process;
- Try to set the most exclusive points, indicating only share a last resource. This represents more spending, but may be the company’s strategy and therefore must be followed.
‘Roof Tops’
If the ‘Site Survey’ is conducted in an urban area with buildings as possible candidates, it is essential that you go up into several, as much as possible.
In this case, mainly applies the criterion of Limited Vision and Macro Scenario, as seen above.
If Repeaters…
In the case of ‘Site Survey’ for the installation of Repeaters, remember to bring extra equipment to measure directed signal, ie, an antenna ‘Yagi’ (with known model and gain), a cable to connect to the phone, and of course, a phone that matches that cable.
Take a printed table (like the one below), to record the relevant data for each scenario.

What data to Collect?
Keep on hand a notebook and a pen. Remember that information is always important, even though at first glance do not appear to be.
Always conduct the ‘Site Survey’ as if it were not you the person who will do the final documentation, that is, collect as much data as possible. So the reports will be made with the greatest amount of detail, which as we saw, can make the difference between a good and a bad Final Deployed Project.
Arriving back in the office
Finally, when arriving at the office, detach all data (Photos, ‘Drive Tests’…) in proper place, especially as indicated in the tutorial on Folder Structure for Telecom.
Remember also to make the observations, and especially, rename photos to the most relevant names. Never procrastinate: you’ll end up forgetting some details, you can be sure.
Conclusion
So, that’s it. Hopefully you have clarified your questions and doubts about conducting a ‘Site Survey’, and have learned some of the best practices adopted by professionals.
As we have seen, this is a very important task, affecting directly and indirectly various aspects of the network, including financial.
In all other activities in both areas of Telecom and IT, the challenge is to get the best results, achieving the goals and objectives. For it is very important have organization and planning before any task, knowing clearly where to obtain or extract the necessary information for analysis viability. Note that this is just what we always talk in the Hunter Methodology.
So, continue trying to follow this methodology in all other activities of your daily work, taking advantage of the tips presented here and in other Sections and Tutorials. Thus, in no time you will gain knowledge as the best professionals have!
telecomHall Community
![]() Telecom Made Easy!
Telecom Made Easy! ![]()
(Share to your friends) ![]()