Introduction
When you think about a painter, which is the first tool that comes to your head? Probably you thought about a paint can or a brush, correct? And when we speak of a handyman, what do you remember? Now probably must have thought about a hammer or saw.
This is fine, because all professions have its tools commonly associated with. But when we talk about a telecommunications professional? Now it is not so easy to say what would be the tool…
But this answer is becoming easier. Nowadays, when it comes to telecommunications, it is not uncommon to see a tool increasingly used by everyone: G-MoN!
G-MoN is an Android application that is already used by many people involved with wireless networks, and if you belong to this world, it will probably be part of yours too!
Since the simplest applications, as to check the signal level of a Wi-Fi network, until more complete statistics and analyses in a 2G/3G/4G Network, G-MoN provides a surprising experience to the user.
Let’s now present some tips as how to download, install and use the G-MoN.
Goal
Introduce G-MoN application, a very useful wireless network application for tasks like ‘WarDriving’, ‘FieldTest’ or ‘Site Survey’.
Note: we’ve talked about Field Test:
What is Cellular Field Test Mode?
And about Site Survey:
How to Run a RF Site Survey (Tips and Best Practices)
Now we only need to understand what is ‘WarDriving’.
Basically, ‘WarDriving’ is the act of collecting data on the move, mapping information of available Wi-Fi networks, using a device that has this capability, such as a PDA or SmartPhone.
G-MoN meets both the needs for ‘WarDriving’ (Wi-Fi) and ‘Site Survey’ / ‘Field Test’ (wireless mobile networks).
G-MoN Application
G-MoN is an application developed for devices with Android operating system (usually installed on SmartPhones). And it is available for free download on Google Play – which can be accessed by those devices.
That is: to use it the only requirement is that you have one of these devices, such as an Android SmartPhone.
Note: you can also visit the website G-MoN in Google Play for more information:
Note: above link was updated to new version of G-MON.
Just remember that it must be installed on an Android device.
Installing G-MoN
So, the first step is to visit Google Play (1), and do a search for ‘G-MoN’.
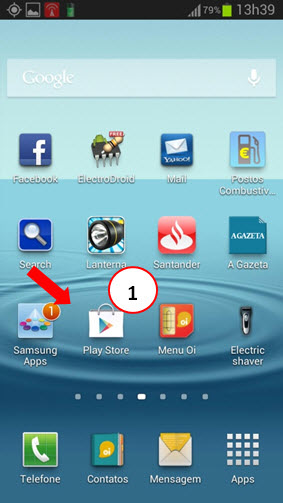
Download and install the program. After installation, you can find an icon to open it.

Note: When you run the program, it check some basic settings, so that all its features can be used. For example, whether the GPS is on - in order to make it possible to identify the location on a map (Google Maps ) and information for the monitored network. In any case, the setting is a user’s choice – the program does not make changes without prompting.
Program Interface
When you run the application, after some possible adjustments as GPS on/off, we have 4 tabs (or windows).
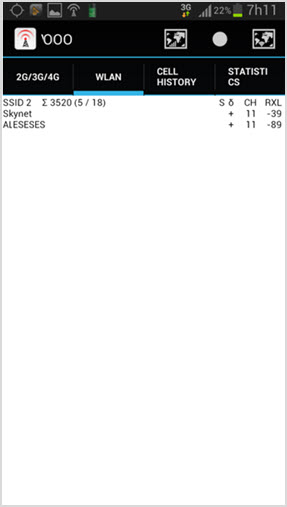
By default, G-MoN starts on the second tab ‘WLAN’. (We’ll see how to change it soon).
On this tab we have the information of the checks (‘scans’) of available Wi-Fi networks.
Note: the use of G-MoN will depend on the use you want to do. For example, if you’re going to use it for Wi-Fi networks checks, you should already be familiar with the terms presented. The same way, if you are using it as a Drive Test Monitor (‘Field Test’), you are already familiar with the values and measures (such as LAC, CID, RX Level, EcIo, etc…). For this reason, let’s not dive in these explanations, since our focus today is to use the tool.
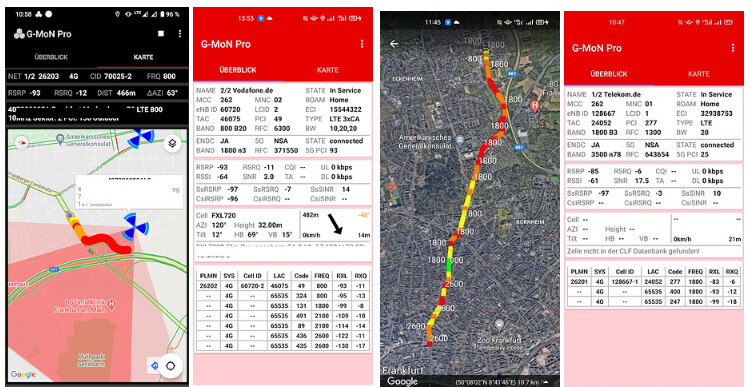
On the ‘WLAN’ tab we have several interesting information, both for professionals and curious.
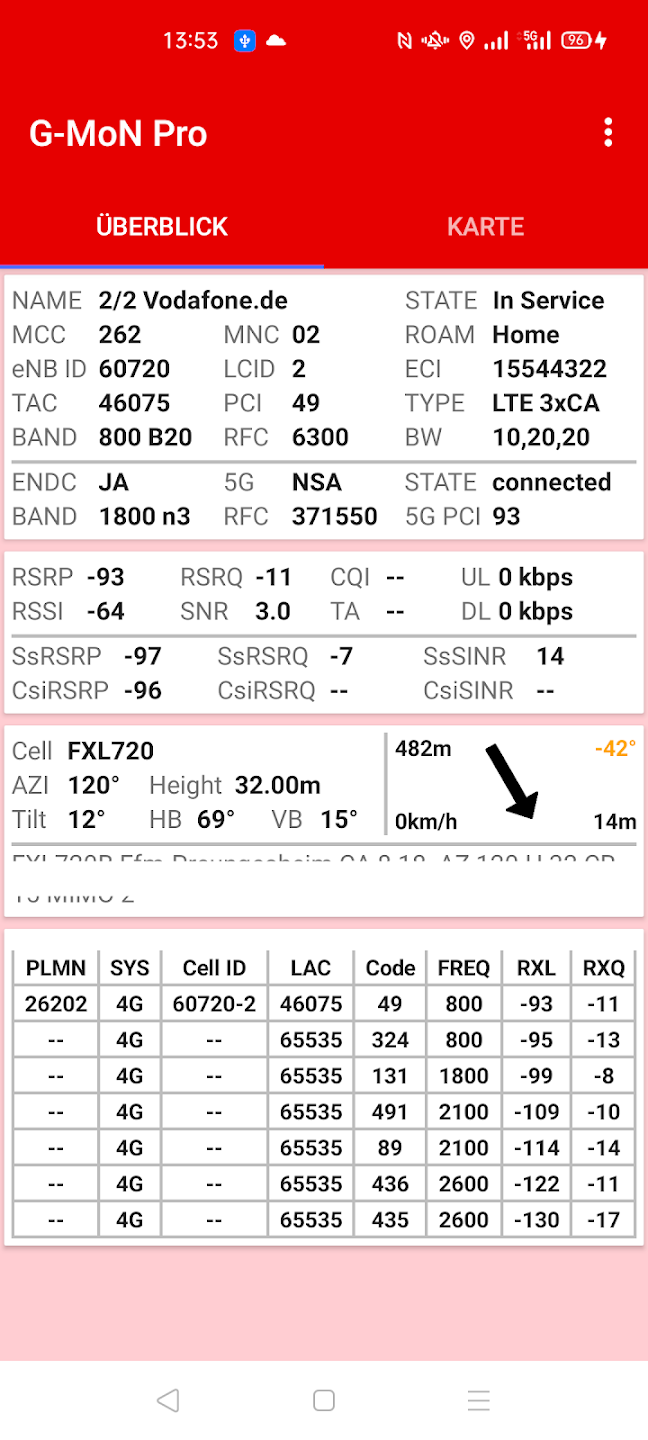
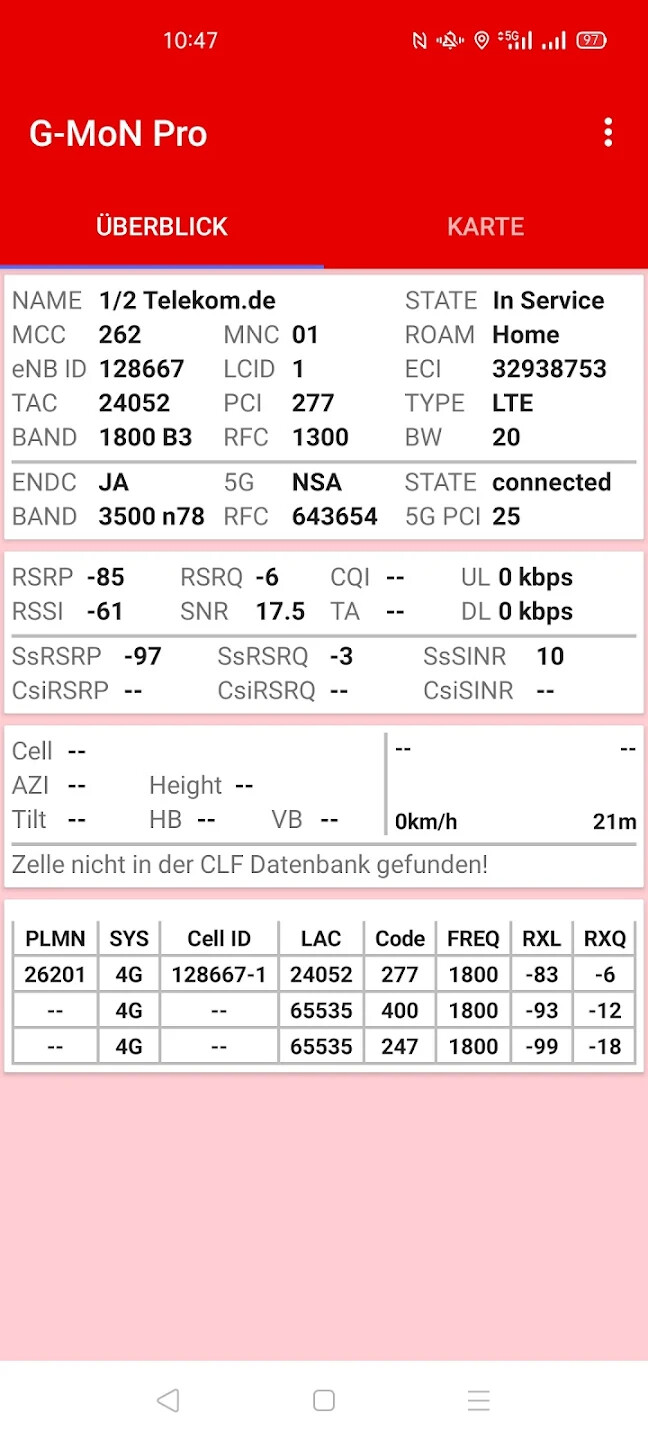
The ‘2G/3G/4G’ tab presents the information for those involved with wireless networks (CID, LAC, Rx Level, EcIo, etc …), since RF professionals (Optimization, Design) to Core Network professionals.
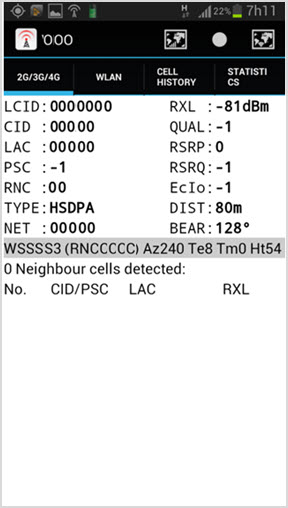
Note: the values shown on the tabs are fictitious, since our only purpose here is presentation.
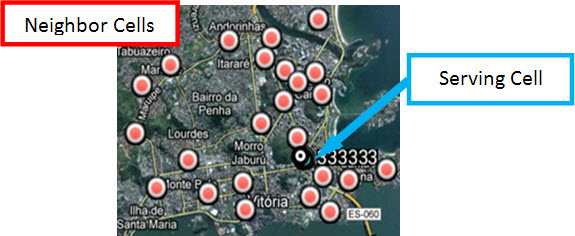
Here we also have neighborlist information, and for each neighbor its corresponding CID/PSC, LAC and RXL.
The ‘Cell History’ tab also has important information such as coordinates (Latitude ‘LAT’ and Longitude ‘LON’) , accuracy ('ACC ') and Altitude ('ALT '). In this case, of course, the GPS must be ‘ON’.
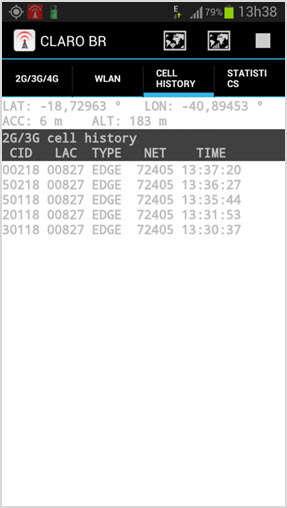
The most interesting thing here is what its name suggests: a ‘history’ of all cells where our UE (User Equipment) was - with LAC, the network Type, and Network information.
This type of information is very useful for example if you are adjusting cell reselection and/or cell Handover in your network.
Finally, the ‘STATISTICS’ tab, also with suggestive name, with several statistics.

The information are mixed. For example for Wi-Fi we have the number of open APs. Here we can also check the numbers of ‘SIM’, ‘IMEI’ and even the ‘IMSI’ – another important information, used for example in 'BSC/RNC’s Call Traces!
Options
In any of the Main Tabs of the program, we have access to several G-MoN Menus (from the Android’s default ‘Menu’ button). (Depending on the model of the device, the presentation - or shape – of the Menu may be different from shown below, but the options are the same).
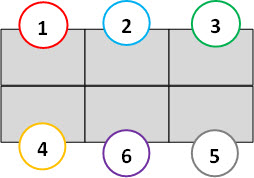
In simple terms, we have:
(1) Wi-Fi : Opens a new window with a Map showing the available Wi-Fi networks.
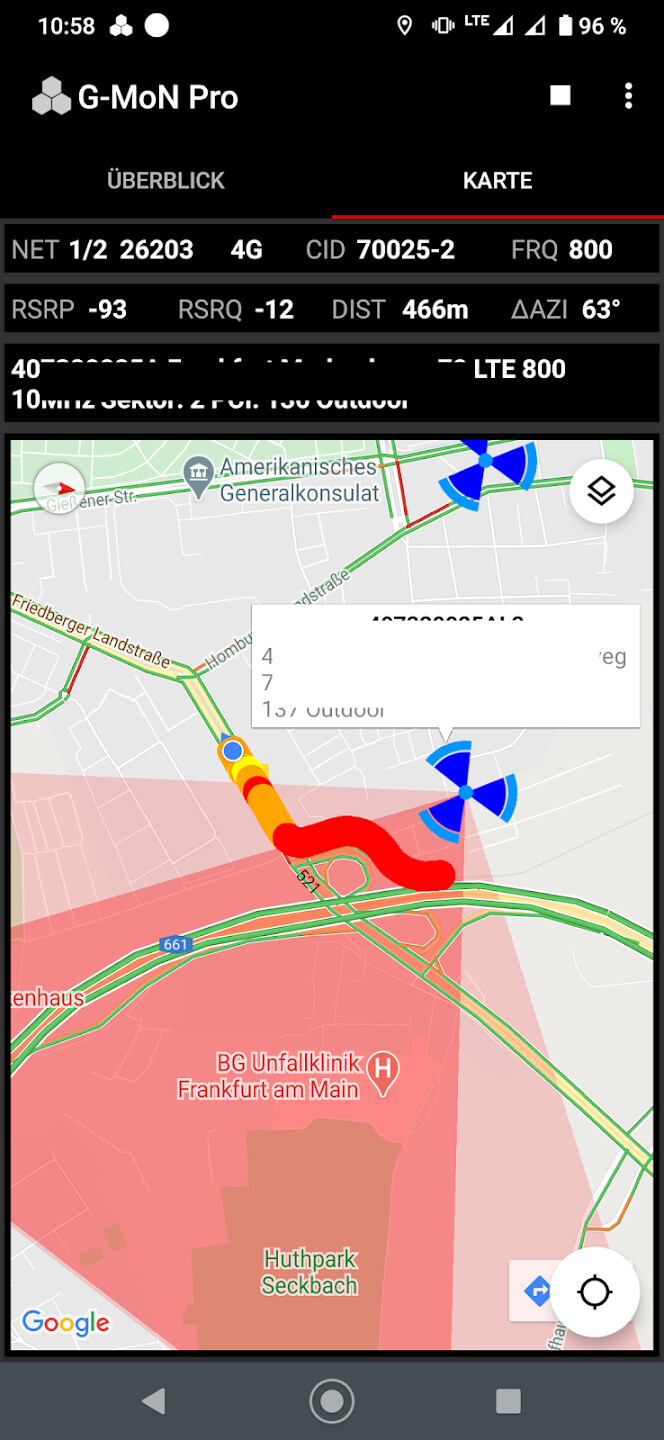
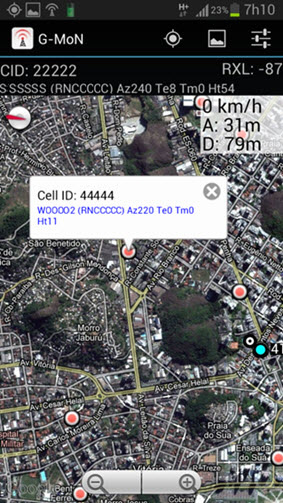
(2) Cell : Opens a new window with a Map showing 2G/3G/4G Networks available.
(3) Start Cell Log : Starts the data collection. We’ll talk more about it soon.
(4) Exit : Exits the program.
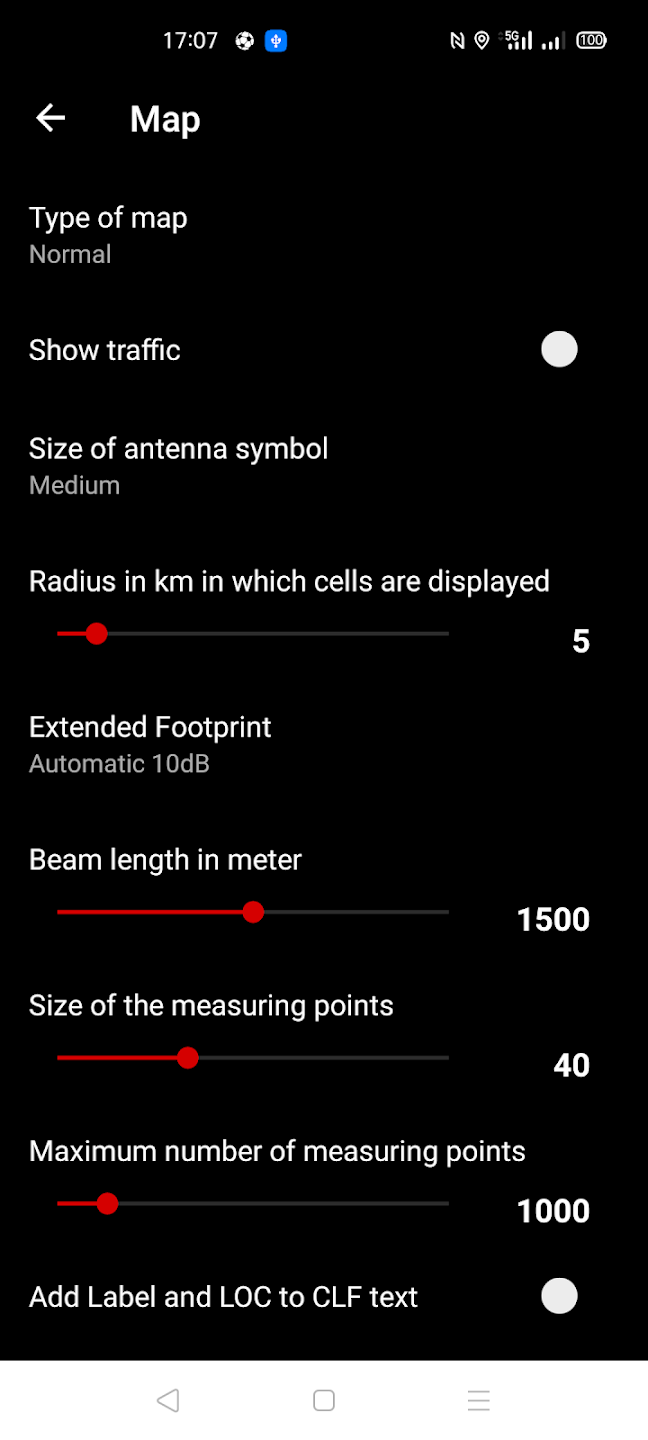
(5) Settings : Opens a new window with several options of program settings, since customization up to technical adjustments.
(6) More : as its name suggests, opens up even more options and program menus. Here is for example where we can import the database of our wireless network!
Help and Settings
With the Android’s ‘Menu’ button, we have the ‘Help’ option (which may be in the ‘More’ menu in some models).
Although the program has a ‘Help’, let’s make here a brief description of this and other available options and settings, so you can find almost everything you can do with your G-MoN!
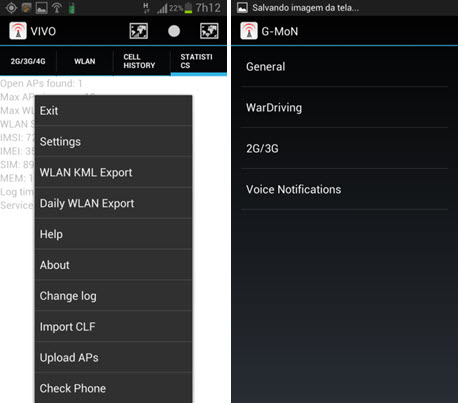
General Settings
In the first option (‘General Settings’) are the most common adjustments that can be made.
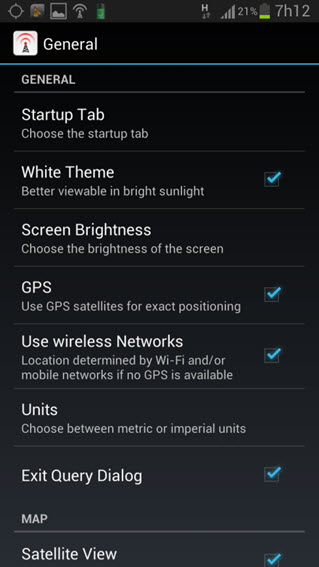
- Settings – General – Startup Tab: allows you to choose which tab opens by default. If you work more with Wi-Fi, the tab ‘WLAN’ should be your choice. If you are more involved with mobile wireless networks, ‘2G/3G/4G’ probably will prefer to choose this screen to open first.
- Settings – General – White Theme: by default, the tabs background is Black. If you want, you can use a White background.
- Settings – General – Screen Brightness: adjusts the screen brightness.
- Settings – General – GPS: use GPS for a more accurate location.
- Settings – General – Use Wireless Networks: select this option to use Wi-Fi networks and/or Mobile Networks if there is no GPS available.
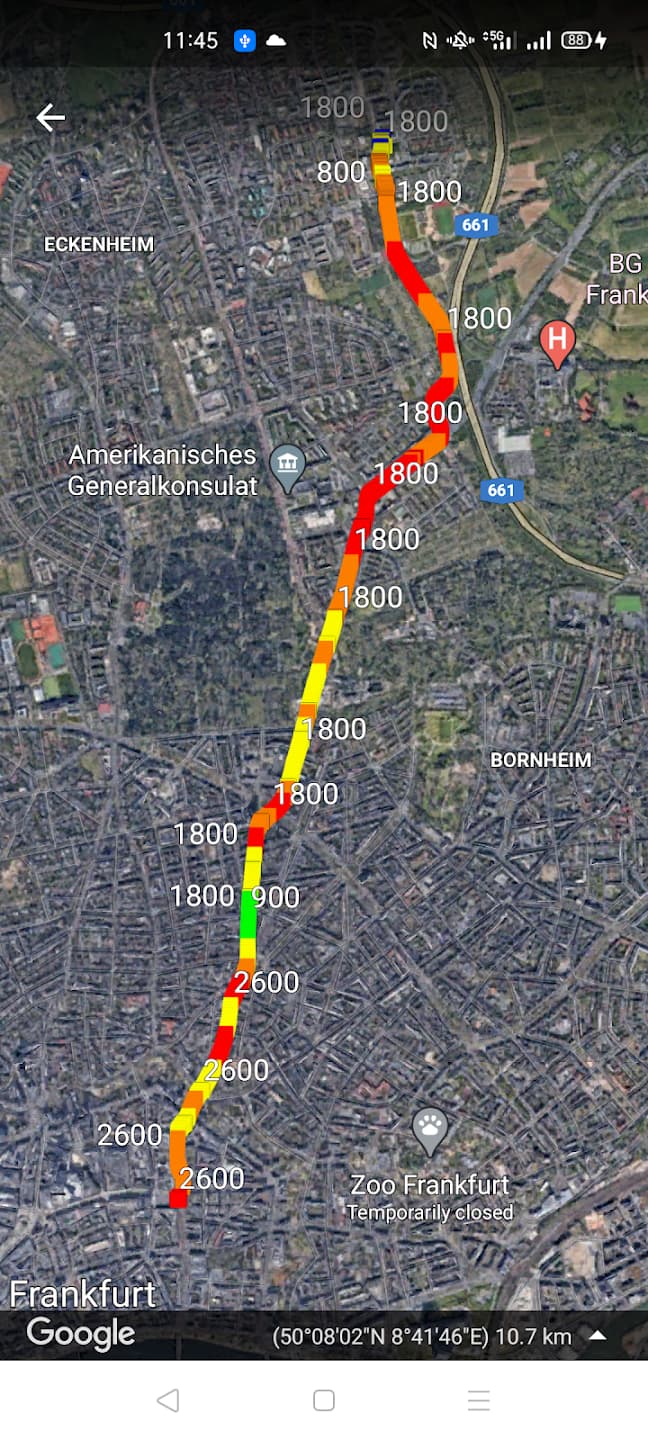
- Settings – General – Satellite View: with this option selected, the map shows satellite view (photos) and not just a simple map.
'WarDriving’ Settings
‘WarDriving’ options are specific for this type of use (Wi-Fi).
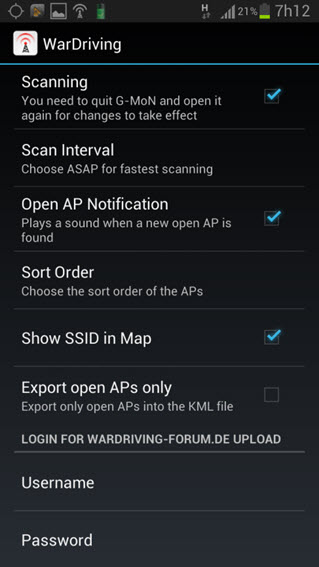
- Settings – ‘WarDriving’ – Scanning: the main switch (on/off) of Wi-Fi signal scan.
- o Important: If you do not want to use G-MoN Wi-Fi option, we recommend that you leave this option unchecked, avoiding unnecessary energy costs.
- Settings – ‘WarDriving’ – Scan Interval: interval for the measures (scanning). Can be ASAP (fastest), 2, 3, 5 or 10 seconds. Remember that the shorter the interval, the more battery power you will waste.
- Settings – ‘WarDriving’ – Open AP Notification: play a sound whenever a new AP is found?
- Settings – ‘WarDriving’ – Sort Order: on the ‘WLAN’ tab, we set how found APs should be sorted (in ascending order, descending order) – by RLX, SSID, Channel, or Crypt.
- Settings – ‘WarDriving’ – Show SSID in MAP: show SSID on a map?
- Settings – ‘WarDriving’ – Export Open APs only: When exporting to Google Earth (KML), tells you whether only open AP should be exported.
- Settings – ‘WarDriving’ – Username and Password: sets username and password for 'WarDriving’ forum website , if you want to participate, for example sending data.
2G/3G Settings
In this group of settings, we have the options for mobile networks.
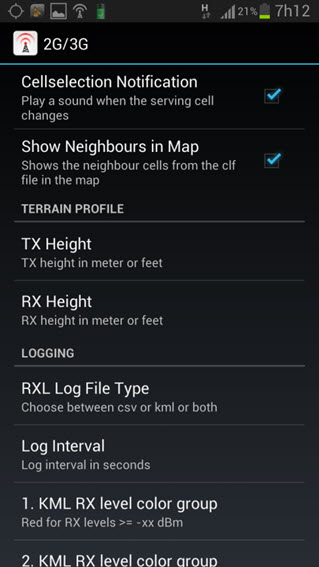
- Settings – 2G/3G – Cellselection Notification: play a sound when the serving cell changes.
- Settings – 2G/3G – Show Neighbors in Map: show neighbors on the map (if present in import.clf file). Note: soon we’ll talk about this clf file.
- Settings – 2G/3G – TX Height: when using the terrain profile on map (we will also see more on this soon), this is the height that will be considered to be the height of the antenna for the transmitting BTS/NodeB. (Default value is 45).
- Settings – 2G/3G – RXL Log File Type: when we run data collection, we can choose that it be recorded in ‘CSV’ , ‘KML’ or ‘CSV/KML’ file type.
- Settings – 2G/3G –Log Interval: Interval - in seconds - the measures should be recorded in the Log. (Default value is 1)./li>
- Settings – 2G/3G –RXL level color group (1 - 4): when exporting to Google Earth, the legend, or ranges for the predefined colors (red, yellow, green and blue). For example, changing the value of the first group to ‘-69’, all signal measures greater than or equal to this level will be plotted with the color of the first group (Red).
Voice Notification Settings
One last interesting group of settings is related to voice Notifications. That is, whenever a particular event occurs, we can have a notification (available in English and German).
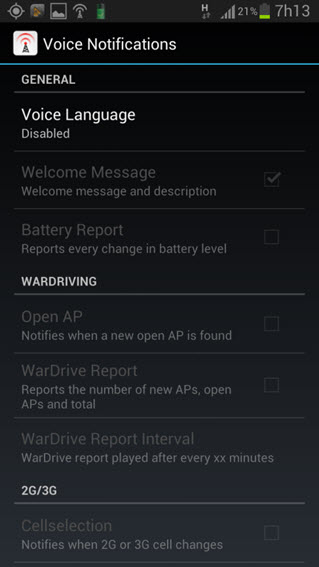
- Settings – Voice Notifications – Voice Language: the main switch (on/off) for voice notifications. We can choose among 'Disabled ', ‘English’ or ‘German’. In the first case, the notifications are disabled for all events. And for the other two options, we choose the language for voice notification.
- Important: this is a very interesting feature, but that also consumes a bit more battery life. Therefore, it should be used with care, and only when necessary.
- Settings – Voice Notifications: voice notifications can be configured for a lot of event types:
- ‘Welcome Message’
- ‘Battery Report’
- ‘‘WarDriving’ - Open AP’
- ‘‘WarDriving’ - Report’
- ‘‘WarDriving’ - Report Interval’
- ‘2G/3G - Cellselection’
- ‘2G/3G – Signalstrenght Notification’
- ‘2G/3G – Upper RXL Limit ’
- ‘2G/3G – Lower RLX Limit ’
- ‘2G/3G – Network Changes’
- ‘2G/3G – LAC Changes’
Importing your network data into G-MoN
UPDATE: Please check NEW CLF format at gmonclf4 - clf4
As mentioned earlier, the standard way G-MoN is installed already can be considered as a valuable tool for anyone working with Wi-Fi and mobile networks.
However, we can improve the user experience, importing - in the case of mobile networks - a file with the information of our own network. So, instead of informing only the identification ‘numbers’ of the cells, we can inform their CELLNAMEs!
Note: Without the cell information file loaded, you will receive the message: ‘No cell tower information found! A proper CLF V3 is needed.’.
The procedure for data import is quite simple. Just follow the program help guide, and create a CLF V3 file with the information in the expected format.
In fact, this CLF file is nothing more than a plain text file. That is, you can create a file using Windows Notepad, and then simply change the extension ‘.txt’ to '.clf’. The most important thing is only that the data be in the correct format, as shown below, an example taken from the program’s own help.

Each row corresponds to one network cell, and has a total of 9 fields:
- 1.field:MCCMNC
- 2.field: CID decimal
- 3.field: LAC 5 digits decimal
- 4.field: RNC decimal (put 0 if you don’t use it)
- 5.field: LAT coordinate WGS84 decimal degrees with a point
- 6.field: LON coordinate WGS84 decimal degrees with a point
- 7.field: POS-RAT precision of the coordinate -1 for exact position
- 8.field: field description of the cell avoid characters like (“), (;), (,) and (‘).
- 9.field: field is not defined, but should be always 0. For CDMA/EVDO networks, use basestation ID for for Cell ID and system ID for LAC in the clf. System ID with 5 leading zeros!
Tip: the ‘8 field’ is a description field, where is usually filled with name for each cell (CELLNAME). However, the trick here is to put more auxiliary information.
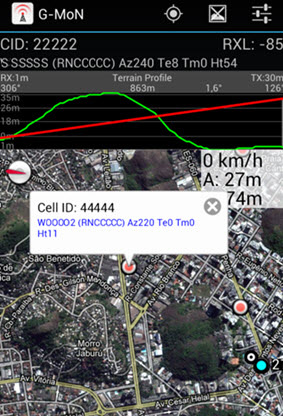
So, when you are in a field monitoring task, you have direct access to this information. In the example below, which is what we use, we have the name of BTS/NodeB, followed its BSC/RNC name, and also the Azimuth (Az), Electrical Tilt (Te), Mechanical Tilt ™ and the Height (Ht) serving cell!

Anyway, being a free field, you can put here what you want, from complying with the limits of memory, and also of common sense (much information can end up confusing).
To import the file, it must have the name 'import.clf '. So, rename the file we created for that name, and then copy it (from our Computer to the SD card, at the ‘gmon’ directory).
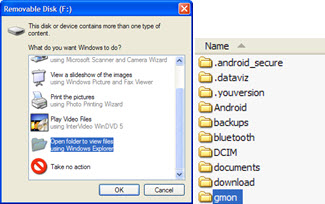
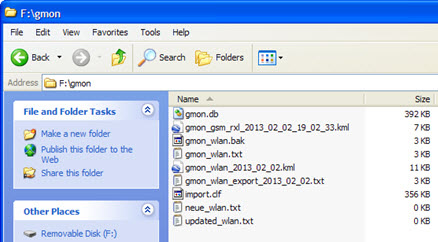
One way to do this is to connect your android device to the computer using an USB cable, and select ‘data transfer’. Open this folders (1) and navigate to the root folder ‘gmon’ (2).
In the folder where you created the file, copy it (CTRL + C) (1). And on the SD card, paste it inside the ‘gmon’ folder (CTRL + V) (2).
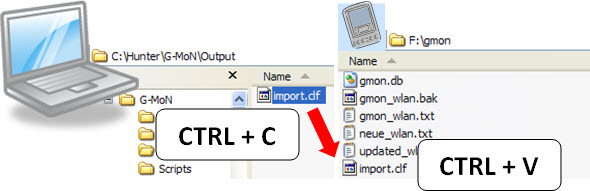
Ok! The first (simple) step was done: the file is now located at the root of the directory where the G-MoN was installed
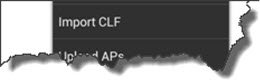
The second and final step is also quick and simple: open G-MoN, and choose Menu: ‘Import CLF’.
Browse to the ‘gmon’ folder (on SD card), and select this file. Next, click the ‘Select’ button and you’re done. Wait for the G-MoN make necessary imports.
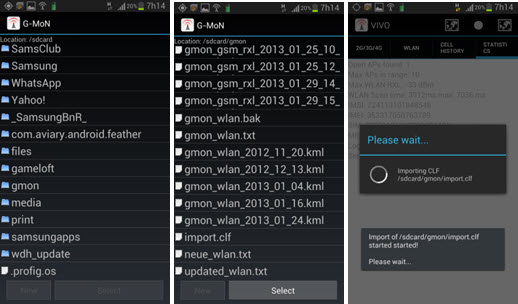
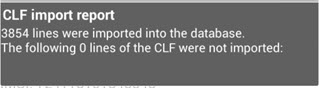
In the end, a message appears, telling you if there were any errors, and how many records with error (if occurred) were not imported. If all went well, ‘Zero’ lines should not have been imported due to some problem!
Congratulations, you are ready to use the G-MoN with customized data info of your network.
Hunter Updater - G-MoN
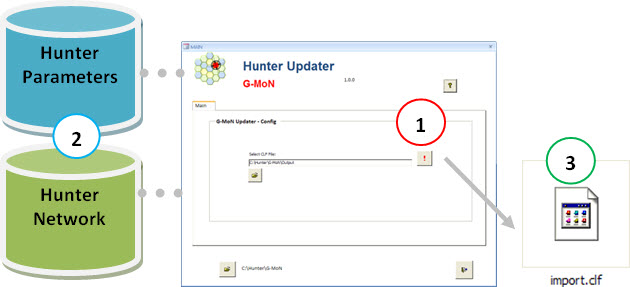
You can also automate the creating of the ‘import.clf’ file.
For example, with a single click (1), the ‘Hunter Updater - G-MoN’ module access the information from other modules (2) with network information (Parameters, Azimuth, etc.) and creates the file in its final form (3).
And you can also create your own macro (using Excel for example). Or even create the data manually. Just follow the standard format.
Collecting data with G-MoN
To collect data, in any of the main screens, click the Android Menu button and choose ‘Start Cell Log’.
When you do this, G-MoN icon turns red, followed by the message: 'RXL Logging is active! Keep screen on! '. This means that you should not switch to another program, otherwise the data will not be written.
Some other messages that may appear when using G-MoN are:
- ‘G-MoN is running’: the program is running (working) fine.
- ‘G-MoN scanning is active’: G-MoN scanner is running.
- ‘G-MoN remote service connected’: G-MoN remote service connected.
- ‘Loading Database /mnt/sdcar/gmon/gmon_wlan.txt…’: the necessary databases for G-MoN to run are being loaded.
- ‘External Storage is not ready’ or ‘No SD Card found’: There is some problem with the storage card.
To stop the collection, select 'Stop Cell Log’.
Exporting collected data (KML, CSV)
Data collected are written in files ‘CSV’, ‘KML’ or ‘Both’ type, as set up in ‘Settings – 2G/3G/4G - RXL Log File Type’.
And to export the collected data, in fact, we simply copy them, that were written to the same directory ‘gmon’ was installed.
The files are written using the Menus ’ Daily WLAN Export ’ and ’ WLAN KML Export ’ for Wi-Fi, and the Start Cell Log Menu for 2G/3G/4G networks, and the formats are shown below.
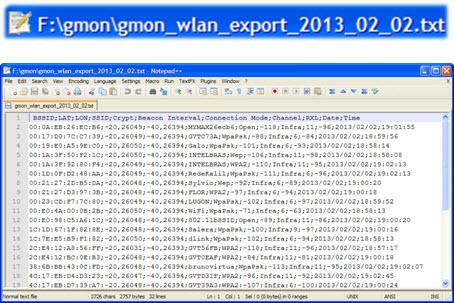
- Daily WLAN Export : the data of the access points found in the day are exported to a file of type ‘gmon_wlan_export_YYYY_MM_DD.txt’, CSV format. That way, you can import that data to a database any (e.g. Microsoft Access) or even Microsoft Excel, and generate any other desired statistics.
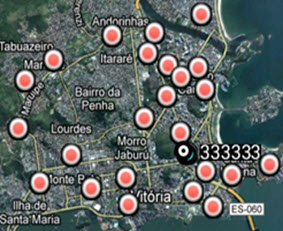
- WLAN KML Export : data from Wi-Fi networks are exported to a file like ‘gmon_wlan_YYYY_MM_DD.kml’. Thus, this file can be opened by Google Earth (or Google Maps) (1). Note: when you click on any AP, we have its detailed information (2).
- Start Cell Log : data from 2G/3G/4G mobile wireless networks are exported to a file like ‘gmon_rxl_YYYY_MM_DD.kml’
Tips for Use - Terrain Profile
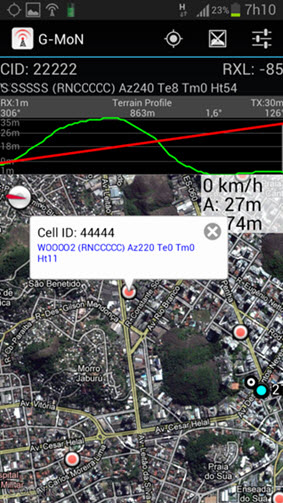
An interesting feature that the G-MoN has is to calculate the ‘terrain profile’, from the current GPS position to a neighboring 2G/3G cell shown on map.
For this, first tap the neighboring cell, and a balloon appears.
Then tap again on the balloon of neighbouring cell.
This feature can be used in several situations, such as visiting the customer for complaint solving, where we are able to see if the point has some obstruction, as we can see below.
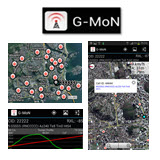
G-MoN Wi-Fi Scanner (‘WarDriving’ ) Video
Next, we have an interesting video available on YouTube showing G-MoN in action.
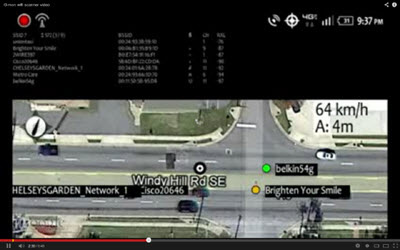

Note: the video was recorded using a LG Steem smartphone (MS910), but as we have seen, G-MoN can be used by a wide variety of brands and Android devices.
Conclusion
We have seen today a very useful program for everyone involved with wireless networks: G-MoN.
This Free Application for Android operating systems is able to meet the needs of more laity to professionals on the subject of evaluation of Wi-Fi networks (’ WarDriving ‘) and/or 2G/3G/4G (‘FieldTest’, ‘Site Survey’).
Be a simple signal level check of a Wi-Fi AP, or in a LTE network field monitoring, we can use G-MoN without any problems, and with great results/reports!
We hope you enjoyed it. Until our next meeting!