Introduction
There are several ways to create and edit code in Python - including using Notepad. ![]()
But of course, if there are tools that help us in some way, why not to use it?
It is not our goal here to tell you what is the best software for you to write your codes in Python. Because it depends on each one, type of use (the purpose), the applications etc.
If you have questions about which editor is best for you, you can search the Internet, and you’ll find hundreds of discussions, each one defending the “best”. ![]()
But if you want to continue and follow our choices, it’s the Jupyter Notebook and PyCharm.
But do I need two editors? No. In fact, as we said, only notepad would be enough. You can choose any editor you prefer, and use it.
But let’s make an analogy: if you buy a car, and you never change the model, will you know if there are worse or better cars?
The “cars” that help us on Python’s journey are Jupyter Notebook and PyCharm,so we see how to install each one
Summary: We need a tool to edit the codes in Python (build codes in Python): Jupyter, PyCharm, VsCode, SublimeText, Komodo Editor, Google Colab… We chose Jupyter, but you can use anyone you prefer.
Jupyter Notebook
The biggest reason that led us to use Jupyter is that it is the most used by the people in Data Science and Machine Learning area (and it is a very interesting area you must agree ![]() ).
).
But also, when you start using it, you have an extra advantage – Jupyter Notebook already comes with plenty of stuff installed, as you’ll see later on.
It’s open source and has everything you need to start programming in Python today.
Did you know? ‘Jupyter’ is an acronym meaning Julia, Python and R – important programming languages that were the original use case for Jupyter – that now supports much more programming languages. And we’re going to use it to program in Python. ![]()
Installing
To get started, let’s go to the official website:
Official site: https://jupyter.org/

This is jupyter’s official website, but this is not the way I use it. We are not going to install “Jupyter”, but the "Anaconda"package. Don’t be scared, that’s right, the name of the package is Anaconda, like that big snake in the movie. But here, the snake is “good”. ![]()
Anaconda already comes with several libraries, several things we use in our Python programming especially if you are more interested in data Science and Artificial Intelligence. You will see in neaar future, just make sure to keep stay together with us in next tutorials.
Anaconda
Then visit anaconda’s website: Download Anaconda Distribution | Anaconda
And click “Install” (1). Notice that it has already identified our Operating System “Windows 64 bits” (2).
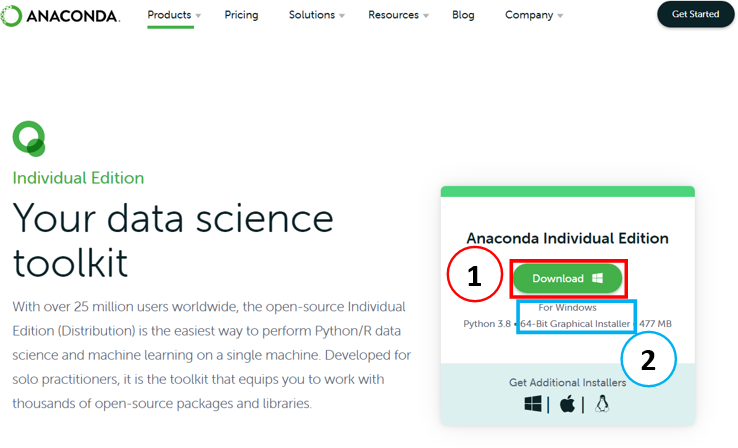
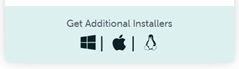
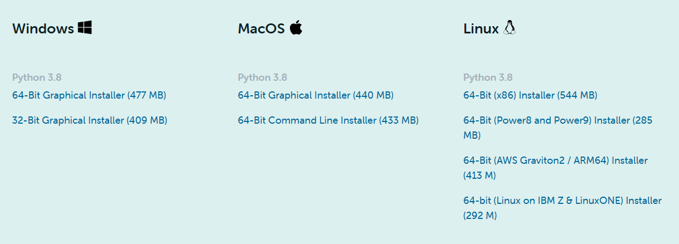
Tip: If it doesn’t identify your OS/bit version, you can manually choose by clicking on the desired Operating System:
Click the"Install" button and wait for the Download to finish. It can take several minutes. ![]()
Once the download is complete, you can proceed with the normal installation.
Tip: In case of problems with the installation, the best way to solve is 1. Uninstall, 2. Restart the Computer and 3. Install again (same process as above).
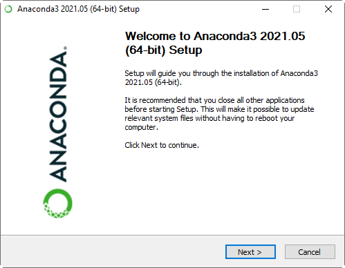
After the Download is complete, we will run the file and basically follow that stream of any installation (next, next, next).
We’ll view here only the screens that have some hint.
Select Installation Type: On this screen, it is recommended to follow with the installer’s suggestion - “Just Me” (1).
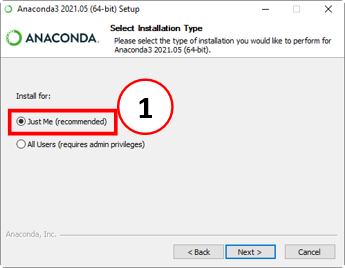
Tip: If you have some kind of problem with your installation, it could be because your username in Windows has some special character. In this case, the tip is to redo the installation if it is a problem, but now choosing the "All Users "option. But in this option, you will need to be the Computer Administrator.
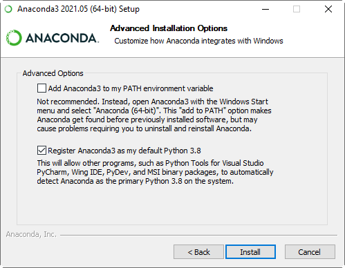
In the next Window we have two advanced options. The installer’s recommendation is to leave unchecked first one, and the checked the second. Let’s leave both as suggested. (Unless you know exactly what they are and want to check/uncheck).
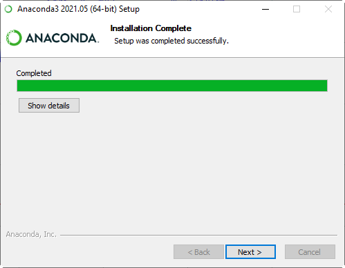
We proceed with the standard installation until it show “Completed” then we click “Next” to finish.
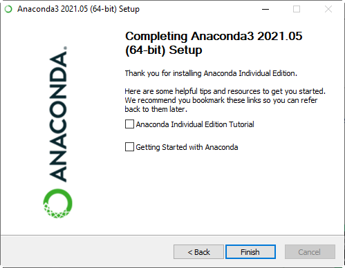
At the end of the installation, if you do not want Anaconda to open anything (tutorials), uncheck the default options. And click the “Finish” button.
Done: Anaconda/Jupyter is installed on your computer! ![]()
Checking installation
And how do I check if it is installed?
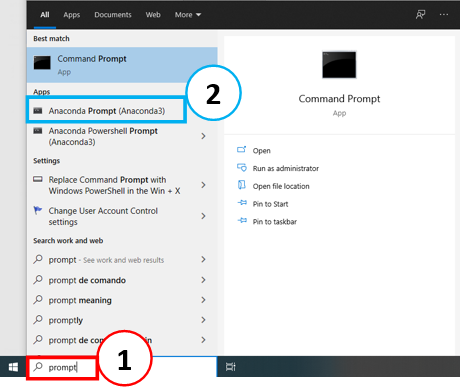
In the Windows taskbar, type “prompt” (1). And you’ll see two shortcuts: one for Windows Command Prompt, and one for Anaconda’s Prompt! (2)
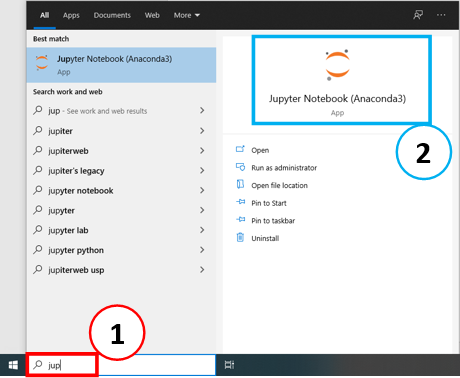
That way, we can see that Anaconda is installed. And we do the same to see that Jupyter is installed. For example, type “jup” (1) in the taskbar, and you will see Jupyter. Click to open it (2).
When you open the Jupyter, it opens a black window. Don’t close this window – if you close this window it’s like you’re turning off Jupyter.
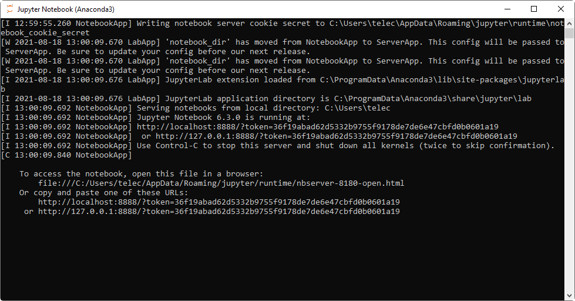
Jupyter is a Python IDE that works in your browser – and opens your default browser. (We recommend Chrome).
Tip: If for some reason when you open Jupyter it does not open the browser, or if you want to use another browser other than the default, you can copy the last line of the black screen (select the text and right click), and paste into a new browser tab.
Done again: You have the Jupyter Notebook working and now a tab in your default browser should open with the Jupyter window!
Jupyter first steps
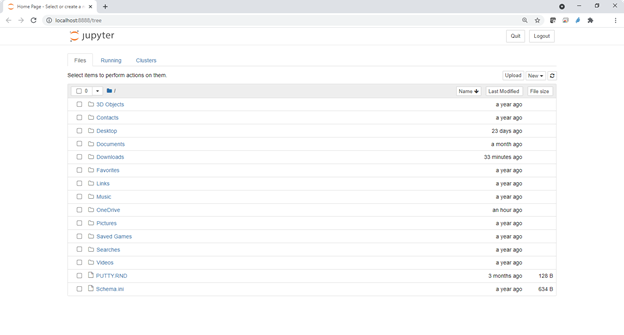
To conclude, we will quickly see some features and hints on Jupyter Interface, which was opened in a window in your browser, for example Chrome.

Inside this Window you find the folders of your computer : Documents, Downloads etc.
You can navigate exactly as if you were browsing Windows Explorer. The notebook files will be created in the desired folders and this helps organize your project.
Summary: It’s the same thing as if you’re browsing your computer. But instead of using Windows Explorer for example – we’re using another interface.
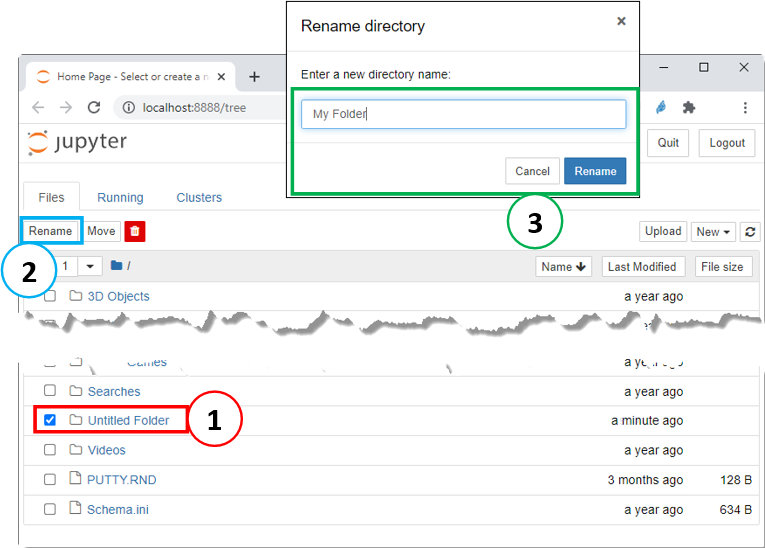
After adding the folder, which was created with the default name “Untitled Folder” we can give rename it and do other actions as we’ll see next.
Now we can then start creating our codes.
Creating a Folder
In any folder we can for example create a new folder to store our codes. Let’s create a new folder (under Documents folder) by navigating to Documents folder and clicking the “New” button (1), and “Folder” (2).
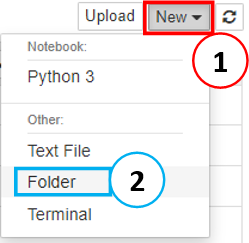
A folder with the name “Untitled Folder” (1) will be created. You can rename this folder by selecting it and clicking “Rename” (2). In the message box, type the desired name (3) and confirm.
Creating a File
Inside this new folder, you can create your files by clicking on “New” (1) → “Python3” (2). And call this file as you wish.
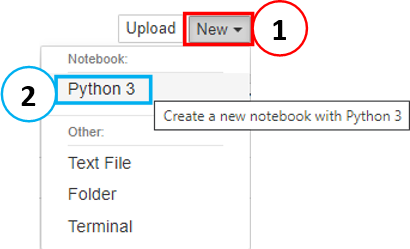
Jupyter Notebook File: a notebook in Python. A file where you type your Python code. (3 here refers to the Python version, but don’t worry with this now).
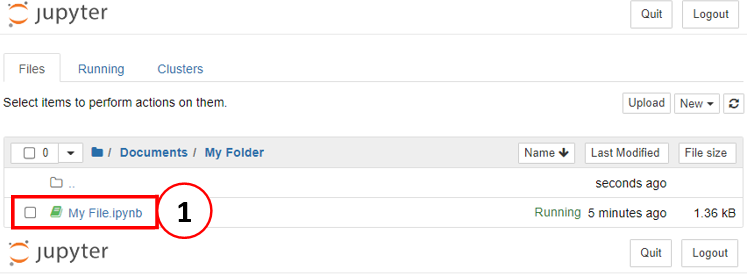
If you’ve come this far, you already have Jupyter installed, you’ve already created a folder and a file. Now you can really start writing “code” in Python.
But let’s look at some basic commands and tips for those who are starting to use the interface (also for those who have never programmed in Python before). ![]()
Code cell
As soon as you create a new file n o Jupyter, you see this screen, with a “cell” of code (which opens in a new tab of your browser).

Tip: If you access the main page, you can see that the file was created as “Untitled.ipynb” (1)
Here we have an important definition: Jupyter is divided into cells. We have for example Code cells, and Markdown cells.
In the code cell of this new file we can for example write (type) our code:
print(‘telecomHall’)
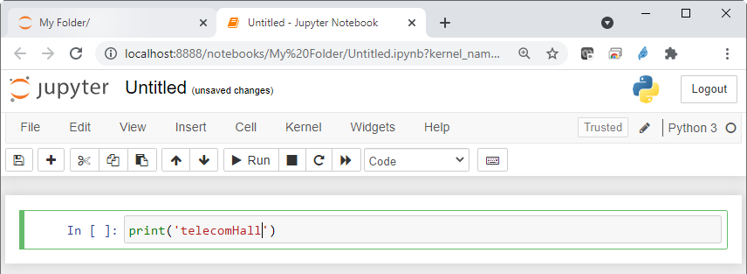
When you type this, you are typing a statement to “print” (show to me) the name that is in quotation marks.
You may have not realized yet, but you just started programming! And you’re already taking your first steps with Python: you have already learned the command to print, which would be “show me information”. And that if the information is a text, it should always be in quotation marks!
Tip: Python accepts both double quotation marks and single quotation marks. You decide what you prefer to use. We prefer single quotation marks.
Running the code
Okay, we wrote the code. But now, how to execute?
To run this code, it’s pretty simple. Just click the"Run" button (1) and Jupyter runs and shows to us! The result appears just below the cell (2). And also, already creates a new cell, so we can continue to write our code (3).
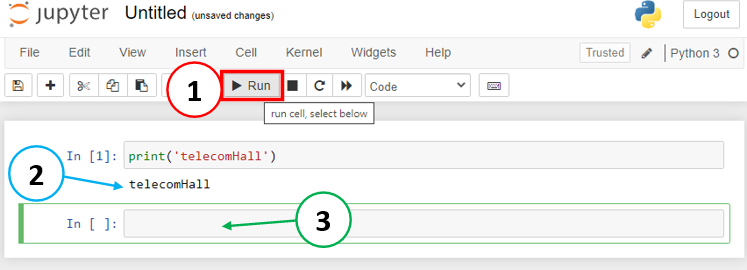
And in this new cell, we can create a new code (1), and run it (2) and again see our expected result (3).
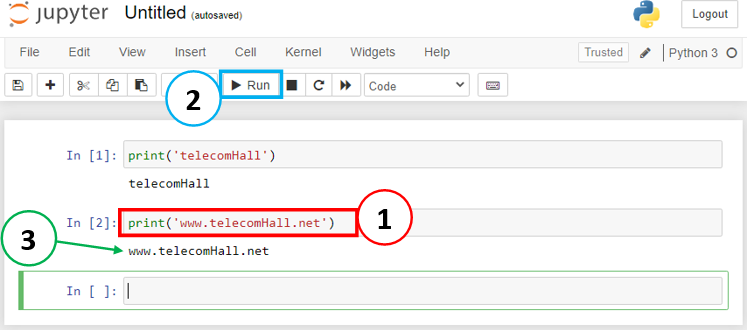
But do I need to create each line of code in a different cell?
No, you can put your lines in the same code cell. Just edit normally in the cell where it is (press enter, and continue adding new lines).

You can make your entire code into one cell or divide into several separate code cells.
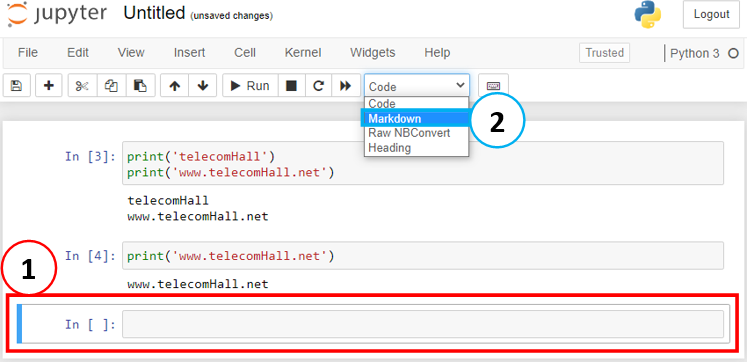
And besides code cells, we have the markdown cells.
Markdown cells
By default, new cells are created as code cells - which is expected, since the most important part is the code.
But there are other types of cells, such as “Markup” cells, where you can write any text, an explanation of the code for example.
To do this, select the cell you want (1) and click “Markdown” (2).
In the new cell – now already with “Markdown” (1) selected, type your desired text (2) and click the button to “Run” (3) and turn the cell into a text.
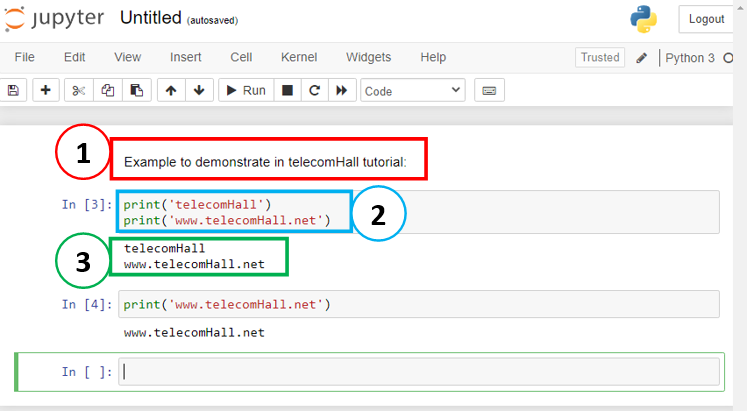
“Example to demonstrate in telecomHall tutorial:”
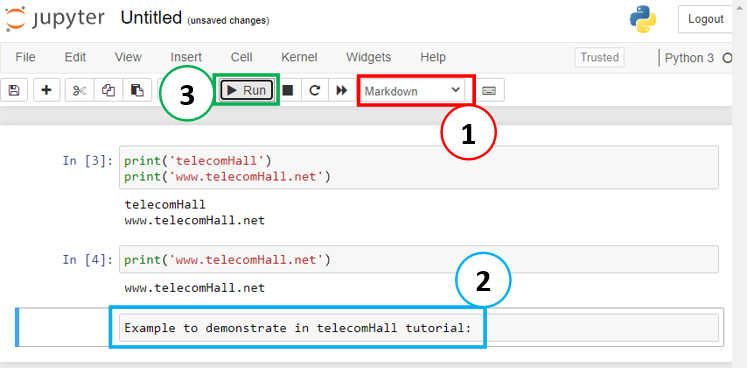
See that now the text appears “embedded” as an explanation (1) to help you understand the code.
Other options
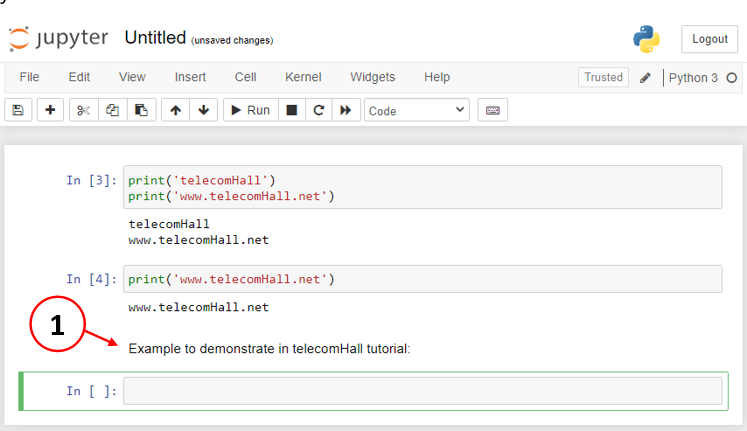
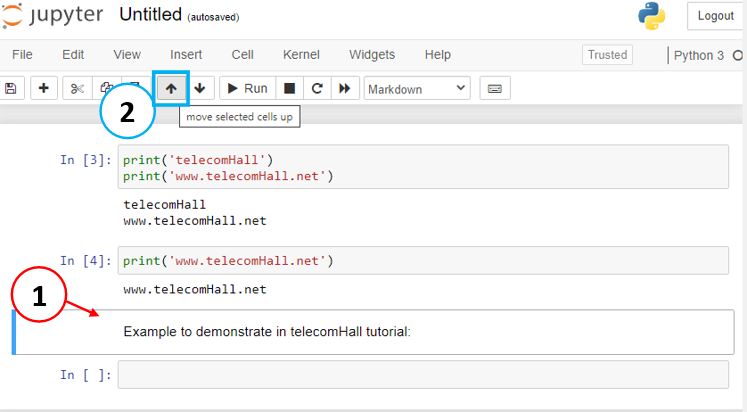
You probably have seen that the new text is “in the wrong place”. But it is very easy to solve: you can select (1) the cell you want (with the markdown), and move for example up, with the arrows (2).
In addition to moving a selected cell (1), you can perform many other actions through the Menu “Edit” (2), such as Delete a cell (3).
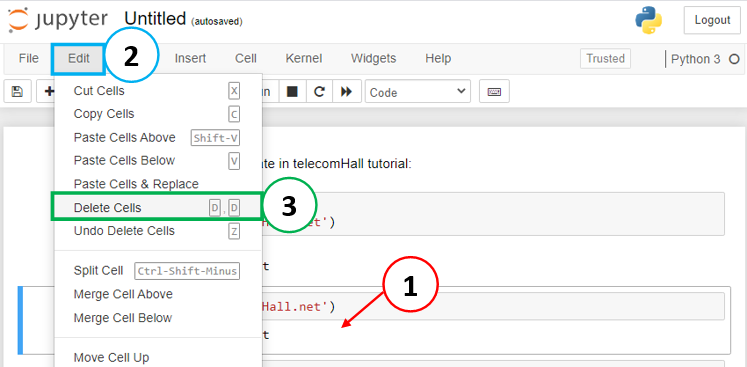
And as you may have noticed, you can use keyboard shortcuts for many actions. For example we can delete the selected cell by pressing the “D” key twice.
But we’ve seen enough about Jupyter today, and we can finish here – you can and should practice, and you’ll be more and more impressed as everything is easy with Python.
To conclude, we have seen that you have together “explaining texts” (1) and “lines of code” (2) and the “results of the lines of code” (3).
This is very good for example when you have a problem, and you want to share this code with someone else, who will already be able to see what you want to do (you explain in the text), the code you built, and the result of your code when it runs.
Tip: It’s a good practice to separate pieces of your code into different cells, divide the code into blocks. Of course, it doesn’t have to be one per line, but as you evolve, you’ll realize how best to do these groupings. But that will come naturally, you don’t have to worry now. ![]()
Saving the code
All right, but how to save the code I wrote?
To save the code you created, just click the floppy icon.
If you remember when you created the file, it was created with the name “Untitled.ipynb”. You can see the name of the file you are editing at the top left (1), and also see that the file is being automatically saved (2). When you click on the file name, you can rename (3) – type your desired name where it says “Untitled”.
Tip: You can be sure that it is being saved when the info message appears (1) when you click on the floppy icon (2).
ipynb?
You probably have noticed that your Jupyter files are saved with the extension “ipynb” - because it was formerly known as IPython Notebook. So, that is the Jupyter Notebook files extension. Most Python IDEs save with the “py” extension. But that isn’t have a problem, it is just the IPython Notebook format.
Google Colab
Now a tip for you who has a “limited” computer.
The Anaconda package is not very heavy, but unfortunately it is not very light. And if your computer is old, you may not be able to work well with Jupyter. In this case you can use an “online version of Jupyter”: it is called Google Colab.
Google Colab is like Jupyter, but 100% online. We have some advantages, such as allowing you who have a limited computer to run things on the internet - if this is by chance your case (your computer has little ability to run programs).
And of course, if you prefer to work with online files, it might be a good option.
Download
You can download the files for this tutorial here: My File.zip (612 Bytes)
Conclusion
That’s it. Today we found how to install the Jupyter Notebook (Anaconda package), which is one of the best editors used to build code in Python.
Note: We show you the steps to install Jupyter Notebook on Windows, but you can also follow similar steps and install on Linux or Mac.
In fact, we took another step in our Python learning. After today’s tutorial, you are able to write code and run on your computer!
Follow us, here in the telecomHall Community. Together we’ll evolve. ![]()
Index
Back to main index: Data Science by telecomHall Community