Introduction
What is one of the tasks you do almost every day?
Among the answers, probably one of them was: send emails!
Sending emails is a time-consuming task (you need to stop, write, attach files…) manual and error-prone - but good news is that it’s very easy to automate with Python!
You may want to receive (or send) email reminders from your code. Or you may receive some kind of report (even by email) and want to process and send the result to others - via email. The possibilities are really many. And the best news: everything is possible with Python, remember? ![]()
What are we going to do?
In this tutorial we’ll show you how to do automation with Python to send emails. While it’s a simple application, you’ll learn a few more concepts – and you can reuse what you learn today in your next applications.
That is, whenever you create a solution that needs to be sent, you don’t have to create a standard email from scratch. If you need to send a specific email - you’ll be able to set up that email in Python itself and automate this process along with the rest of your code.
Outlook
Python can send an email without the need of any email programs installed, such as Microsoft Outlook.
But let’s think a little: if we already have everything up and running, why do we have to redo everything from scratch? ![]()
Yes: we will not reinvent the wheel, and in this example we will consider that you have already installed on your computer Outlook (Program) - and we will use it for sending email.
This way you won’t need to do any security, port or any other settings to be able to send the email. But just remembering again: you can do with Python even if you don’t have Outlook installed! In the near future we will - when you are already a Python Expert. ![]()
Win32
Before we proceed, let’s make a little introduction to Win32. You may have already heard in many places about the Win32, but you may not understand what it represents, applications etc.
It can have several meanings, and obviously has to do with 32 bits (actual bits amount that the platform can address or size of the processor registers), but in terms of programming, that’s what interests usis that : it’s the name of a Windows API.
A Windows API is a base set of information that the Microsoft Windows operating system uses.
Windows has its roots in 16-bit but also needs to support 64-bit Windows. Win32 is different from the old Windows API that was 16-bit, but Windows 64-bit also uses the same API - though it sounds weird. ![]()
When you hear someone talk about Win32 applications you are referring to applications that make direct use of that API. Even though it was compiled on a Windows 64.
We’re not going to extend this, but it’s good to know: 64-bit applications “can” make use of a more modern API, Win64. But the Win64 API is not necessarily win32’s replacement - it’s basically the same API with different pointer size! And precisely for this, even when it is compiled to run in 64 bits, the application makes use of Win32.
Just to complete the technical information for today, in Windows you can use other APIs such as COM, .NET, and WinRT (currently UWP). But: in the end they all end up using Win32 indirectly. ![]()
Important: this issue is very, very complex. We tried to give a brief explanation, but it is very difficult to be totally clear, especially if you are not familiar with some of the concepts involved. But the good thing is: you don’t have to worry – we’ll always guide you on what to do. Follow us, and you’ll learn more and more with each new tutorial. Just don’t leave to read several tutorials at once – because then you won’t be able to learn. ![]()
Integration with Outlook
All the introduction we’ve made, and more precisely about the Win32 API, is simply because Outlook (which we’re going to use) integrates with Windows by accessing the data from that Win32 API. (Actually, not only Outlook, but all Office, like Excel and Word.)
Win32 is a package, or library. And for Python to access this library, it needs to import, so it can make references (call) in code.
We’ve seen how to import Python libraries via PIP through windows terminal.
But now let’s learn an easier way through PyCharm.
Installing a PyThon library on PyCharm
To install the Python Win32 library using PyCharm, we access the Terminal at the bottom left (1).
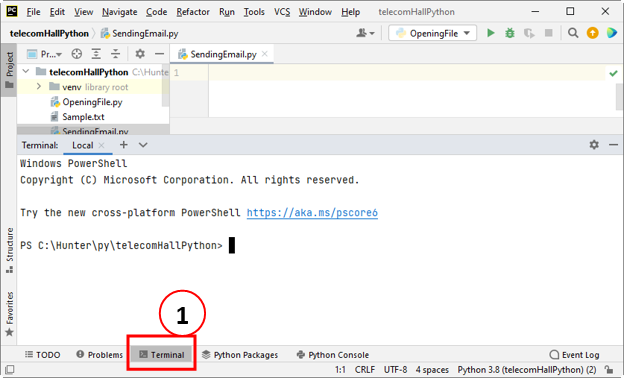
An type pip install pywin32 and wait.
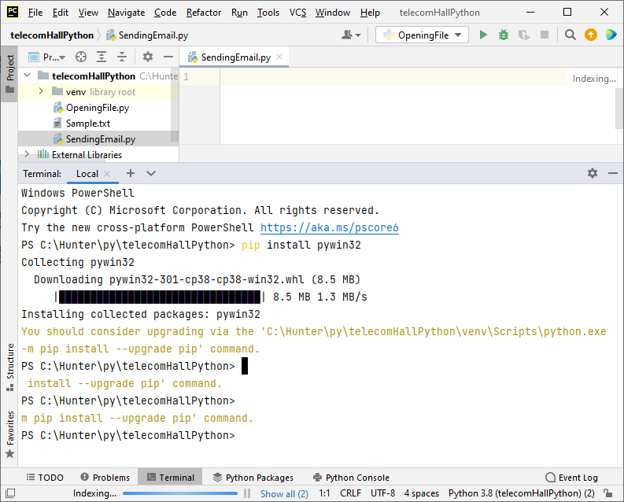
![]()
Done, we already have the pywin32 library installed and available to be used.
Programming Logic
As always, let’s rather do the “hardest part” of our code: programming logic.
-
# step 1 - create integration with Outlook -
# step 2 - create an email -
# step 3 - configure email information -
# step 4 - attach a file to email -
# step 5 - send an email
That’s what we have to do. We simply have to “translate” into Python code.
Writing the Code
If you remember the last tutorial, we use built-in functions, that is, functions that Python already has inside it, do not need to install anything.
But now we’ll write code that references a Windows API, or a library. For Python to understand and be able to talk to this API, we need to import that (this information) into it first of all.
Note: Unfortunately, pywin32 does not have an “official” source of up-to-date online documentation. But when we install pywin32, a help file is installed together. One person took this file, and updated it on their page: PyWin32 Documentation, which turned out to be one of the biggest online references if you need help. There are other locations, but this location has everything you need.
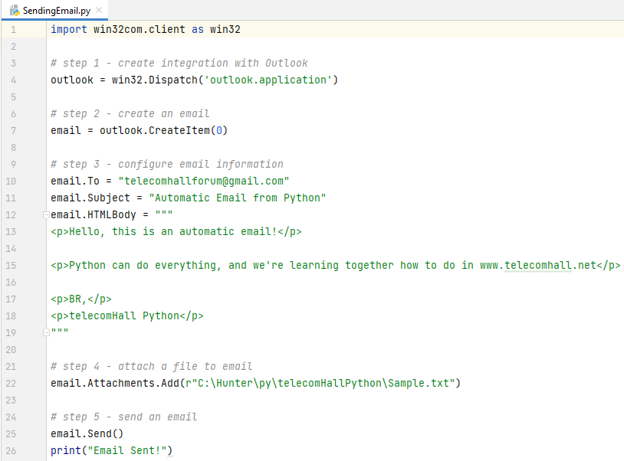
# step 1 - create integration with Outlook
Let’s first integrate with Outlook, via code.
But what does that mean? It means Python needs to know how to “talk” to Outlook.
Python has the “Python for Windows Extensions” package known as pywin32, which allows us to easily access the Windows Component Object Model (COM) and control Microsoft applications via Python. As we’ve seen, the big advantage of this is that you can do just about anything a Microsoft application can do through Python!
But what is COM?
According to Microsof is:
A Platform-independent, distributed, object-oriented system for creating binary software components that can interact. COM is the foundation technology for Microsoft’s OLE (compound documents) and ActiveX (Internet-enabled components) technologies. COM objects can be created with a variety of programming languages.
But it’s still a very complex description for those who aren’t from this area. Simply put: it’s a technology that allows us to control Windows applications from another program. You’ve probably seen or used VBA for some level of automation of an Excel task, the famous “macros”. So: COM is the basic technology that supports VBA. ![]()
Note: PyWin32 is currently hosted on GitHub (previously on SourceForge) by Mark Hammond and is an open-source project with which the community contributes. There are many different APIs available for Windows through this library.
But again: enough technical information. ![]()
To be able to talk (interact) with Outlook, Python needs to import the win32com module. It’s as simple as that.
win32com import
But you don’t have to import everything (this module has multiple classes). Let’s import only one, specifically the “client” class of this module, which is what we need:
win32com.client import
Just to conclude, and to make it easier to reference in our code later, let’s give it a nickname. And let’s give - as we have already seen - the same name that all other programmers give: “win32”
import win32com.client as win32
Done. We can continue, and access the functions and classes of “win32” (or win32com.client). ![]()
With it we can start our “outlook” application, using the following code:
outlook = win32. Dispatch('outlook.application')
Tip: Don’t worry about understanding what “Dispatch” is now. Just understand that by using Dispatch as in the above form we can work with Outlook in our variable “outlook”.
# step 2 - create an email
And we can, from “our Outlook”, or “outlook” variable that we created, now create our “email”, which is an “item” of Outlook.
As always, everything is intuitive in Python.
email = outlook.CreateItem(0)
This item (0) that we created is our email, and now we just need to configure it.
It’s like if at this point, in Python’s memory, there’s this:
# step 3 - configure email information
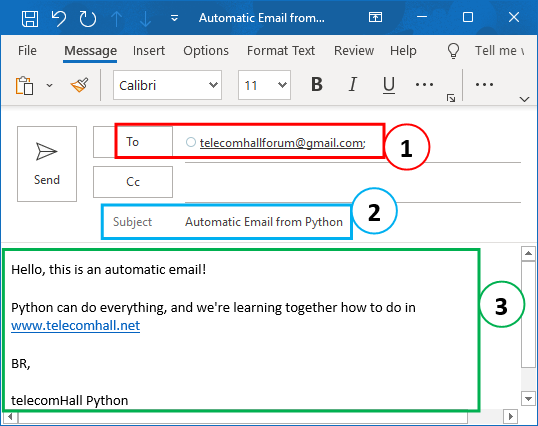
To configure our email, just assign the desired values to the corresponding fields - which are also very intuitive and do not require explanation.
email.To = "telecomhallforum@gmail.com"
email.Subject = "Automatic Email from Python"
email.HTMLBody = ""<p>Hello, this is an automatic email!</p>
<p>Python can do everything, and we're learning together
how to do in www.telecomhall.net</p>

<p>BR,</p>
<p>telecomHall Python</p>""
The only point that deserves attention here is about HTMLBody. This is an HTML field and can be formatted as we wish.
It is worth just remembering, that in HTML, the tag that indicates a paragraph is the “p”. And we should start the paragraph with “
” and end with
. That is, everything within these symbols refers to a paragraph. If you want a new paragraph, just place the next text with that same markup. And you can do the same with any other HTML tag.Also, you may have noticed: triple quotes (“”") before and after the body text of the email.
This is to indicate that our text will be written in more than one line. We use 3 quotation marks (double or single, whatever) at the beginning and end of the code, and then we can write exactly as it will appear in the email.
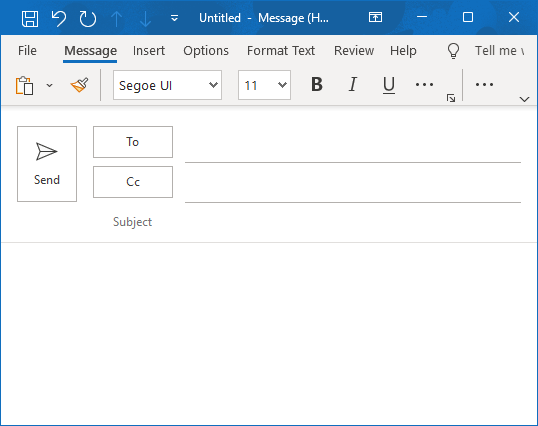
Now, our email is like this (fields “To” (1), “Subject” (2) and “Body” (3) filled in as we desire):
# step 4 - attach a file to email
Now that the email is already created and configured, we also have the option to attach a file.
The code is simple: in our email, add an Attachment – our “Sample.txt” file that is located in "C:\Hunter\py\telecomHallPython".
email.Attachments.Add("C:\Hunter\py\telecomHallPython\Sample.txt")
But look that Python is warning us that something is wrong:
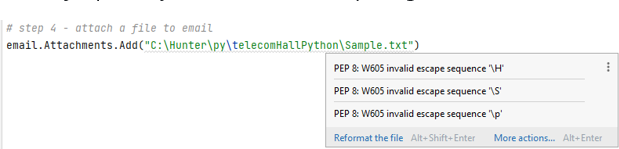
This is because it is identifying special characters in the string! ![]()
Special Characters?
Strings in Python typically contain characters.
These characters can typically be printed, but sometimes you want to include a character that cannot be printed, such as a TAB.
In these cases, Python (like many other programming languages) has special code that will insert the special character. (To avoid this, you need to use some “escape” character – but let’s talk about this in future).
For example, Python interprets the “\t” in a string as the character “TAB”. So, if we write “C:\telecomhall” it would put a TAB between the “:” and the “e”.
And that’s exactly what happens if we run the code as it is. And it would cause an error.
There are several ways to work around this in Python, such as writing the path with backslashes “C://Hunter/py/telecomHallPython/" rather than slashes "C:\Hunter\py\telecomHallPython". It would work, and anyone who is used to unix for example would not be surprised.
But since most use Windows, there are other ways to work with paths and files. One used a lot is the “os.path” module, which has many tools to work around these types of problems – or the latest “pathlib” standard library for dealing with files and paths.
Let’s leave to use this later, today we’re just going to “make it work”.
And to make it work with our path written in the same way as in Windows, we simply write an “r” before the string. So Python doesn’t interpret, and just uses the value. The “r” indicates that Python should consider the string as “raw”, that is, that it should not handled/interpret.
So, in our code, we have:
email.Attachments.Add(r"C:\Hunter\py\telecomHallPython\Sample.txt")
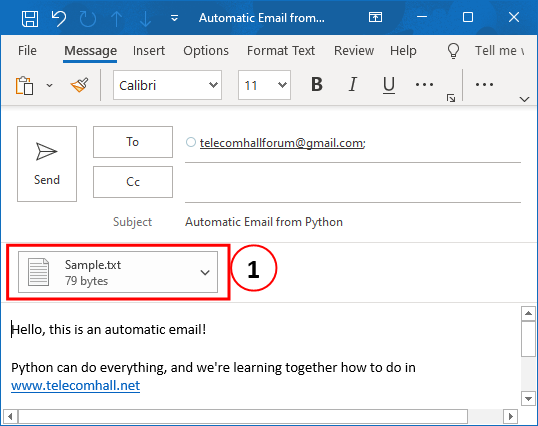
And now Python doesn’t complain anymore. ![]()
At this point, the file is already attached (1) in our email.
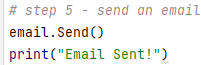
# step 5 - send an email
Now all that’s left is to send the email.
And you probably already have your guess as to which command is, huh? ![]()
email.Send()
A “proof” that Python is using Outlook can be seen (very quickly, and you will hardly notice) is the message that appears in the taskbar: “Another program is using Outlook. To disconnect programs and exit Outlook click the Outlook icon and then click Exit.”
![]()
And if you have Outlook open, you’ll be able to see the email being sent.
![]()
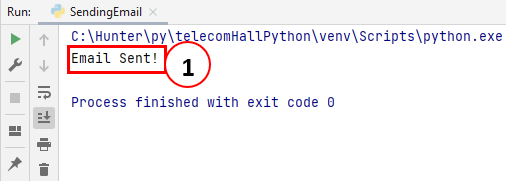
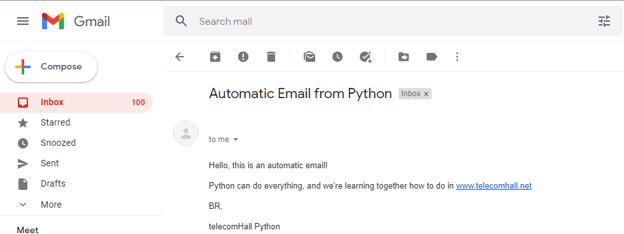
Done! Our email was sent, exactly the way it was set up by us.
This is our email sent, as we can see by printed “Email Sent!” (1).
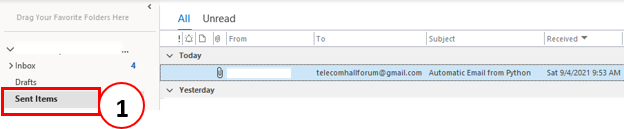
And of course, we can also open Outlook and see the “Sent Items”.
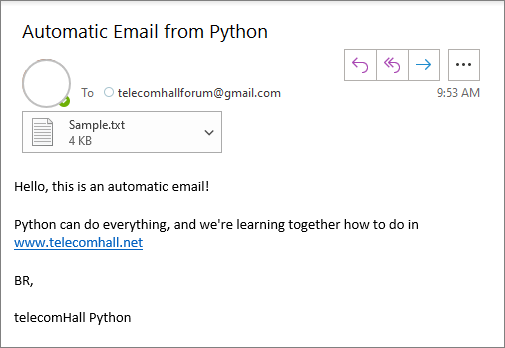
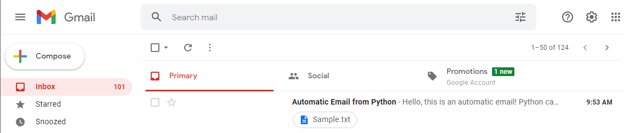
And this is our email received:
So, we have demonstrated how simple it is to send an email using Python!
Note: Of course, it is important to verify that you are logged into Outlook and that the file that is actually running is the email sending file. Checked this, code should work normally.
Running code
The complete code of our solution today:
And as expected, the email was sent (with a file attached)!
Without the comments, our code would be:
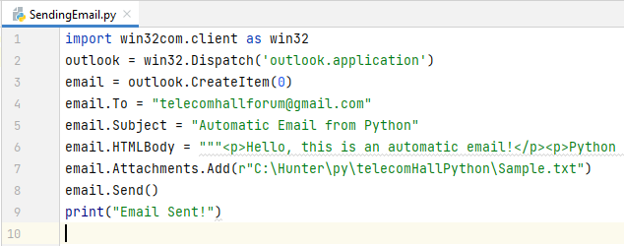
That is, in less than 10 lines of code (including one line with print command) we were able to complete another project, we created another solution in Python! ![]()
Download
You can download the files for this tutorial here: SendingEmail.zip (802 Bytes)
Conclusion
Then you came to the end of another tutorial: today you saw how to send an email automatically using Python, with a code that you can reuse in several other projects.
But the most important thing is that you’ve learned a little more, some Python concepts and commands, and you’re moving forward, at a good pace, and consistently.
Remember that our methodology is different – you need to follow all the tutorials, because in each are taught small concepts that in the end will be part of your complete learning – when you least realize, you will already be a Python Programmer and a Data Scientist.
Our solutions that we are demonstrating are focused on Telecommunications – of course, this is the focus of our Community. But you will realize – more and more – that creativity will be your limit. It’s up to you to apply everything in any other area, because as we say, Python can do everything – it doesn’t matter your area of work! ![]()
Be sure to practice, you are already able to replicate everything we have seen to date.
And for you to be able to fix the learning you need to practice! You need to practice to always keep in mind everything you need. And we don’t mean remembering all codes, commands, etc. Just knowing that “it is possible”, and with a search you find all the code you need, and you only make some “adjusts” to fit your needs.
And finally, don’t forget to comment – and not just if you have questions. The comments are like fuel and proof that our methodology is being followed, and therefore we must continue. ![]()
Index
Back to main index: Data Science by telecomHall Community
