Introduction
Hello friends, today we will talk about a small change in our presentation way, or the methodology of Hunter tutorials, mainly due to user requests.
Until today, all tutorials were written so extensively, aiming mainly to allow an easy understanding of everything that was needed so that all users could learn how to use their own tools available, such as Microsoft Access and Google Earth.
To do this, in several tutorials, we extensively detailed the use of Access and VBA, demonstrating how we can create incredible systems using it.
However, many new users do not have much experience with Access, which ends up minimizing the efficiency of learning.
On the other hand, virtually all users use or already have their main data in Microsoft Excel. And the reason is because it is actually simpler and more intuitive to work with it.
Thus, starting this week, our tutorials as well as our sample applications, will have this orientation, more geared to the use, or ’ leverage ’ of your existing data.
It is important to note however that this does not mean a ’ change ’ in the way that we use to be working.
What will happen now is that you will have the option of working with data sources in Access ’ and ’ also with Excel, if you prefer, or feel more comfortable.
Todos os ganhos e benefícios demonstrados do Sistema Hunter vão continuar, principalmente em relação à modularização – que permite a reutilização de dados base para demais aplicações.
A única diferença é que agora você poderá ‘manter’ os seus dados atuais no formato que estão, como o Excel.
All gains and benefits already demonstrated here will continue, especially in the modularization – that allows reuse of base data for other applications.
Example: Network_DB
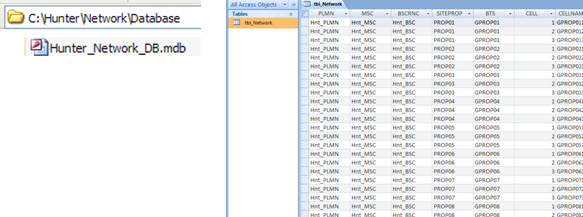
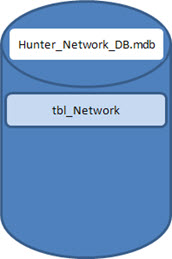
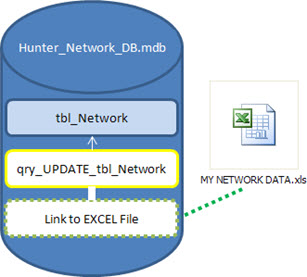
As you may recall, the Hunter System expects to find the data of your network (Network) in the Access database ‘Hunter_Network_DB.mdb’ in the folder ‘C:\Hunter\Network\Database\’.
When any other Hunter module must use some information from the network, it only needs to make a ‘link’ to this known table, i.e. has access to its data.
Again, this will continue, and it is certainly a good practice to be followed.
But as we speak, we’ll open a new option so that, as far as possible, you can keep your data in its current format. In the today’s example, we will show you how to use data from a ‘table’ in Excel, highlighting however you can make this type of connection with any other type of data source.
To do this, simply put our Excel worksheet in a place where we can access it later. To make it easier, let’s put our ExcelSheet in the same folder where we can find our database (Acces) with the ‘tbl_Network’ table.
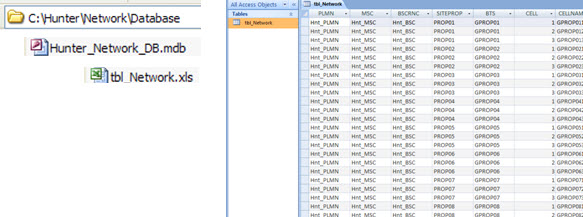
Now, some notes about this ‘new’ ‘tbl_Network’ table.
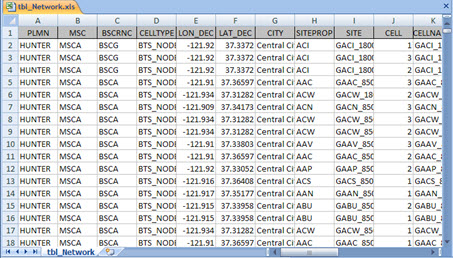
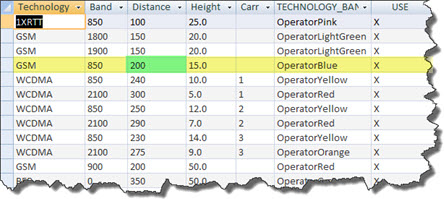
Although we have this flexibility to also use the data in Excel, it must have same names and formats just like the Access table. For example, the field that tells the latitude of a website should be called ‘Latitude’, the field that tells the longitude of a website should be called ‘Longitude’, and so on.
Otherwise, all other modules that use these data should also be updated - and this ould be a unnecessary problem.
Explaining better with an example: the ‘Hunter GE Network’ module, which plots the network data in Google Earth, expects to find the field ‘Latitude’ and ‘Longitude’ in the table ‘tbl_Network’, be it from Access or Excel. If your Excel table contains these data as ‘LAT’ and ‘LON’, we will have an error, and it won’t work.
The ’ solution ’ that comes to mind is to fix this particular module, changing all places where we use the old fields (Latitude, Longitude) by the new ones (LAT, LON).
But definitely this is not good. Mainly because we’d have to update ‘all’ the other existing modules, which certainly would give a lot of work.
Then, the rule for those who want to use the sample applications with their own data is: keep exactly the same structure!
If your worksheet has more data (more fields) then necessary, don’t worry. Just make sure it has the necessary data (Latitude, Longitude, and a few others as can be checked in the Excel table – also available as example download).
Another option, and that can also be used, is an intermediate solution, and enables you:
- Keep your data exactly as they are.
- And use the modules with your data.
To do this, you ‘inserts’ your data in the standards tables, mainly for the basic modules, for example through the use of UPDATE queries, which may for example contain expressions of translation of names ‘Latitude:LAT’.
In short, to use the data of your network with Hunter modules we have 3 options:
- Use the data from Access itself. Following the example of the base module ‘Hunter Network DB’, we have a table in Access with our data, the ‘tbl_Network’ table.
- Keep the data in Excel, but as a ‘mirror’ table on the expected format. In this case, any other module that use these data should make the data link for this table.
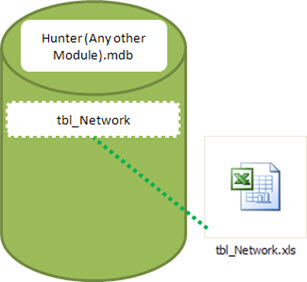
- Keep the data in Excel unchanged, and update the corresponding database tables. In this case, you should use techniques as ‘Update’ query to ensure that the data are as expected.
Whatever the option chosen by you to suit your data, the final results – the outputs of all other modules that use basic information – will always be the same.
Another Note
We are increasingly focused on applications, since the majority of necessary learning for to use the Hunter System has been demonstrated in several tutorials, already published.
Evolution has been gradual, with very detailed explanations in the first tutorials. Over time, the repetition of the same explanations (e.g.: how to create an UPDATE query to create a new table with the desired data) ends up being so exhausting and unnecessary.
So: If you want to take advantage of all this material provided it is extremely necessary that you read, practice and understand ALL previous tutorials.
It is very common for new users ask questions about issues which have already been detailed above. So: Even if the subject of one or another tutorial is not of interest (for example, you may not have any interest in Drive Test) you SHOULD read and understand the tutorial about it.
Moreover, in addition to the written explanations on the site, all codes are quite commented, allowing a true ‘reading’ of it.
Finally, there is still a huge amount of modules to be published. The more time we spend on redundant explanations (and thus unnecessary) end up deferring the publication of new modules.
That said, we will be publishing modules more focused in applications, pointing out that you’re able to reproduce the steps shown here using the received files.
Hunter GE Network – Some Updates
We’ll take advantage of today’s tutorial, and we’ll demonstrate the use of an Excel ‘tbl_Network’ table, where we will be showing some new implementations/techniques.
Using Excel as a data source
To use Excel as a data source - rather than the table in the Access itself – simply make the link to the Excel ‘table’ (file).
In other words, this Excel worksheet becomes our base ‘database’. We open the file ‘Hunter_GE_Network_RUN_2.0.0.mdb’ located in the folder ‘C:\Hunter\GE\Network\Scripts’.
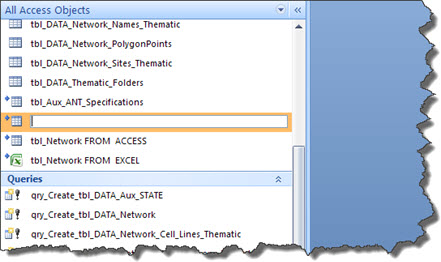
Note that we have 2 linked data sources:
- ‘tbl_Network FROM ACCESS’: a link to the base table ‘tbl_Network’, from base database ‘C:\Hunter\Network\Database\Hunter_Network_DB.mdb’.
- ‘tbl_Network FROM EXCEL’: a link to the Excel worksheet ‘tbl_Network.xls’, located in ‘C:\Hunter\Network\Database\’.
These names are only auxiliary, these two data sources are not used. This is because the current module expects to find our data in a table called ‘tbl_Network’, regardless of whether it is a local Access table, a link to an Access table in another database, or even a link to an Excel spreadsheet.
What matters here is that ‘tbl_Network’ has the data we need!
Copy and paste the Excel linked table, and then rename it to ‘tbl_Network’.
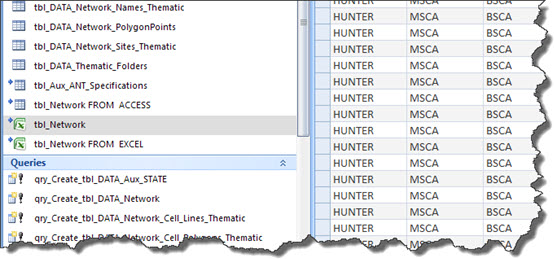
Done, the application already runs based on the data of your network, as they are in Excel file!
‘DATA’ tables
The main new today, besides the possibility of use of Excel as the source of the data, is the use of the ‘technique’ of creating ‘DATA’ tables.
This is a new concept, and important for a better efficiency in the execution of applications.
Quite simply, every ‘DATA’ table contains ‘temporary’ data, and only the necessary.
It becomes easier to understand this functionality if you look to other modules, and not just the one that plots the network data in Google Earth.
Whenever we plot the data, we must do several calculations, for example the away final coordinates of each cell based on the values configured for distance, technology, etc.
For example, we currently have configured that we want the GSM850 cells have a length of 200 meters.
Okay, whenever we can run this application, we can run these calculations via a query, access them and create the output files (through VBA). Is pretty simple, and we’ve already seen in detail how this is done.
But we have two improvements that can be (and are) made here.
First, when we access the data of a query that performs calculations, our processing time get bigger - to access data directly from a temporary table is much faster!
Second, and more interesting yet: If we have another module, for example the one that plots the Performance/KPI data in Google Earth, should we do all these calculations again?
Yes, we could. But in fact, we use data that has already been calculated here! It is much more efficient and fast.
In conclusion, these data could be accessed by other modules through the ‘DATA’ tables located in this database. But it is most recommended or ‘standardized’ that the others modules seek their data in base modules.
So, we created the ‘DATA’ tables in this database, to speed processing.
And also, we copy (via VBA code) these same tables for the base database with the data from the network – and from there, all other modules that needs/uses that data can easily access it.
These implementations can be seen as options through the main interface of this module: ‘Hunter GE Network’.
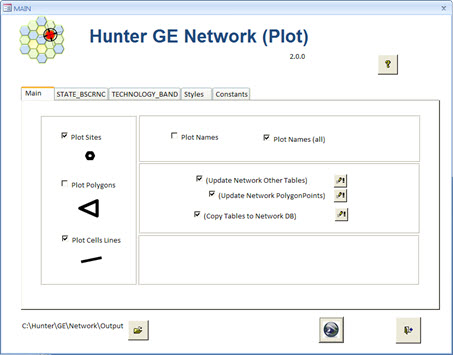
‘checkbox’ ‘(Update Network Other Tables)’ updates the main tables, such as ‘tbl_DATA_Network’ and ‘tbl_DATA_Network_CellPoints’, only with the data according to the configured criteria (distance, etc.).
‘checkbox’ ‘(Update Network PolygonPoints)’ updates the data in the ‘tbl_DATA_Network_PolygonPoints’ table. Different from ‘tbl_DATA_Network_CellPoints’ table, this table takes a little longer to run, and if the network had no change in coordinates, it is not necessary to always update it.
‘checkbox’ ‘(Copy Tables to Network DB)’ copies the ‘DATA’ tables from the current database to the ‘Network DB’ database.
The optional button below is meant to run the corresponding actions.
![]()
These are the main changes, or updates of this module.
Just as a minor revision, we have 3 main modules in Hunter System:
- Network : with all the information of the network, mainly in terms of physical parameters such as coordinates, azimutes, etc.
- Parameters : with all logical parameter information from the network as BCCH, PSC, etc.
- Performance : with the information of Performance/KPI’s.
The modules derived therefrom, such as the GE Network, which plots the physical information of the network in Google Earth, in a sense can be considered as a main module, also because that it is in this module we do some settings that can be used by other modules.
An example of this, we have the size of each cell according to their Technology and Band, for example. We can say that our cells GSM850 must be 200 metres, and GSM1900 must be 150 meters.
Thus, in the modules that we will see shortly, these values are already calculated beforehand, and according to what we have configured.
That’s why we create the tables of ‘DATA’ type. And the reason to copy IT to the Network database, is that the other remaining modules will access this data ready from there.
Trying to explain more clearly, when we plot KPI in Google Earth (or anything else), do we not need to recalculate for example the final coordinates of polygons from each cell. This would be possible, for sure. But then we would have rework, and waste of time.
If even with these explanations this issues have not been completely clear, don’t worry: as the new modules are available, you will be able to learn in a practical manner using the examples files provided, with data that is fully functional.
Then just go adapting to your network/scenario.
Legends
To make it easier the use of icons from your operator, we provide generic icons, small circles, with the name of each color.
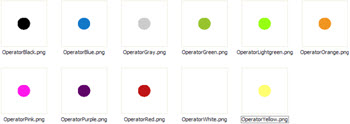
We also provide an Excel spreadsheet with the caption we have created in accordance with the sample data.
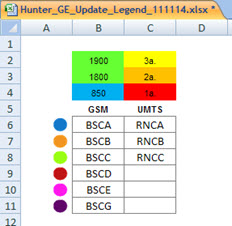
Note: you can find this worksheet in ‘C:\Hunter\GE\Network\Help’.
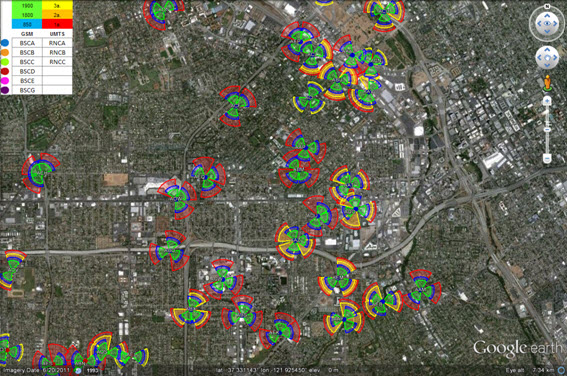
Results
The result of this module does not change. You continue having the physical data of your network presented in simplified form in Google Earth.
Conclusion
Today we begin a new stage in developments of Hunter Applications, as requested by some users.
Now we are working with the data source in Access and/or Excel.
This allows a greater degree of take-up of knowledge for who is starting, and is more familiar with Excel than Access.
Anyway, the main processing is to be carried by the Access, taking advantage of the tremendous power of this program in terms of processing and application diversity, thanks a lot to VBA, with full code provided in all Hunter Tutorials.
Again we thank you participation, and for donations received. This means recognition to us on telecomHall Team, to keep increasing the availability of new and fantastic applications, covering everything you need to improve your work and your experience.
Thank you also for visits to other sections, such as Tips and Courses, and by a lot of comments left there.
And thanks also for sharing telecomHall with your network – we noticed an increase in the number of new visitors, and this sure is because you help us.
Until our next meeting, always evolving!
Download
Download Source Code: Blog_037_HunterGENetwork(Application)_UPDATED.zip (1.6 MB)