Introduction
One of the most important tasks for an efficient control of a cellular network is to ensure that all of its Configuration Parameters (GSM, UMTS, LTE …) are properly adjusted.
Any one parameter, incorrectly configured can cause real damage to the Performance, and therefore to Customer Satisfaction. And the time it takes to find such a problem is unnecessary - since the problem could be easily and quickly found by an efficient and automatic algorithm.
The causes for parameters misconfigured are several, such as an initial database with errors, changes of elements (eg TRX), applications Patch in BSCs / RNCs - which can take several parameters to a default value - different from the ideal, cases where the optimization parameters are ‘forgotten’ after some tests, etc…
To worse this scenario, a network has a huge amount of parameters for different situations (Access, Handover, Power, etc. …). And this task becomes extremely difficult to do manually and or by sampling.
As this task is essential, then we’ll now know a Complete and Basic Application that does all these treatments quickly and automatically to us: Module ‘Hunter Parameters Audit - Check Parameters’.
Although it may seem not, this application is very simple, but the results are Fantastic. And it is a MUST HAVE skill for any Telecom Professional. You can try when you use on your network.
So here we go.
Goal
Present the solution for the module ‘Hunter Parameters Audit - Check Parameters’.
Note 1: This module is very complete, and fulfilling his goal of making the audit of all parameters of all the tables of our network. Anyway, small improvements can be made in due course. You already received the code: take the time to understand the code - do not worry as we speak, everything is very simple and fully commented. As always, you will probably find no problems, and will continue to evolve your knowledge.
Note 2: If you are NOT a collaborator/donator, but is interested in developing similar application, this step by step, like all Hunter step by steps, let you find an excellent starting point. Tutorial by tutorial, you can learn more and more.
Note 3: as mentioned earlier, we will soon be entering the world of Key Performance Indicators. Applications - complete and very interesting - delta KPI, rank, full reports by e-mail, among other algorithms that are very efficient and important for you to learn and use. So, get ready for what comes around, be sure to read all tutorials before, and most importantly, familiarize yourself with these simple tools, but extremely efficient.
Sure. As always, let’s start with the User Interface of this module.
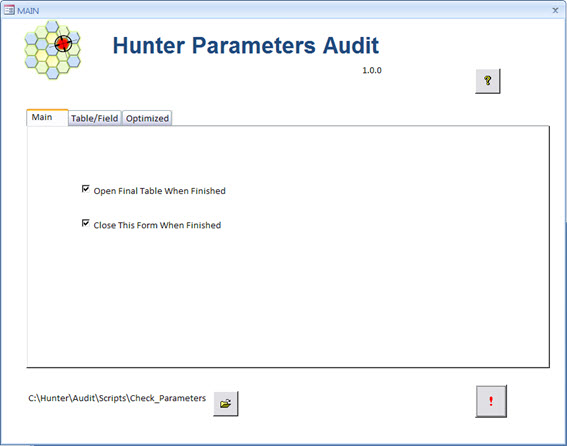
This is a very simple interface, since we do not have much to do: the algorithm should look for ALL that is wrong. Period!
Note: As always, the Hunter User Interfaces are simple and practical. Nothing prevents you from making more changes, following the example of ready-made interfaces.
This interface interacts with the data of the module ‘Hunter Parameters’. Basically this module is a repository database containing all the configuration tables of our network. in a GSM / UMTS network for example, the number of these tables are hundreds. For this reason, this module is a ‘base’, ie, serves as a data source for several other Hunter modules, like the one we are seeing right now.
Going back to the User Interface, we have settings also presented in other tabs.
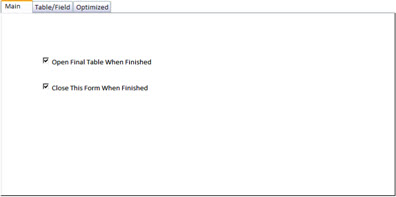
In the first tab (Main) we have simple options of choice.
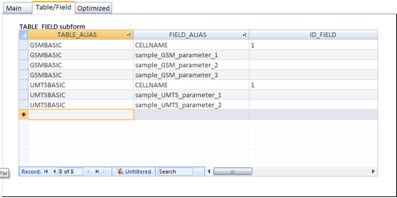
The tab ‘Table / Field’ contains the data (information) for the names of our tables and fields. This is to inform the tool which tables / fields that it should treat (hence the name TABLE_FIELD). We’ll talk more about it soon in this tutorial.
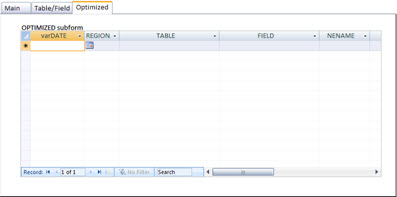
Finally, an extra tab (Optimized), but with an interesting purpose, we also see that soon.
As with other modules, we have the option to directly open the location (directory) where the files are, improving the user experience.
A little help can be accessed through ‘Help’, with the main help text for this specific module.
And the main button with the symbol “!”, that runs the tool.
You should already be familiar, but here goes again: Do not worry - although it may seem a bit complicated, we will explain everything and you will see that it’s not complicated. Especially after practicing with the tool, which is already complete and functional with our sample data.
So, let’s move on? We look in a little more detail the database objects (tables, queries, etc…), and the global process.
Scenario
First, we define our scenario today.
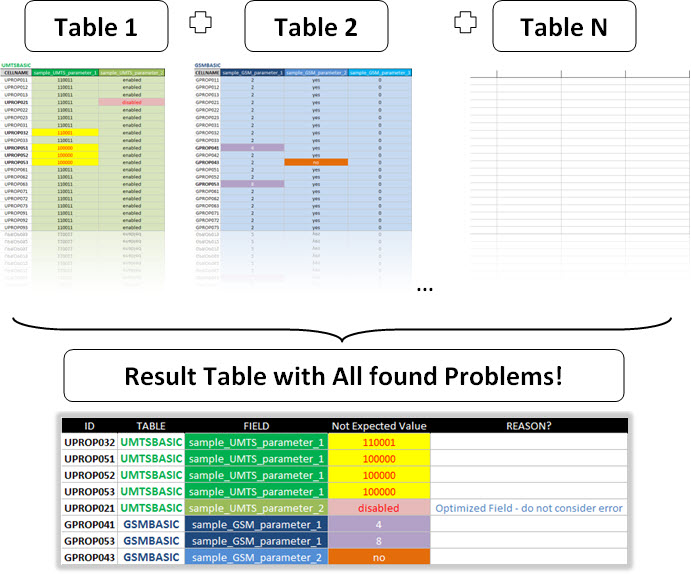
Although you may have already noticed the main idea, let’s see some examples before, with our dummy data.
Note: we mentioned that a real network has hundreds of tables, each with dozens of fields.
But to show the idea, we do not need as much data. Two tables with two or three sample parameters are more than sufficient.
So, suppose we have two configuration parameters tables in our network.
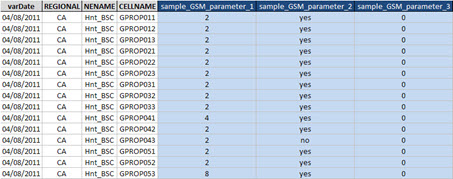
A table ‘GSMBASIC’ with 3 GSM parameters, and another table ‘UMTSBASIC’ with 2 UMTS parameters. (Nor need we repeat tables for more technology, the idea is the same for 2 or 2000 tables!).
In the GSM sample table we have parameters ‘sample_GSM_parameter_1’, ‘sample_GSM_parameter_2’ and ‘sample_GSM_parameter_3’.
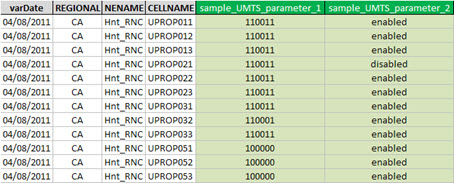
In the UMTS table we have parameters ‘sample_UMTS_parameter_1’ and ‘sample_UMTS_parameter_2’.
Now here we go: just looking at the tables, you can identify which parameters are - at least - different from a pattern?
Making a visual inspection for each parameter, we identify those ‘suspicious’ values. For example, the parameter ‘sample_UMTS_parameter_2’ is set to ‘enabled’ for all other sectors of our network - with the sole exception of the sector ‘UPROP21’.
![]()
But we know that the number of parameters is huge: you can not do this for all tables and fields, dont you think?
How about if we have an algorithm to do this job for us, and present all that fields values is ‘different’ in a table?
Good. Bu to know that a parameter is differente from a default value, we need to set this default value! And that’s what we enter in table ‘TABLE_FIELD’ - that table we also have access through the User Interface, remember?
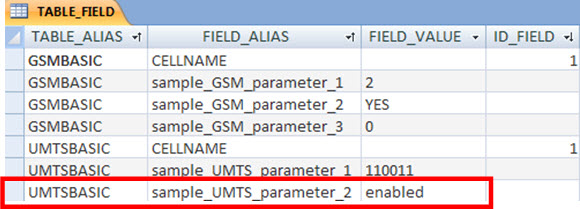
See for example, that the value of parameter ‘sample_UMTS_parameter_2’ in our network must be set to ‘enabled’!
You should also noted that this table also has a field called ‘ID_FIELD’. This is just an auxiliary field. Serves to exclude those fields of our algorithm that should not be processed. For example, the field with the name of the cell - a field that surely will be different for every cell.
Anticipating the result of the tool, after clicking Run, we have the result in seconds.
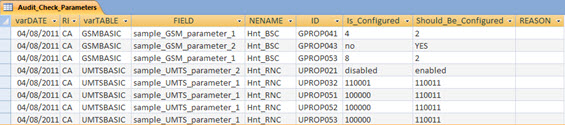
Here we have all the records that are parameterized with different values of those who “supposedly” had to be configured.
The field ‘Is_Configured’ displays the current value which is at the BSC / RNC, while the ‘Should_Be_Configured’ shows the value that it should have.
But here we are talking about “supposedly”. This is because a different parameter of the expected value is not necessarily wrong.
Suppose one optimizer has deliberately disabled the parameter to for example meet a specific user complaint. What to do then?
You probably also noticed that the table has a field called ‘REASON’. In exceptional cases like the one above, just tell that there is a reason for the parameter is configured in such a way. (For example, the parameter ‘sample_UMTS_parameter_2’ was optimized for ‘disabled’ to meet a User Complaint).
Sure, but how we make this feedback?
Well, the first time you run the tool, you will find a similar result (only with many more ‘inconsistencies’).

In the same table (if you prefer, you can copy the table into Excel and work there), identify cases of optimization and any other cases in which the parameters are in this situation and fill the field ‘REASON’. (For example, here the only notable exception is because the complaint was optimized for client X on 05/01/2010).
Copy these lines (excluding applying a simple filter where REASON is blank) and simply paste in the table ‘OPTIMIZED’. Okay, the next time you run the tool it will identify that this specific field has this reason to be configured this way, and present the final table in the same way as shown above (with the reason registered).

Note: If you want to see only the fields that are incorrectly configured, you can make a simple query with the criteria REASON = Null.
But you might think, 'What a work. I have to identify all the parameters that are currently optimized on my network? "
Well, the inquiry proceeds. Of course, you will have a small initial work. But you will end up being ‘forced’ to use another practice and valued highly recommended: keep track of the optimized parameters.
If you do not have this control, you should have!
Anyway, we’re talking about the way you work - and at this point, who decides what you do is, right?
Here is just a recommendation that you make this control - with the great help of this module, which already gives you all set. One suggestion is to transport the generated initial table, and crossing (VLOOKUP) with your control data. Anyway, it’s just a suggestion: we respect your freedom.
File Structure
The basic structure of Hunter you know from other tutorials, and if you’ve been following us, some directories are probably already created.
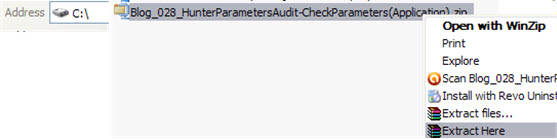
IMPORTANT: All files that you receive for each tutorial are exactly in the expected format. Simply click 'Extract Here … " using WinZIP or WinRAR - with this file in the root directory 'C: '.
After extracting the files of this module, you have everything configured properly as follows.
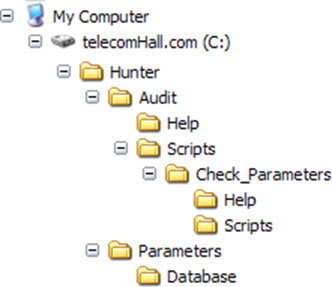
The directory ‘Parameters \ Database’ contains the underlying database with all our configuration parameters tables.
The directory ‘Audit’ is the root of Audit modules, like this first one. For example, the directory ‘Audit \ Help’ contains all the auxiliary files and help for the module ‘Hunter Audit’ - generic.
But note that here we have a small difference in the way we are used: The scripts directory does not contain the application of this module - actually contains a second directory, ‘Check_Parameters’. This is actually the directory that contains subdirectories for this specific module (‘Help’ with auxiliary exclusive files for ‘Check_Parameters’ and ‘Scripts’, with the application of this module).
But why is that? Simple, because ‘Check_Parameters’ is not the only Audit module that we’ll have, it’s only the first one. Tutorial by Tutorial we’ll find amazing new audit modules such as Performance Audit, Network Audit and even other variations Audit Parameters - Parameters Delta. But the explanation of this and other modules audit will come in due time.
A Pause
Now, it’s worth doing a little pause.
As a reminder of the main objective of telecomHall, which is well illustrated by our slogan: ‘Your success is our success’.
This means that more important than receiving applications and simply use them, is you learn. Only then you will reach the expected success.
Be sure to practice, study applying the ideas and procedures. Read all the tutorials in sequence, and without exception. And do not skip any of them, especially the first ones where the basics are more detailed. For example, even if you never worked with Test Drive, or should work, be sure to read the modules involving Test Drive. Same for any other topic, even if not your area, read the tutorials, with accompanying files received.
The average period of one week is intentional - if not, we could simply publish a ton of tutorials and applications. But this is not our goal. Therefore, track, engage, and learn! Agreed? If you need it, take your post / question in the forums and it will be answered.
IMPORTANT: As always, in every tutorial, we will present the forms created by us to obtain the solution. This includes a series of tricks and considerations that allow us with creativity get a practical and functional outcome. Of course there can always be improvements, including some already planned and under development. You can even extend the application to an higher level and suitable for your possible needs. Anyway, certainly worth learning and understand how everything can be done.
The Application
Again, this is an application made entirely using Microsoft Access with VBA. Let’s see some important details about the development.
Database objects (Tables, Queries, Macros and Forms)
We started talking about the table ‘Audit_Check_Parameters’. This table contains the final result. Every time the tool runs, it deletes the data in this table, and regenerates it.
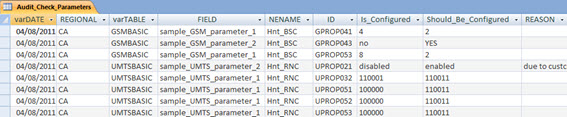
Table ‘TABLE_FIELD’, as we know, is the table that contains the information of tables, fields and values that the application uses.
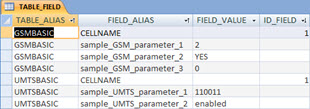
Table ‘OPTIMIZED’ also had its purpose explained before: the table where we insert the slap on the exceptions that must be submitted / considered by the tool.
![]()
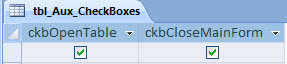
Table ‘tbl_Aux_CheckBoxes’ has exactly the same purpose of storing the values of the interface, as explained in the tutorial ‘Hunter GE Network (Application)’, so we need not explain again here.
Now we will speak of tables with the parameters. The tables ‘GSMBASIC’ and ‘UMTSBASIC’ tables are based on the configuration parameters of our network, linked/acessed from the base module ‘Hunter Parameters’.

Here is an important observation: for each table we want to process, we need to identify a primary key. Do not be alarmed, it’s not complicated. What happens is that we have tables in different granularities.
For example, ‘CELL tables’ have a field cellname, and we can use it as ID. But there are other types of tables, for example ‘TRX tables’, which has several CELL for each TRX. In this case, to create a unique ID for each row, create the ID field as a concatenation of fields cellname and TRX.
The following figures explain better.
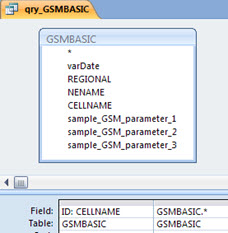
In our table ‘GSMBASIC’ the field ‘ID’ corresponds to cellname, that is nothing new.
![]()
Now suppose a new table ‘GSMTRXBASIC’.

The field ‘ID’, must contain the information for cellname and TRX, so the result is correctly identified at the final table. (If it were not so, the ID would be ‘GPROP011’ - not identifying the record, or better, with the specific problematic TRX).

The ID field does not exist in any table, then we need to create queries for each original table, with all the original fields of the same, including the field ‘ID’, calculated according to the primary key or unique identifier for each specific table). The name of the query is ‘qry_’ + the name of the table. But this one time procedure is very easy and simple.
See the example for the query ‘qry_GSMBASIC’.
And finally, we have two auxiliary queries.
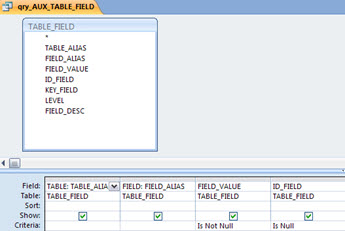
The query ‘qry_AUX_TABLE_FIELD’ is simple: make a filter on data in table ‘TABLE_FIELD’. It excludes the fields with no processing target values (FIELD_VALUE is not null), and also the fields identified as identifiers (ID_FIELD is null), that don’t need to be processed.
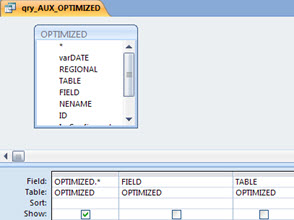
And finally the query ‘qry_AUX_OPTIMIZED’ is a base query, which is changed by the VBA code on the fly: in a simple loop, for the ‘ID’ of each query (table) processed, it checks the corresponding value in table ‘OPTIMIZED’.
VBA Code
Since you’re already used to, all our supplied code * is always commented. This makes the explanation again here redundant, extensive and unnecessary.
IMPORTANT: The full code, including lines with comments, you have less than 100 lines! Still, if you encounter any problems or have any questions on any procedure, please contact us by posting your question in the forum.
Result
Well, that was a module where the outcome has been shown and explained.
Anyway, the following diagram shows the process in a generic way.
Good guys, for today is this. We hope you enjoyed, and continue practicing. So you learn in a simple and easy way. And prepares for the new tutorials prepared.
Challenge (Exercise)
We might extend the tutorial a little more, with some issues: yes, there are still cool things can be done with this module the way it is.
But this time we do a little different. In the next tutorial, regardless of the subject, we explain a way to get the value ‘default’ for each field of each table, using nothing more than this module (with only a GROUP BY query - oops, talk too much).
Jokes aside, the challenge is there for you until next week. After practicing, find a way to identify the default value of all fields from all tables - and then fill the table with the same TABLE_FIELD value.
Tip: understand as the default value of each field, its value that has more counts! Okay they may not be right - most often is - but it’s a good start to you fine tune.
If you can figure out how to do this, send me an email. Otherwise, wait for the next tutorial: it we’ll be explained.
Conclusion
We have seen how to create another complete customized application using Microsoft Access.
The application, though simple, is a Fantastic Tool for Audit, and the results are impressive - in addition to high speed processing.
The application is complete and functional with dummy data, and nothing prevents you to use on your network instantly, and also to make their own improvements / extensions.
Thank you for visiting and we hope that the information presented can serve as a starting point for your own solutions and macros.
In particular, we thank the donators of telecomHall. The tutorial files was already sent to you, please check. If you have had a problem upon receipt, please inform.
We continue with the preparation of tutorials for various other modules, to be published gradually and in due course. At the moment, as also mentioned in the previous tutorial, we have a series on Performance, with unique and interesting algorithms to ensure the best quality in your network.
And many other are to be published soon.
Our search is continued for the development of applications in a more simple way, allowing us to improve our work, quickly and efficiently. Read all the tutorials and practice: the knowledge acquired can be your biggest difference!
Thanks, and be sure to visit the new tips published this week!
Download
Download Source Code: Blog_028_HunterParametersAudit-CheckParameters(Application).zip (338.5 KB)