Introduction
We’ve already learned some applications using System Hunter, mainly using VBA and Access and Excel. Except that until now, we need to run any of it - for example Hunter GE Network, which plots the network information sectors in Google Earth - we neede to use methods not so friendly, like running macros directly in the program interface or the VBE environment.
But when we talk about applications, the first thing that comes to mind is an interface, does not it? Okay, the way you do, you end up learning more. Except that there comes a time in which interfaces can help us, even as a matter of organization and integration of various modules. So, today we see how we create our system User Interfaces.
So here we go.
Purpose
Learning to use interfaces for dealing with data and applications developed.
Our audience is from students to experienced professionals. Therefore we ask for a little understanding and tolerance if some some of the concepts presented today are too basic for you. Moreover, all the tutorials, codes and programs are at a continuous process of editing. This means that if we find any error, for example, grammar or spelling, try to fix it as soon as possible. We would also like to receive your feedback, informing us of errors or passages that were confusing and deserve to be rewritten.
File Structure
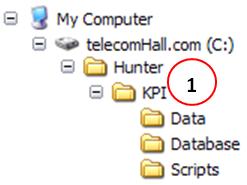
Again, although there is no need to create another new directory. This is because in the previous tutorial we already created the basic structure of the KPI module, as we recall below, and it is in this module that we will see how interfaces are created.
Do I need to use interface in my macros and programs?
Okay, not everyone needs to use interfaces. There are people who prefer to use the applications developed on how we show up today. For example, to show the data from a query, prefer to open the Access database, and simply double click on the desired query and done.
And is this right? Yes, each one works the way feels is the best.
Not the same thing, but we can make an analogy with the use of User Interface and Command Line programs used to make changes to network elements. Generally there are two possibilities, and you always find people who prefer to make changes using the GUI, and others that prefer to use the Command Line. Of course, in this case, there’s other factors such as the amount of changes to be implemented: If they are many, you will probably be ‘forced’ to give up and use the command line. If few, you can always opt for the GUI, certainly more friendly.

Anyway, what matters is the final result.
In the following steps, let’s create a simple interface, even if it seems ugly! But our goal today is to teach the concepts involved, and how we can create interfaces for user interaction, in which case it can be ourselves. The design skills are for another time…
We recommend that you read all tutorial, and do not worry if you do not understand very well. In time, especially when you start practicing, you’ll realize the advantages of using interfaces to work.
A button, an action …
Sure, we’re not programmers, but will use the interfaces in some applications. So we need to learn some small concepts. Let’s see only the main necessary for us to create an interaction with Access.
The interfaces are defined by the Access Forms.
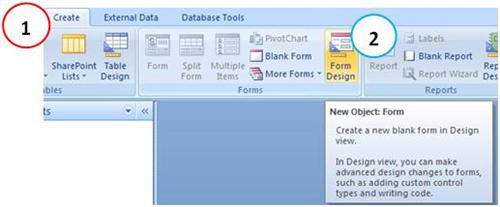
We learn by doing, creating a form in an Access in an empty database. To do this, go to Menu Create (1) -> Form Design (2).
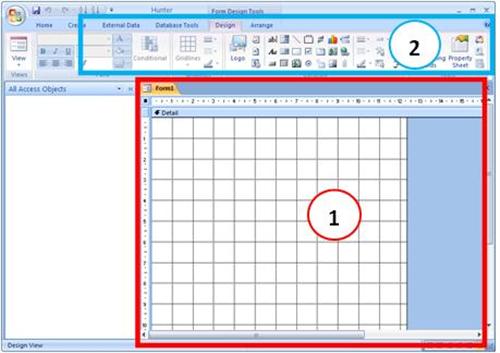
Done, we have an interface, ie a form! Now, we need a way to interface with it, inserting objects such as buttons and checkboxes.
From quite general highlight:
-
Area 1: a white checkerboard grid, where we actually draw our interface.
-
Area 2: with the controls, tools, properties and everything that serves to design and configure the form, or our interface.
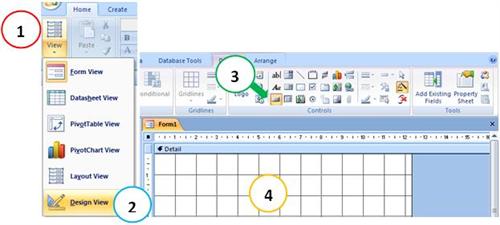
If you click on View (1) -> Form View (2) you can see an interface - nothing, of course.

Continuing with the practice we will then insert a button. As everyone knows, one button performs some action when clicked.
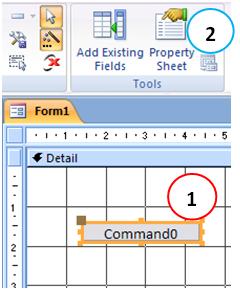
To re-edit our form, click again on the View (1) -> Design View (2). In the tool bar with controls, click the button icon (3), and then click anywhere on the form (4) - white checkerboard grid.
Once you click the Details area of the form, appears is a Wizard that will help you to set a command that the button will do.
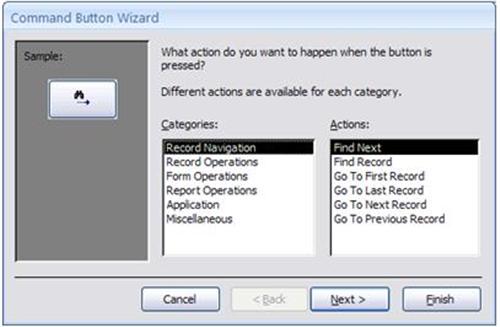
But will no use it. Let us learn to go a little deeper. Using Wizard is always optional, but you’ll realize that what we do is always much more that the commands given by it.
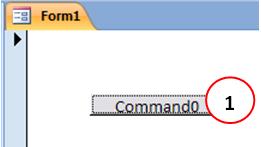
So, click the Cancel button. Note that the button that we are configuring appears. As we canceled the Wizard, and we did not set any commands to it, it does nothing when clicked. Take the test, view the form (as shown View -> Form) and click the button: nothing happens!
Then we will insert a command to be executed when this button is clicked.
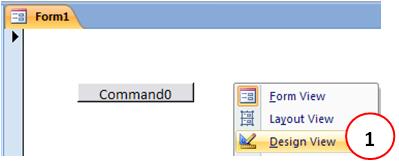
To enter a command, again return the form to edit mode. A quick way to do this is to use the right mouse click shortcut anywhere in the area of the form and click View Structure (1).
A small pause. As always, we are always showing the most common ways we used the forms. But at each point there is much to be explored. For example, we are talking of a button, but we know - and you can see the control bar - that there is an big amount of controls to be used depending on each goal.
Similarly, the commands issued to control - remember that we are setting a command to a button control - are different. For example, for a simple button, we can make it run a command when clicked, but also can make something else happen if we pass the mouse over it. And so we have a number of other combinations such as double click, etc… And look what we’re talking about a button!
But let’s keep things simple, everything you need to see, you’ll see in right time. Keeping our goal, we assign a command - or action - to be executed when the button is clicked.
Back, double-click the edge of the orange button (1), or alternatively click Properties (2).
As we speak, there’s a list of options for events (clicking, double clicking, etc …) (1).
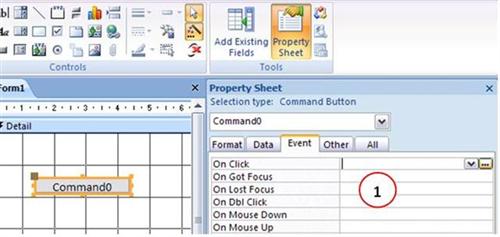
Well, we want to assign an action when the button is clicked only, so we use the On Click line.
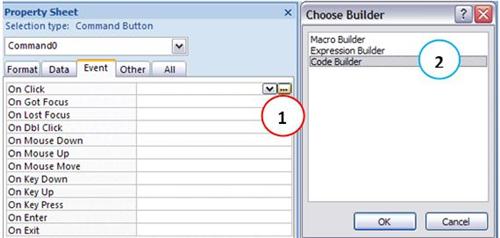
And how do you set the command? There are several ways, one is click the little box with three dots (1) and then choose Code Builder (2), since we’ll build the code we want.
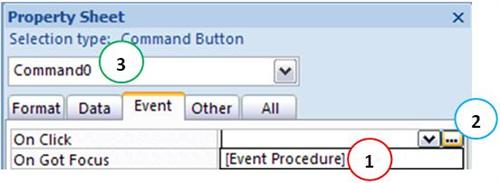
Another way is to select [Event Procedure] in the box (1) and then click the button with three dots (2). Note that this button has the standard name of Command0 (3). Later we will see how to change this name to a more meaningful name.
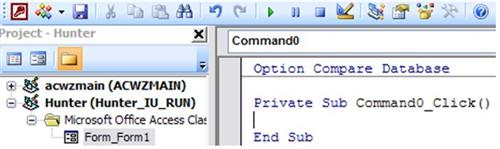
In either form, we come to the VBE, as shown below. Commands that we put inside this procedure (Sub) will be executed when the button is clicked.
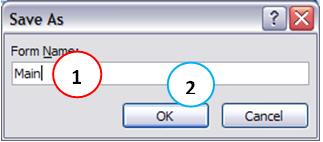
Clicking the save button, Access will ask the name of the Form. Save as Main (1) and click the OK button (2).
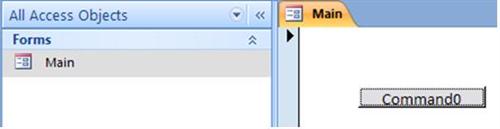
Close all windows and open the form with a double click on it on the left side of the main area of Access. Observe that when you click the button, nothing happens: of course, we didn’t enter any command to be executed.
Again, here we must pause. First of all, it is essential that you are understanding what we are doing. In short, we are creating an interface in Access - form - to perform some actions. We recognize that we are talking about something that may not be common to you - commands, controls, properties, events, etc … Only understanding these concepts is important by now. Anyway, we’re trying to demonstrate the simplest way possible. Learning the basics, you will certainly have benefits for understanding the rest.
Back then, we now assign an action to our button. As an example, let’s just open a table in our database.
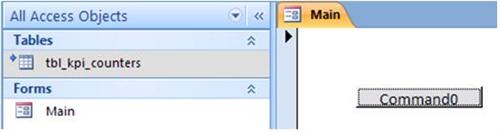
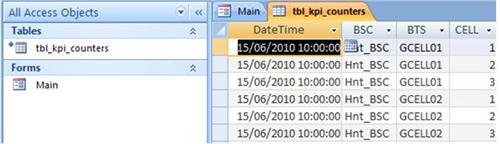
As we yet have no table in our database, we will link an existing, for example the table tbl_kpi_counters Hunter_KPI_DB.mdb database. We have already shown how*, so we consider that the table is already available - linked - in this database. *If necessary, please refer to previous tutorials.
Okay, now simply enter the relevant code in the VBE of the command associated with the button, that we’ve done before.
The command to open the table is:
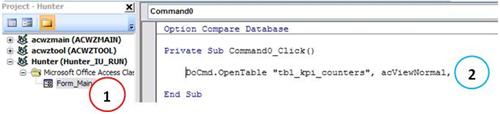
DoCmd.OpenTable “tbl_kpi_counters” acViewNormal, acEdit
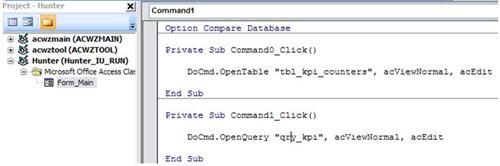
One way to return to the VBE is to use the shortcut ALT + F11 , and already in the VBE , double click in our Form Form_Main (1). Then type the command in the appropriate location (2). (Note: you can use ALT + F11 in all Office Applications, like Excel or Word)
Again, save and close everything. In the main area of Access, open the form (with a double click for example) and click the button.
As a result of the click, the table is opened
Note: this was only to demonstrate. In future, we’ll do a lot more then simply open a query.
Okay, so far created a simple interface, insert a button and assign an action to open the table tbl_kpi_counters when it is clicked.
Close the table and let’s continue.
In addition to the buttons, what else do we have?
A button is a kind of basic control, but the interface is much more than that, and we hope that our interface is more interactive as possible. That is, we allow them to be chosen criteria, and based on them, execute actions.
An easy example to understand is to use a checkbox or dropdownlist containing a list of values. We chose a particular value, and seek data based on that value.
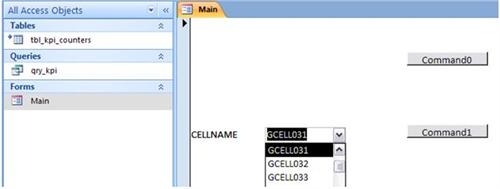
Bringing this example to our case, we will create a box with a list of all our sectors. And let’s create a button that when clicked, will open a query with the data only for the selected sector.
But we have not yet created a query in our database. We can create a simple query such as qry_kpi we created in the previous tutorial. But since this query already exists, we simply copy it to the database.
Yes, we can copy queries from one database to another. This can be done by importing the same, through the Import External Data menu. But it can also be done in a simpler form, let’s see…
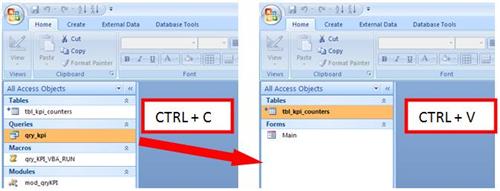
To copy a query from one database to another, open the first one, and select the desired query. Copy the query (CTRL + C). In the second database - destination - simply paste the query (CTRL + V).
Okay, now we have our query available, and we can continue.
For such query be opened based on the criterion of a field form our Main form, we must do two things: create a field whose value will be used as a criterion of this consultation, and enter this field as a parameter to this query.
First, let’s create the field with the values of the sectors. Let’s use a Combo Box control.
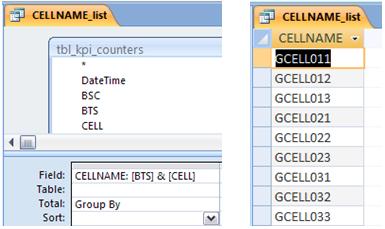
The values that we use this control must come from some place. To make it easier, let’s create a simple query, presenting only the list of cellname - query CELLNAME_list.
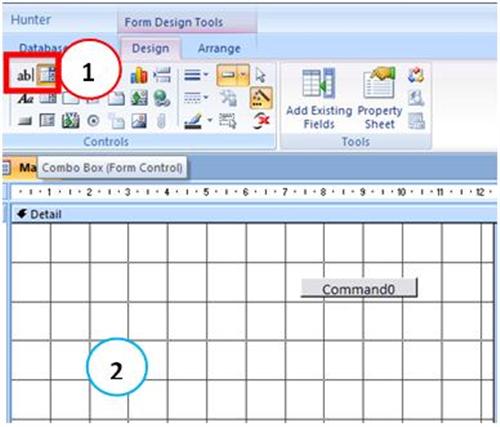
Now open the form in Design view. In the control bar, click the Combo Box control (1), and then click the form (2), where you want to put this control.
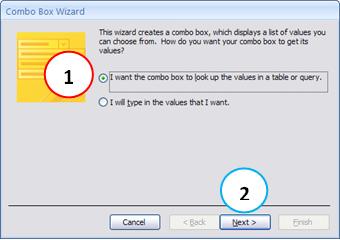
We do not always use the Wizard, but in this case we will follow it to also serve as a demonstration. Let chosen the first option (a), which shows that we want to fetch the data that control of a table or query. Then click the Next button (2).
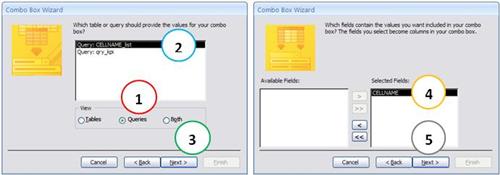
How do we use a query field CELLNAME_list choose Queries (1) and select this query (2). Click the Next button (3). In the new window, select the field CELLNAME and move to the right (4) and click the Next button. (5)
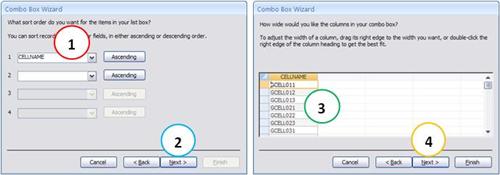
Below, we define the field cellname should appear in ascending order (1). Click the Next button (2). The next screen shows how the data will appear (3), allowing adjustment of column width. Click the Next button (4).
Finally, set the label of the field as CELLNAME (1) and click the Finish button (2).

Part one almost ready. Only we also create a new button, just as we did before, but now put the code to open the query qry_kpi.
DoCmd.OpenQuery “qry_kpi” acViewNormal, acEdit
Thus, the code of the form can be seen in the VBE.
Note: we note that the buttons are with the default names suggested by Access. Since this is only a demo, no problem. But in a real application, we will change the names to more meaningful. Then we’ll see how.
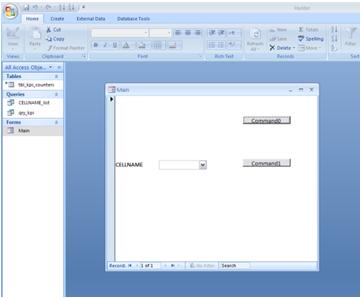
Closing all, and opening the form, we have the final interface. But note that even choosing a value of cellname when clicking the Command1 button, all the qry_kpi query is shown.
Of course, because we lack the second part: to insert the field as a parameter cellname qry_kpi query.
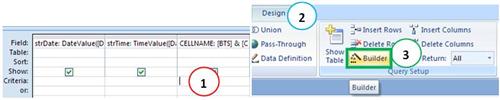
Let’s do it. Open the qry_kpi query in Design mode. Click the line of the CELLNAME field Criteria (1). Then Menu Design (2) click on the Builder (3).
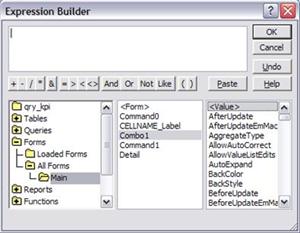
Browse as shown below into the field Combo1 - containing cellname in our form, and double-click on it’s property Value (1), which is the default property of that control. Then click the OK button (2).
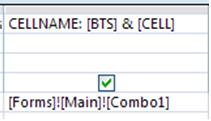
As a result, the row with the appropriate criterion is filled.
We use this form to enter the feature - through the expression builder - for demonstration purposes. We could simply have typed in the test line.
[Forms]! [Main]! [Combo1]
The above expression is used in the query means That the query should use the Value form field Combo1 from our Main form as a criterion for the field CELLNAME.
Come on, close everything and open our form Main. Choose a value and click on Command1 (1).
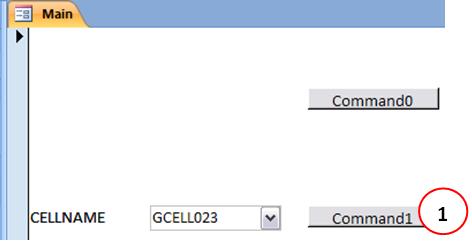
The result, as expected, is the query qry_kpi being open, but showing values only for the chosen CELLNAME.

Okay, we agree that it’s getting a bit confused. And so far, not very useful. But hopefully you’ve managed to see how the forms can be used to create the interfaces of our programs.
Just some thoughts for today …
Unfortunately, we have spread too much, although there are still many important details that need to be passed. Let’s talk about some more, but certainly we’ll go back talking about that in future tutorials.
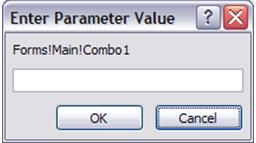
The first important information is that once we have entered a query criteria, whenever it is run, will try these criteria. For example, if you try to open the query qyr_kpi that we changed - and the form with the criterion is not open! - it will display a dialog box asking you to enter these criteria. If you enter the criteria, it also works. But it is not a desired behavior.
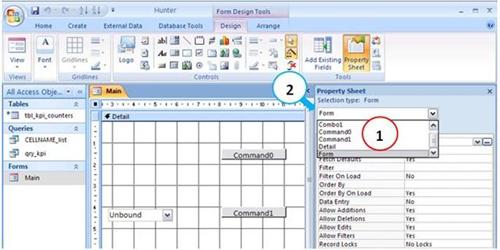
Other relevant information is on the properties, so little explored today.
For each element of the form (1) - including the form its own (2) - we can configure a huge variety of properties.
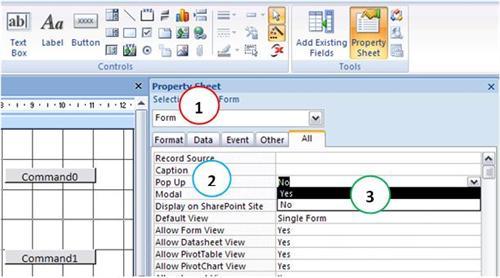
For each element, the adjustment of property gives us an impressive control of what we can do. Let’s take one final example. In Design Mode, choose Form Properties (1) and change property Pop Up (2) from No to Yes (3).
See what happens.
Now yes, it is becoming much more like an application, does not?
Okay, just one last concept, and finished for today, okay?
What do you expect from an application? Well, at least it displays the main interface when you run, right?
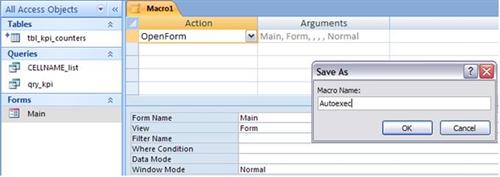
To do this with Access applications, we have an interesting feature. Access has a reserved name for macros, the name AUTOEXEC. Basically, if you simply have a macro named AutoExec, it runs always the database is opened!
Needless to say how we take advantage of this feature: create a new macro with the name AutoExec, and the Open Form action in the case, our form Main.
Done. Close the database and reopen it (eg by double clicking in Windows Explorer). Note that the program now opens showing the created interface, yet simple, but useful to demonstrate.
Draft
They who program, before anything else, should know what they want! And what this means in terms of programming? Basically, whenever you’re creating something, must have at least a sketch of what you need. Can not be on time running, changing direction.

In our case today, we suggest that you draw first as this will be your form, give names to fields, and define what each control will do. This makes it much easier to create your applications.
But the interface is very ugly!
Fully agree. Only remember one thing. Today we are mainly presenting and demonstrating new concepts. Hunter interfaces are much more nice, we guarantee. But you will prove in the future, with the interfaces provided in each module. The interfaces have these cool features, which do not show today. We use images - the logo Hunter, use hyperlinks instead of buttons - giving an impression of the application of Web 2.0, among others. But for today, if you understood what was shown is already sufficient.
Finally: practice and make sure you understand everything that was shown. In case of problems or questions, please contact us.
Conclusion
Today we had an introduction on how to create interfaces in Access by using forms, VBA, tables and queries. Gradually we learn the concepts for the future that we’ll fully use and modifie according to our needs, and not just as a user.
We try to avoid clichés of most computers, but the matter needed these concepts to be said. At least try to understand how interactivity can be done the way shown. And notice that increasing your creativity will be the limits of applications. Although Hunter is a complete system, you will be able to evolve further. To evolve however, the concepts need to be well understood each week. Keep reading, do not accumulate.
We hope you’ve enjoyed. If you have any doubts, find the answers posting your comments in the blog or via our support via chat or email.
Till our next meeting, and remember: Your success is our success!
Download
Download Source Code:Blog_016_Hunter_UI.zip (18.4 KB)