Introduction
Ready to start? So here we go. This is the first contact with the practical development. We will start our system from scratch, from the network data to the tools designed to be used in it. Surely it would be a long journey, because there are undoubtedly a lot to explore. But we also believe will be increasingly productive and rewarding for all. So let’s not waste time, and start.
Network Data
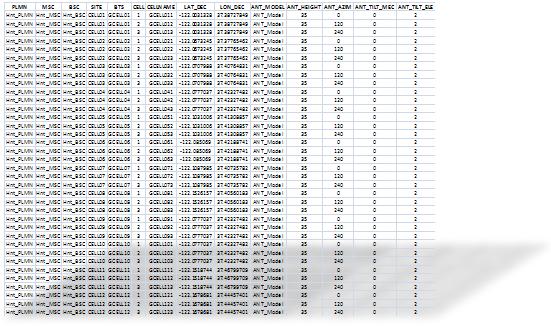
So we can start our work, the first thing we need are the data from our network. We need at least basic information such as the geographic coordinates of the stations, physical data of the antennas as heights, azimuths and tilts, etc… This is usually available in the form of an Excel spreadsheet with a series physical and logical data - network parameters.
And as we are beginning by defining all, let’s enjoy and standardize some concepts that will follow us from now on. Then create a table with the initial baseline data, whose fields are shown below with a brief description.
-
PLMN : Public Land Mobile Network. Any network of a mobile operator.
-
MSC : Mobile Switching Center. The Center for switching of mobile telephony, with interface for BSC’s, MSC’s too, and among other things that we will see later.
-
BSC : Base Station Controller. It is the network element that controls a number of BTS.
-
SITE : name of the physical location where equipment is installed.
-
BTS : Base Transceiver Station. It is the network element that communicates with the mobile station.
-
CELL : The area covered by one BTS. It is omni (360 degrees) or sectorized given distinct regions. It is the part that contains the transmitters / receivers, antennas and associated equipment.
-
CellName : The name of the cell.
-
LAT_DEC : The latitude in decimal format, for example 29.3432345.
-
LON_DEC : The longitude in decimal format, for example -100.25242.
-
ANT_MODEL : The model of the antenna used in the cell.
-
ANT_HEIGHT : The height of the antenna.
-
ANT_AZIM : The azimuth, or direction to where the antenna is pointed.
-
ANT_TILT_ELE : The antenna electrical tilt.
-
ANT_TILT_MEC : The mechanical tilt of the antenna.
Fields have properly filled up, but that’s way oversimplified, the picture of our network. These data are usually maintained and updated by spreadsheets such as Excel, or more specific entries.
This will be our starting point and today we will see how to store our Excel spreadsheet in a database Access! For some, this task is trivial, for others, we are entering a new world. Anyway, we are just creating our bases.
And exactly at this point, let’s make a small parenthesis. We have the data fictitious initial minimum requirements for the creation of our system, but does not say anything about Access and Excel. Therefore, it is necessary that we practice a brief introduction about the same, and a little further down talk them. As we said earlier, our goal is not to teach or Access or Excel. This knowledge will be obtained in practice, simply by following the tutorials.
Of course, you can search the Internet, where there is a wide availability of material. Particularly, I think as follows: Imagine someone who wants to learn to ride a bike. He can spend days studying before, knowing how to brake, how many gears there are, as the pedals should be rotated, notions of physics, etc… But you can simply mount and walk on. Okay, you might think the guy will fall. But it can also get up and continue. Perhaps the example was not the best, but it is more or less what we do (at least those who have not seen anything to date schedule): let’s go riding!
Note : In the vast majority of the tutorials have the related files, which are sent to Subscribers. If you are a subscriber, please check in your e-mail the Blog_002_Hunter_Network.zip. Use the support for any questions or issues you have.
File Structure
As we saw in the previous lesson, our files have always set a place to locate. For this first module - Hunter Network, a directory structure to be created is shown below.
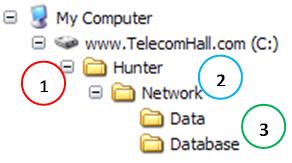
If you have not created, now create the main directory of all our applications, the directory Hunter (1).
Then, just below this directory, create the root directory and that names the module, the Network (2).
Finally, create two directories, also below the previously created Network: Data and Database directories (3). The Data directory contains data entry Hunter Network, in which case the worksheet is the standard with the basic data which we defined above, have the database directory will contain our Access database.
We are ready to proceed.
Excel fine, but Access?
Most people know Excel. Not all know Access. We mainly use Access, so you need to get to know him.
Think of Access as a place where you can place multiple Excel spreadsheets in the form of tables. To access the data in these tables you can open them directly and view or modify data, or access their data through Query
There are several types of queries, and we all in due time. Now we concern ourselves only with the simplest of queries, which are queries of type selection. As its name suggests, are queries that allow us to select (access) data from one or more tables. They serve to check the data, but can also make calculations, use filter parameters, etc…
In addition to the consultations, the Access has the ability to create macros. Macros in Access are not exactly the way we know it in Excel, where you can write such a routine task and then use this recorded macro to repeat the same, but they have the same aim: to automate tasks.
Forms Access are used to create interfaces for data access, and reports to present them in a more elegant. Let’s leave these two items for later, because beyond our initial goal.
To finish this quick summary, we Modules Access. A module can be understood as the place where we store our VBA code that will be called to perform tasks. There is much to explore here, and chances are very great, without exaggeration.
Well, made this super quick theoretical introduction to Access, we now try to see some of these concepts in practice.
Note: all that we here can be done in Excel. But the purpose here is to demonstrate how all this is done using Access.
Data Table - Importing Excel to Access
Open the file Network.xls. You will see a table with the fields defined above. Let’s see how to import data into Access. There are several ways.
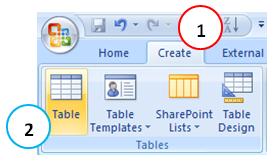
We can create a blank table through the Menu: Create (1) -> Table (2), and then enter all the data.
We will not use this option.
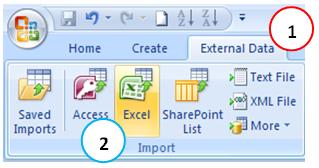
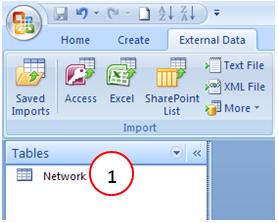
Another, perhaps more correct in our case since we already have the data in Excel, it would import the table through the Menu: External Data (1) -> Excel ( 2). Then click the Browse … and point to our Excel file (3).
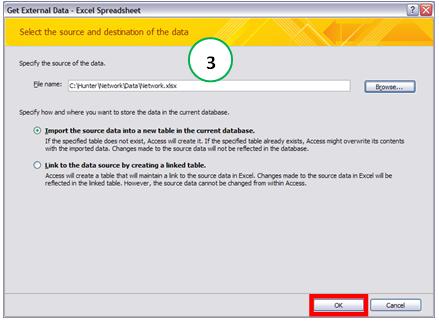
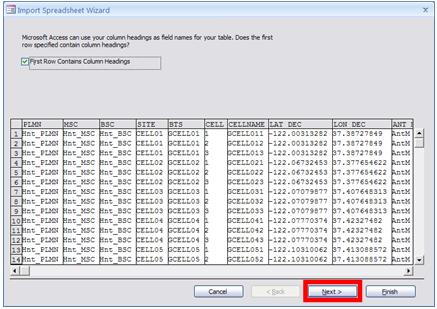
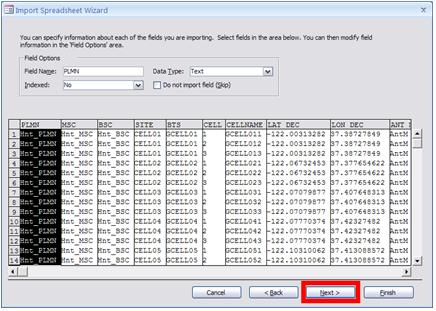
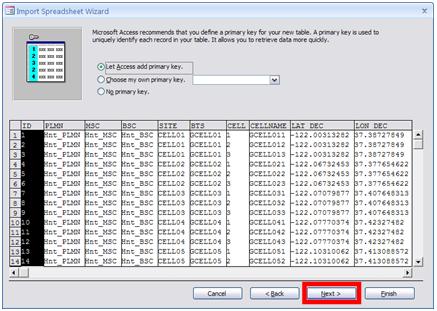
Clicking the OK button starts a wizard to import the Excel file. Select the default actions: Click the Next button four times, the Finish button and the Close button. Following these steps the Excel data is imported into a new table in our database. (As we follow the standard steps, Access included an additional field identification. Do not worry about this field, the last step of the Wizard, Access asks if we want to create a primary key, and that’s what he did, we could have chosen Do not create primary key).
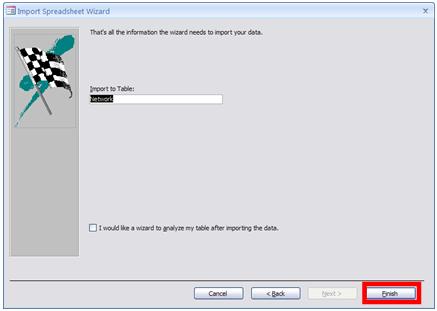
After clicking the Finish button, Access creates a table with the data as we have in the Excel file. This last step could also have set the table name to be imported, if at all.
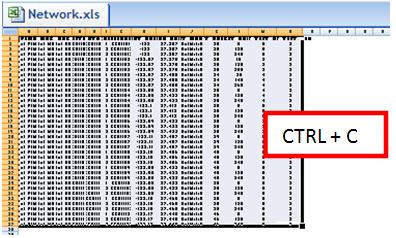
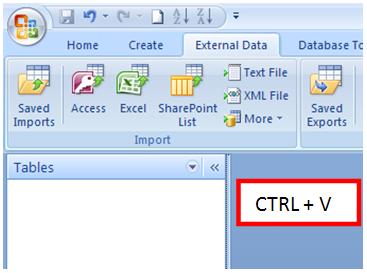
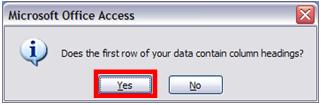
learn the standard way to import, but now wants to see a little bit different, but faster? Open Excel, select all the data, and copy (1) data (Menu, Copy or Ctrl + C). Then click on the desktop Access cole (2) data (Menu Paste or Ctrl + V). Access will ask if the first line contains the field names (3); answer yes. Not faster?
Whether by default or by import prices, in the end we have the table with the data now available in Access (1).
There are other ways of importing data from Excel through macros and through VBA code, where you can for example ask the Access search in a directory, and if there is a specific file, import. But we see this when we need this kind of functionality.
NOTE : In the file that you received, the table is already imported, and the name tbl_Network. But it is important that you practice the above steps, as simple as it seems, to get more familiar with the use of Access.
Selection - Selecting Data
With our table properly imported, we can start making our consultations to the data, or access the data table.
To create a query, go to the Create Menu (1) -> Query Design (2).

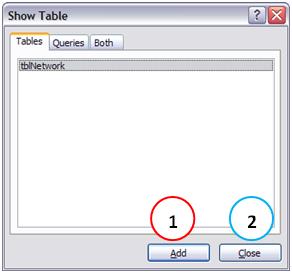
The new window displays the available tables in the database to be used in this query. Click the Add button (1) to add to our table (the only one so far and already selected), and then the Close button (2).
So far: we import the data from our network who was on an Excel worksheet to the table tbl_Network, and just create a query that will access that data.
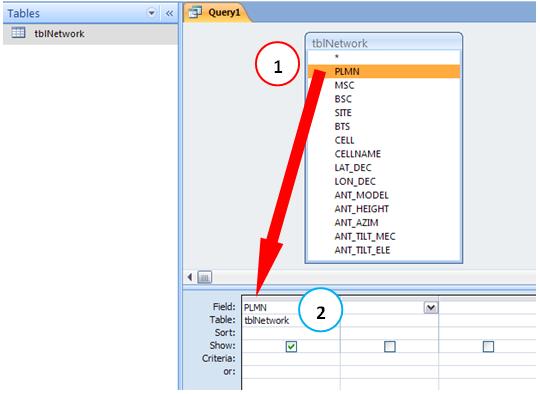
The simplest form of consultation is to show all data from all fields of the table. The consultation is being built according to our need, and can contain only one field, or all the available fields. To add a field to a query, you can double-click the desired fields (1), and also click on the desired fields, hold the mouse clicked and drag to query fields (2).
So far: indicate which fields we want to appear in our query.
To practice, we view all data from our table through the query that we created. First, add all available fields and fields of the query. (In this case you would only include the ‘*’, which is the same as entering all the fields one by one, however, we will see later that in order to have better control of what field we want and what we do not want is a good practice always set the fields instead of using the wildcard).
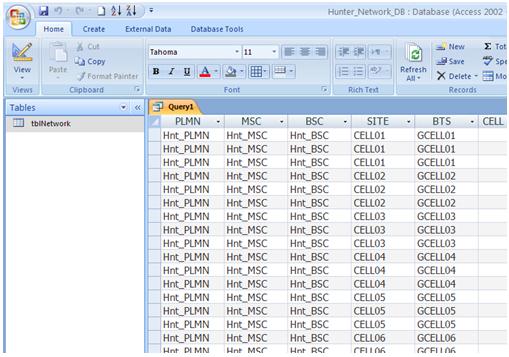
After adding all the fields, we run the query, ie, we can run the SQL code that consultation. Do not worry now with SQL, we still talk about it too, but not now. When executed, the query returns the data according to the fields included.
To run the query, and view data, select the Menu Design (1) -> Run (2) - click the red exclamation.

Pronto. You just created our first query.
Now, let’s save the query. To do this, click Save (the floppy disk icon next to the Office button). If we closed without saving this query, Access will ask if you would like the query to be saved, and just click Yes We saved our first visit as qry_Network.
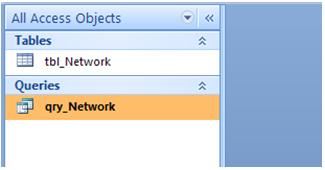
Note : If you are unable to view the consultation on the desktop versions of Access, click the arrow (1) of the Navigation Pane and select All Access Objects (the default option shows only the tables ).

To open (or run) our query again, we can simply double click on it, or click right on it and choose Open.
Nothing extraordinary so far: we have a table - tbl_Network - with our data, and a query - qry_Network - where we can view the data.
are tired, or we can see some more? If you never had contact with Access probably is, we understand perfectly, because we’re seeing several concepts. But hold on there just a little longer, and again do not worry: the examples cited are always full, what we are doing here is showing the best way to work with them.
Query - Grouping Data
Okay, so suppose that now we need to know how many sectors exist in our network. (Remember that we are practicing, and although these examples are very simple, serve to fixate some concepts that we use later). Then we create a new query, and call it qry_Network_NumberOfCells.
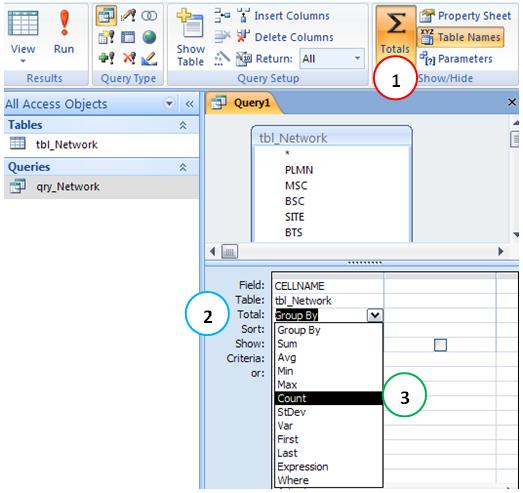
this query does not add all the fields, we add only the field CellName.
Next, Menu Design, we clicked Totals (1) - the button with the symbol of summation. Clicking this button, a new line appears in the query, the row Total (2), with some options, and group by default. Change this value to count (3).
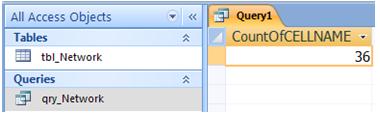
running the query, we have the result: we have 36 cells in our network.
Besides counting, there are several other options, which apply according to the types of data - high, low, etc… We will use all options, but today is good that we saw on Total.
Queries - Criteria
Going a little further, to finish by today, suppose we need to show that the sectors that use antenna model ‘AntModel02’. For this, we create the query qry_Network_SectorsWithAntModel02.
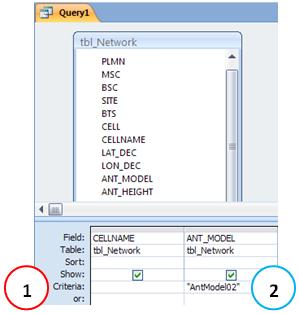
We add the table fields to the query - at least the field ANT_MODEL - because we filter it through the test, and the field CellName to show the sectors that have antennas model AntModel02 .
In the Criteria row (1) of the query, below the field ANT_MODEL put the criterion AntModel02 (2).
running the query, see the sectors with antennas AntModel02 model.

We have seen, to serving the Group or Total, which we use for example to count the number of sectors of the network, and how to set criteria, which we use to show only the sectors with model antenna AntModel02.
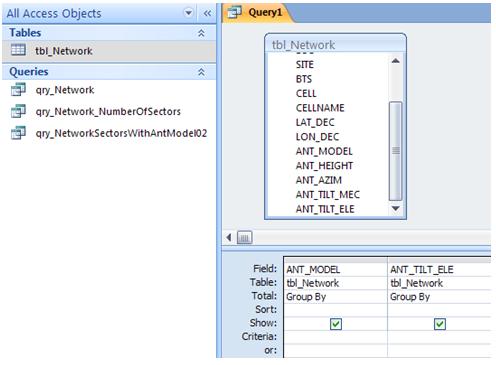
We now use the two options. Suppose we want to know the mean of Electrical Tilt to the sectors that have the type of antenna AntModel01. To do this we create the query qry_Network_MeanTEAntModel01.
This time we will add only the fields ANT_TILT_ELE, we obtain the average through the grouping, and the field ANT_MODEL, as we filter only the model AntModel01.
After creating a new query, add the fields, and click in Grouping (summation symbol) which have shown below.
To achieve our goal, we need to include the criterion ‘AntModel01’ in the line of field criteria ANT_MODEL (1), and change the Group By option line of the field ANT_TILT_ELE to Medium (2).
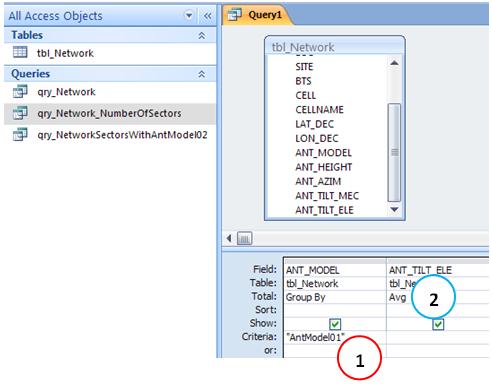
In other words, we want the group by AntModel01 Access and take the average of the tilt. Running the query, we have the expected result. The sectors with antenna AntModel01 has averaged electric tilt equal to 2.

could go here, create many query combinations, with criteria and groupings, but we saw enough to know them and see what can be done with Access not?
So we conclude for today, but so is pursuing with the data already available. Anyway feel free, and use the concepts to secure visas.
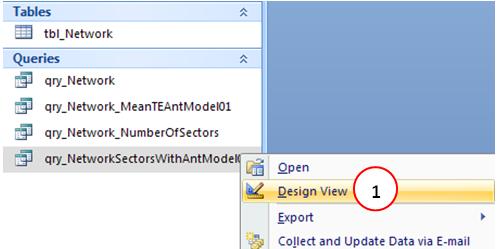
Only one last piece of information: To change an existing query, click right on it and choose Design Query (1).
Conclusion
This tutorial marked the beginning of our work, and was also extensive. Started a path that will evolve increasingly becoming more complete. This was the basis of our system, to be as complex and powerful as we wish.
We hope you’ve enjoyed. If you have any doubts, find the answers posting your comments in the blog or via our support via chat or email.
Till our next meeting, and remember: Your success is our success!
Download
Download Source Code: Blog_002_Hunter_Network.zip (21.3 KB)