Introduction
Ever need to rename multiple files, and had to do one by one? Well aware that there are programs that have this purpose and fulfill their purpose very well. They are known as bulk-renamers, and we know today Bulk Rename Utility . Note: If you have no interest in installing the free program, at least read the end of this tip that shows how to do this using only Windows Explorer.
What is a file renamer?
A file renamer program serves to make changes to names of several files at once. You may even wonder, "Why would I want a program to easily rename files, if I can select a file in Explorer, right-click and choose Rename? Or so even faster, simply press F2? ". Okay … if you have only a few files. But if you have to rename many will see that your fingers will ache and your eyes will burn! It is a good reason to consider using one, eh?
Installation and License
Installation of Bulk Rename Utility is trivial, and the program is free. Download the installation program from the Internet, and proceed with the default installation.

Program Site: http://www. bulkrenameutility.co.uk/download.php
![]()
Program Interface
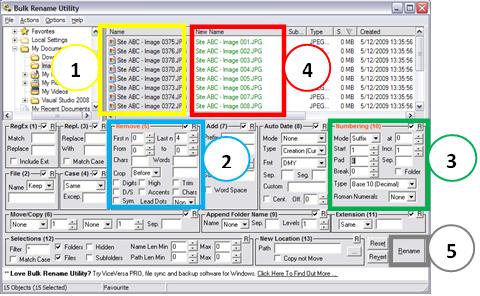
Yes: the user interface scares, and much, ‘thousands’ of buttons and text boxes …you can be in panic!
But don’t be! Let’s look it more easy. It happens that there are numerous possibilities (insert prefix, suffix insert, replace, etc.), And there also is the need for buttons and text fields for each specific area.
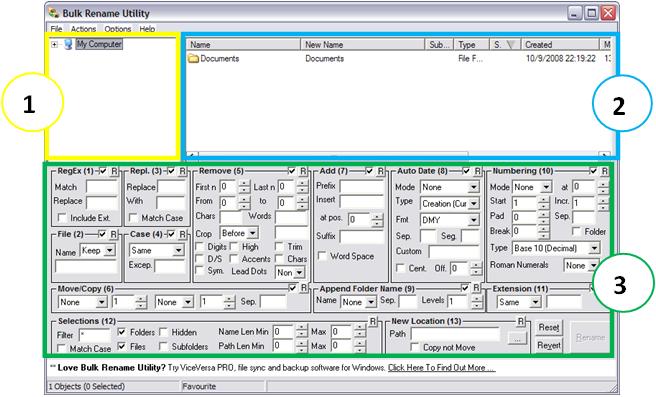
Very quickly we have:
-
- Navigation : with a graphical representation of the directories on your computer, like in Windows Explorer. We use this area to select the desired files
-
- View showing the files in given directory (the one selected in the Tree Menu), and we can also see how will the new filename (New Name column)
-
- Commands : where are the numerous commands. Again, do not panic! All groups have a number, a description and some text boxes and controls. Most are optional. For example if you have no interest in changing everything to upper case, you do not have to worry about the group Case (4)! Likewise, you’ll just type something in Regular Expression (group 1) if you know of Regular Expressions
As always, it is easier to understand by example.
Inserting a prefix or suffix to file names
Let’s take the example of 15 pictures taken in a survey in a given fictitious site. (Actually, they could be more, do even more sense to demonstrate the purpose of the program, but we will not use so many pictures on the ground to facilitate the demonstration).

As a first example, we will insert the name of our site each file, so now it becomes easier to identify the picture of which site it is. Call our site ABC. We open the Bulk Rename Utility, and navigate to the folder where the files.
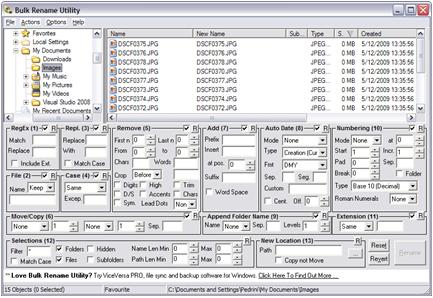
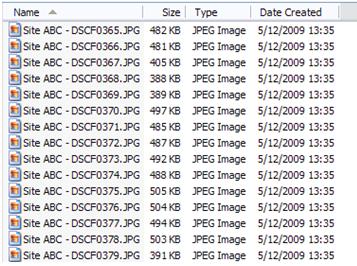
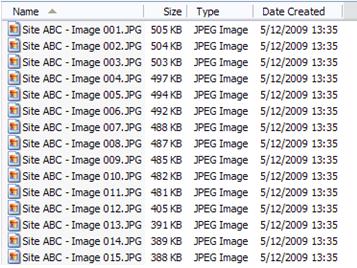
Note that initially, our records begin with DSCF, and will sequentially 0365-0379.
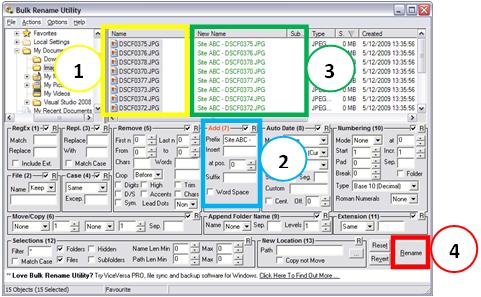
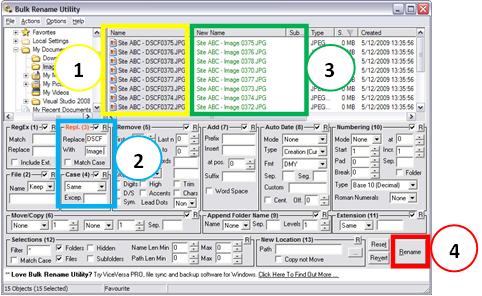
First of all, we mark the files you wish to change (using the mouse, keyboard, CTRL + A, etc.)… (1) And now let’s use the group 7 (Add), since we’ll insert the name of our website at the beginning of each file. Typed ‘Site ABC -’ (with a space at the end) in the text box Prefix (2). We can already see how it will be the name of new files in the New Name column (3). To finalize and implement the changes, we click Rename (4).
This brings up a dialog box asking whether to continue, click OK. Verify that the files were altered as expected.
Replacing part of the text in the file names
Further, we now replace the text by the text DCFS ‘Image’ (again, watch out for space at the end). (Click the Reset button - next to the Rename button - this causes the program to be ‘reset’, but uploading the changes we’ve done yet).
Again, mark the files you wish to change (using the mouse, keyboard, CTRL + A, etc.)… (1) Now let’s use the group 3 (Repl.), since we will replace part of the file name. Typed ‘Site ABC -’ (with a space at the end) in the Replace text box, and typed ‘Image -’. We can already see how it will be the name of new files in the New Name column (3). Again, to finalize and implement the changes, we click Rename (4). This brings up a dialog box asking whether to continue, click OK.
Removing part of the text in the file names, and entering Auto-numbering
We can remove some of the text in the file names by Replace, replacing the text wanted for anything, but we can also remove n characters from a certain position. Let’s do this Below, we will now replace the text by the text DCFS ‘Image’ (again, watch out for space at the end). (Click the Reset button (next to the Rename button), this causes the program to be ‘reset’, but uploading the changes we’ve done yet).
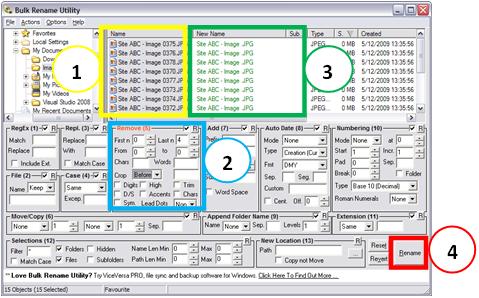
Again, mark the files you wish to change (using the mouse, keyboard, CTRL + A, etc.)… (1) Now let’s use the group 5 (Remove), since we want to remove characters from filename. 4 selected in the combobox Last paragraph (2), ie we remove the last four characters. We can already see how it will be the name of new files in the New Name column (3). Now we have one important detail. We click Rename (4). This brings up a dialog box asking whether to continue clicking OK.
Note that we try to rename (click the Rename button) all files to the same name.
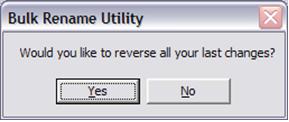
Luckily, we can undo our changes (Menu: Actions → Rename undo or CTRL + Z).
For the files have different names, in addition to the choices made above, we will insert an autonumber in the end, putting 001 instead of 0365.
We mark the files you wish to change (using the mouse, keyboard, CTRL + A, etc.)… (1) In Group 5 (Remove), selected in the combobox Last paragraph 4 (2), and group 10 (Numbering) selected as Pad 3 and Mode as a suffix (3). We can already see how it will be the name of new files in the New Name column (4).
Now yes, clicking Rename (5), we have the end result.
The remaining boxes and options are very similar. The number next to each group simply denotes the sequence in which the changes are processed. For example, the program will make any substitutions (Group 3) before he put as capitalization. The only real exception to every rule above is the group 12, which indicates which files/directories appear on the screen. All other groups follow the same rules.
Maybe you’ve gotten this far, and still found it tricky. Probably because you never need to rename large numbers of files, or simply because they have not practiced. Well, at least when you have the need to do some work like that, you now know where to find help.
Alternative Method
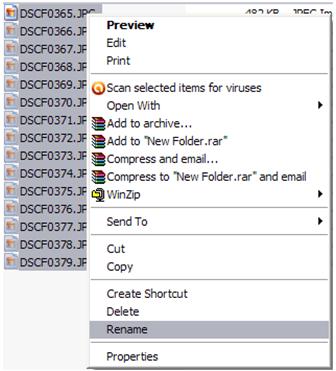
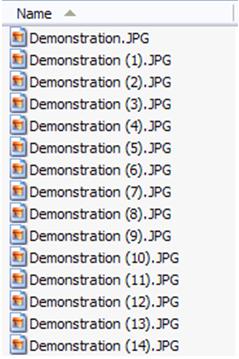
Well, it’s nice to have the program installed, we recommend it. But if for some reason you do not want to install, there is a great tip for anyone who wants to rename multiple files in Windows Explorer, sequentially. First, select all files you want to rename and then right in the first sequence.
Then enter the file name common to all selected. In this case, as an example typed Demonstration. And clicking the Enter key.
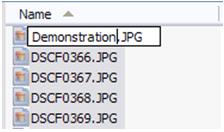
Note that now all files have been renamed with the common name (Demonstration) and followed an order (1), (2), (3) and so on.
Just to finish, rename the first file in the series including the index (0), as shown below. (This is why we click the first file in the sequence we want to rename).

This was an alternative way to rename multiple files at once, directly through Windows Explorer
Conclusion
This was a brief summary of the software Bulk Rename Utility . This is the program to rename files whenever necessary in our studies. We also saw how to rename multiple files using only Windows Explorer (only this way we have less resources). More details can be found in the help file of the program and the manual.
We hope you’ve enjoyed. If you have any doubts, find the answers posting your comments in the blog or via our support via chat or email.
Till our next meeting, and remember: Your success is our success!