Introduction
There are some tasks that we need to run repeatedly, and with some frequency. Some of them like reading e-mails or reviewing reports have no other way: we have to do it manually and repeat it again and again.
However, there are some tasks that can be performed automatically for us, in other words, can be automated. And as a result, among other advantages, is a reasonable ‘time saving’.
So let’s know a program that can help us a lot in the automation of some tasks that we perform with your computer: AutoIt!

The AutoIt is a simple tool, but it is nevertheless to be powerful. It allows for example the automation of repetitive activities such as installing programs (IT Staff).
And also, do you know that repetitive task of logging in the OSS (Management System), download a series of tables and data dumps that Telecom Engineers always do? The AutoIt also allows them to be automated.
AutoIt allow compilation of Scripts into Programs (executable files) that can do almost anything - even simulate keystrokes or clicks on the computer.
For these and other advantages, it is worth knowing it.
Why should I use a Task Automation Tool?
As always, the answer to that question depends on your need. In our case, applies to users who have the need to perform tasks repeatedly. With AutoIt, when you automate the task, it also ends up running faster than manually!
One disadvantage in the current version of AutoIt is that it does not have (yet) a WYSIWYG GUI designer - ‘What You See Is What You Get’, ie everything has to be done in the Cartesian plane. But while developers do not add this feature, we still we can take a lot of advantage of this fantastic program.
Note: but there are other external programs that supply this lack in AutoIt, we’ll show how you can do it too.
So let’s test the AutoIt? Do not worry, we will accompany you in the first steps.
Installation and License
Visit the program website and download the latest version (current) in the Downloads section.
It is currently in version v3.3.6.1. Click the link to download this version, and proceed with the installation. Do not worry, the installation is as simple as any standard installation.

Program website:
Hint: download the full version.
Program Interface
Sure, once installed the program, we can begin to use it.
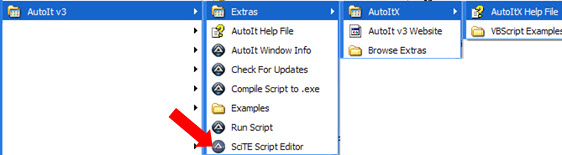
The menu AutoIt presents a series of options. What interests us now is the Scripts Editor, then go to ‘SciTE Script Editor’.
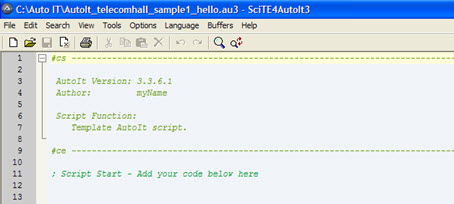
This is the main screen of the Editor.
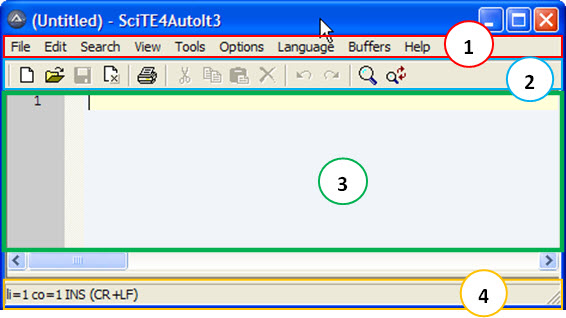
Like any editor, we have the ‘Menu Bar’ (1), ‘Task Bar Buttons (2)’ and ‘Status Bar / Information’ (4).
But the most important area, no doubt, is the area (3), which is where we create our Scripts.
Here it is worth an observation: if you’re not familiar with any programming language such as VBA, do not worry. The AutoIt has a BASIC-like syntax, that is very similar to Visual Basic, one of the easiest languages to learn.
Let us introduce the creation of a very simple application. In future tutorials we’ll give more practical examples and common to our needs. But if you want to evolve with the use of AutoIt for other applications, you will not find many problems.
Made the necessary introductions, let’s go.
Creating Our First Script
We have mentioned here that we do not like the ‘Scripts’ type ‘Hello World’, mainly because it is the style of application for those who are learning / teaching ‘Programming Language’. Remember that this is the first tutorial for the AutoIt ‘Program’ itself, and not on its ‘Programming Language’.
But today we make an exception, mainly because this is a program ‘based’ on programming. And then, let’s create the famous ‘Script’ ‘Hello World’ to AutoIt.
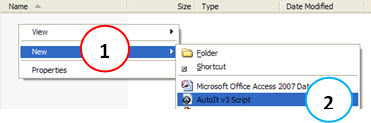
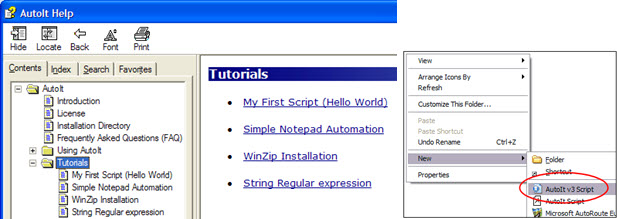
To create your first script, navigate to the directory where you want to create it, right-click menu and choose ‘New’ → 'AutoIt v3 Script ".
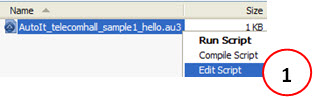
Save it with any name, eg ‘AutoIt_telecomhall_sample1_hello.au3’. Click again with the right button, and choose Edit Script '(1) to edit this script.
When the script is opened for editing in this way, we have an area for comments, which can be used for more important information, especially if this is a large ‘Script’, and require some description.
But since this is only an example, let’s remove the comments to facilitate the demonstration.
Like any programming language, AutoIt has functions or commands, which may have one or more arguments or parameters, Optional or Required.
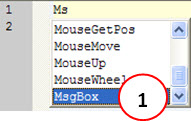
We begin with the most basic of functions, ‘MsgBox’ (1). Note bellow that when we start typing, we have a list of possible functions (like autocomplete). We enter the function completely, select with the mouse, or simply hit Enter.
Then, to enter the parameters of the function, open parenthesis ‘(’.

But we do not know what the expected or possible values are, even with the help of the tip on the screen. Then click the function and press the ‘F1’ to open the help directly in the description of that function.
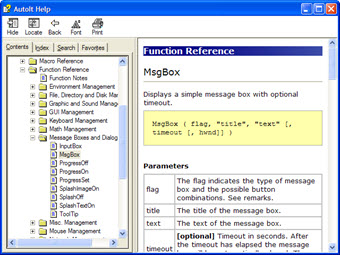
Optional parameters are enclosed in square brackets ‘[’ and ‘]’. Today we’ll only assign the required values.
Depending on the parameters, the way the function work is changed.
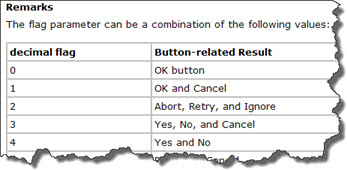
For example, in our case, if the first argument, ‘flag’ is ‘0’, we have a message box with only an ‘OK’ button. If this value is equal to ‘1’, we have buttons ‘OK’ and ‘Cancel’. Remember that all this information can be easily accessed in the Program Help.
Let’s create a simple message box, so we chose the ‘flag’ equal to ‘0’.
The parameters are separated by a comma followed by space, always counting on the help screen, showing what is the next parameter (in blue) (1).

We continue to fulfill the function by assigning a specific value for ‘title’ and ‘text’, respectively ‘Title’ and ‘Text’ of our message box. We can then close the parenthesis ‘)’ - all required parameters have been informed.
![]()
Note: For this function, see that we have two optional parameters - ‘timeout’ and ‘hwnd’. See the example provided in this Help function, where is the optional parameter timeout to close the dialog box in 10 seconds.
![]()
Okay, at this point we have our ‘Script’ ready with all the information it needs. Save and close it.
Running our First Script
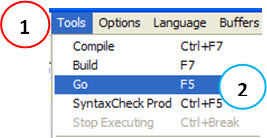
You can run a script through the Editor, by accessing the Menu: Tools (1) → Go (2), or simply pressing the ‘F5’.
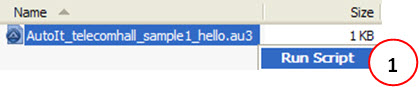
But let’s run the script in a more common way: through the file and / or shortcut to it. Navigating directly to the directory where you saved the file, click the right mouse button and choose ‘Run Script’ (1), or simply double-click.
The result is as expected.

Only we have a problem: the extent of AutoIt (AU3 extension) is not recognized as an executable file from our OS! Note: In our example, this extension is recognized, because we have the AutoIt installed, but most people do not.
The solution is then generate an executable file type (. Exe), which can be runned by anyone.
To do this, use the options ‘Compile’ or ‘Build’. If you are familiar with Scripts, you should know these terms. Let’s not worry about the difference between them now: we simply use the command ‘Compile’ to generate our executable files.
Note: Compile is about gathering all the information needed for the developed application to work properly, according to the data defined in the script. For example, if the script access a particular library (DLL) it will be incorporated into the final executable file.
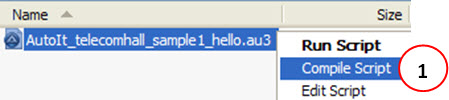
Like we did to run a script, we can Compile using the Editor, or via Windows Explorer. Do this directly through the second option by clicking the right mouse button, and instead of choosing ‘Run Script’ chose ‘Compile Script’ (1).
With this, the script is compiled, and our executable file is created (1).

Double-click the executable file, and see the result.
Congratulations: you’ve created your first Script using AutoIt, and compiled it generating an Executable File - in other words a complete application, which can now be shared with anyone!
OK, it’s a very simple application, like all initial applications of those who begin to learn or program in any programming language. But it is a complete application, and believe me, you can do much more!
Other Examples
The possibilities of developments and applications - as in other programming languages - are virtually limitless. Largely depends on your needs, your will, and also your ability / creativity.
We understand that it would be easier for you to really understand the power of this tool if we showed some practical examples more than just a dialog box. But it is very difficult to meet the needs of all, for the automation of tasks is often a very specific action.
That is, if is there interest, we recommend that you continue through the examples available in the AutoIt help itself (this example we cover here is the first example of such help).
Then do an Internet search on examples of AutoIt ‘Scripts’, in accordance with your application need.
Anyway, in future we will post some tutorials with practical examples of specific use of AutoIt, for example to export a periodic (repeating) data.
Language Reference
And like any language, AutoIt has its own reference. You can see that is very complete.
- Variables
- Macros
- Operators
- Conditional Statements
- Loop Statements
- Obj Statements
- User Functions
- Comments
And also very well documented. Take the example of operators.
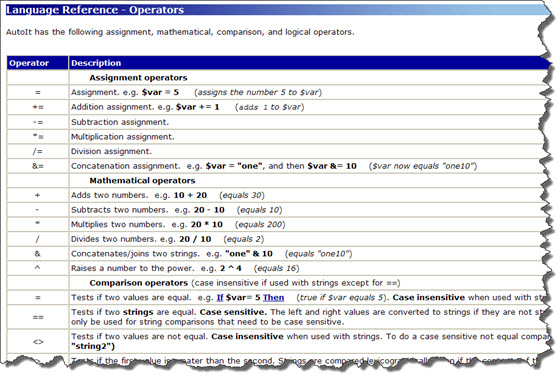
But all this, of course, will be seen in greater detail once you start using AutoIt - or follow our upcoming tutorials with practical examples of Scripts.
Other Features
There are some other features of the program that we did not cover here.
One of them, and very interesting, is that AutoIt lets you create User Interfaces (GUI) - although it ‘must’* be done all through hard-code. (*Do not worry, you have and workaround to graphically create interfaces).
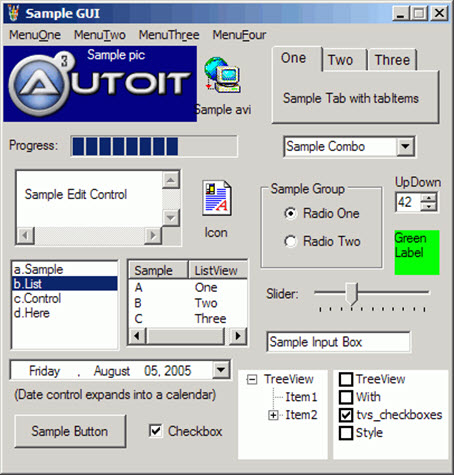
But here, it may have appeared a little doubt. You see, even the AutoIt Program do not has an internal GUI creator, it allows the creation of these interfaces (GUI)! And even this small limitation can be bypassed with an external program which can create the GUI, and then apply to AutoIt. But let’s leave these concepts and explanations also for a future tutorial.
The goal today was simply to present the program, giving an overview of the way it work, and its capabilities, and we believe this goal was achieved.
Conclusion
This was a brief summary of AutoIt software, an excellent support tool for automating tasks.
The AutoIt can be summarized as simple and powerful, this being dependent on your will and creativity to extract the best to run your own activities as best as possible.
The program is completely free, and increasingly used worldwide.
As always, you can count on our help, and soon we’ll show its excellent application in practical scenarios - for example to download data for daily counters and parameters, storing them in a proper place for further treatment.
We hope you enjoyed. Till our next meeting.