Here at telecomHall you already know: we are constantly trying to find the best Telecommunications Tips and Practices to simply share them with you. As its name suggests (Telecommunications Hall) we try to be the location where these Telecommunications and IT professionals find help to start, or even to evolve in their daily tasks.
In this way, today we would like to present to you - that are still not familiar with - a fantastic set of free solutions, but that surely will have utility for anyone who works with GSM, UMTS and/or LTE: Let’s talk about G-NetTrack (and several other modules in the ‘package’), an application for Android devices that will likely surprise you by the quality and efficiency with which performs various types of tasks.
So, let’s go?
Where it all began… XDA-Developers!
Before talking about the application itself, it is worth doing a short introduction.
If you’re in the business of mobile device programming for sure you’ve heard of XDA Developers. If you haven’t heard, it’s worth knowing: this is one of the largest existing online communities, formed by the best developers of all kinds of software, operating systems and mobile device manufacturers. The xda-developers.com ‘main site’ is focused on Windows Phone and Android (and other similar as WebOS and Ubuntu Touch). As another ‘arm’ of development, we have the ‘iphone-developers.com’ site, virtually a mirror of xda-developers, but with focus on iPhone iOS.
Note: the name XDA is derived from the ‘XPDA’, or an PDA with ‘Extra Features’ released by O2.
As we said, this community brings together the best professionals in this area. And a few years ago the Member ‘gyokov’, one of the participants of this forum, has developed and released an application for Windows Phone, as we can see here in the original post of the Forum:
http://forum.xda-developers.com/showthread.php?t=833176
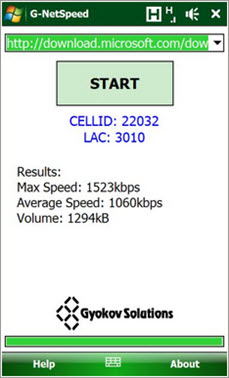
A fairly simple application to the present day: when you click on a ‘Start’ button (1), the user can see the Cellid changes and the LAC of the GSM network, as well as the Data Speed of the network.
Like any good developer, gyokov continued developing the G-NetSpeed. Currently we have available a version for Android, and with more features: the G-NetTrack, as we can see in the ‘official’ release in another post from XDA-Developers:
http://forum.xda-developers.com/showthread.php?t=1751074
In addition to the G-NetTrack, other tools or ‘solutions’ were developed, creating a complete system for analysis and monitoring that all professional who works with 2G, 3G or 4G networks must have.
So let’s continue seeing some of these tools in action. All of them can be found on the developer’s website: Gyokov Solutions.

G-NetTrack
We start with G-NetTrack, the most complete solution for testing and quality monitoring in 2G, 3G and/or 4G networks.
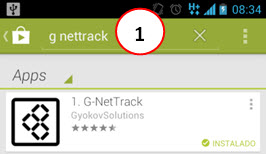
To start using the program, the first step, as always, is to access ‘Google Play’, and do a search for it (1). Continue with the default installation, and open it.
General Information (Cell)
When you start the G-NetTrack main screen appears below.
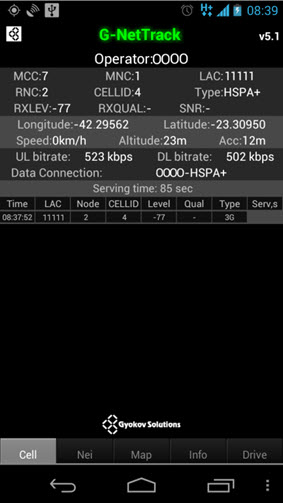
The information here is useful for those already working in the area, and therefore already know all these concepts and measures, with no need for further details.
Here we have several information: MCC, MNC, LAC, RNC, Cellid, Type, RXLEV, RXQUAL, UL Bit Rate, Dl Bit Rate, Latitude, Longitude among others.
Note: attention here for the time that the cell was as servant. And the data of the previous server cells are also available in a table (including the time when the EU was in each one of them).
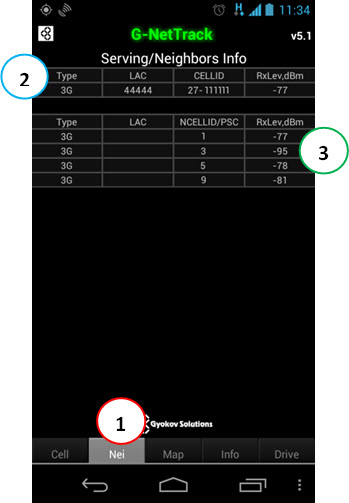
Neighbors (Nei)
Continuing on the screens of the application, click on the button ‘NEI’ (1) and thus we have the server cell information (2) and also of its neighbors (3).
Other Information (Info)
We will purposefully here ‘skip’ the Map Window, because we will be discussing it with more details later. Then, in the ‘Info’ (1) window, as its name suggests, we have various information, as seen in the following example.
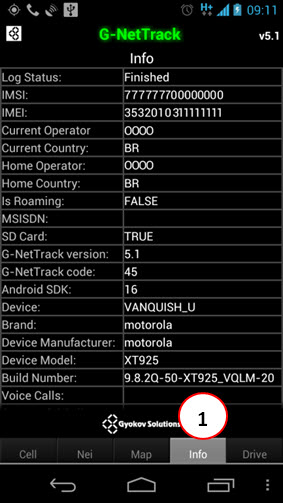
From af all information available here, probably the one that deserves mention is the IMSI, because this field is used to perform Call Trace in ‘BSC/RNC’ — that is, you can easily find and pass this information to anyone in the Office doing a possible parallel monitoring (trace).
Drive Test Mode (Drive)
A very interesting feature of the application is that it allows the ‘Drive Mode’, that is, a way with big letters with the most important information: Technology (1), LAC (2), Cellid (3) and RXLEV (4).
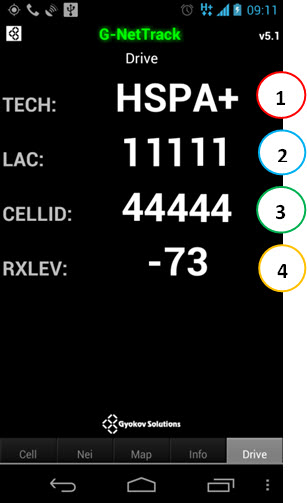
Of course, we do not recommend using this feature when you’re driving, but this big screen is very useful even when we stopped in specific locations. You can for example put the device on the dashboard of the vehicle and continue working in parallel with your notebook.
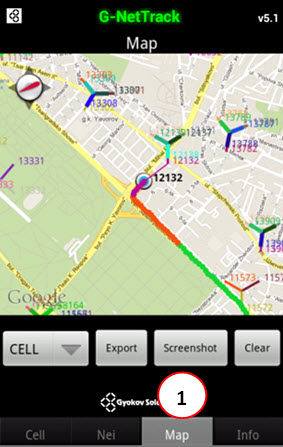
Map (Map)
But with no doubt, one of the best options that we have is to display the data in a Map - ‘Map’ button (1).
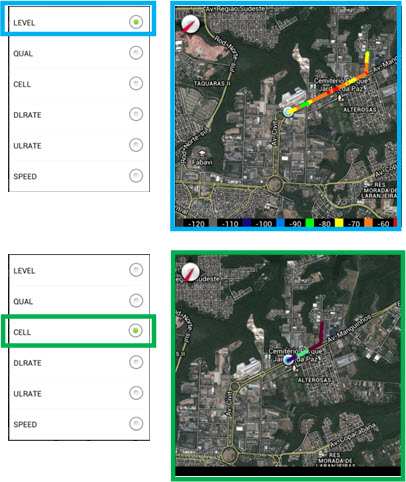
By clicking on the ‘DropDown’ Menu (1), we have access to a number of measures, such as ‘LEVEL’ e ‘CELL’ (best server).
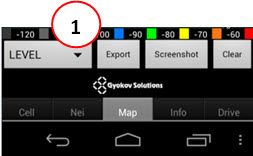
According to the choice, the information in the map are updated.
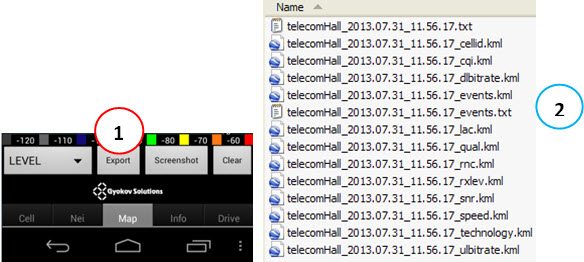
When you click the ‘Export’ button (1), multiple files are generated in a folder (2), where the G-NetTrack was installed (‘G-NetTrack _ Logs’). For each of the collected data (rxlev, snr, bestserver, etc …) there’s a Google Earth KML file, in addition to a Text type file with all the information needed, so you can postProcess (for example in Mapinfo or G-Net ‘own’ Drive Test parser that we will see more below). A file is also generated with the Events (Dropped Calls, Failures, etc…).
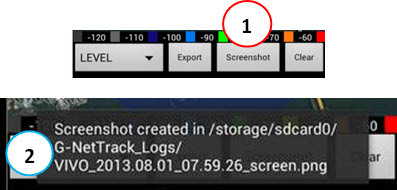
Another very interesting feature of this application is the ability to save a snapshot of the screen (2) just by clicking the corresponding ‘Screenshot’ button (1).
And our Test Drive starts to get even more interesting when we enter our own network information. Each cell is represented with an arrow, which according to the technology is thicker or thinner. In addition, the arrows are colored with relevant colours – each sector has the same color when active and is plotted on a map.
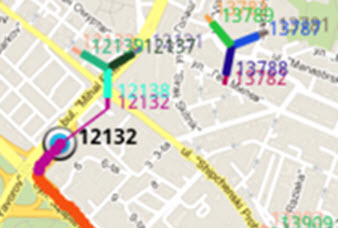
Note: soon we will see how to import the basic information of our network in the application.
Other Menus
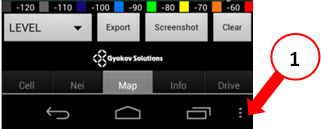
Through the Main Menu (1), we have access to several ‘Options and Settings’.
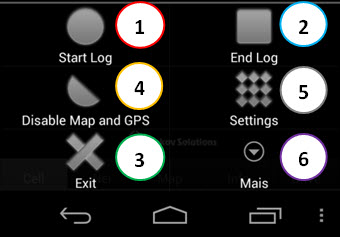
Here’s where you start (1), pause and stop (2) data collections. It is also here where you can ‘Exit the Application’ (3), and if you want to, ‘Disable Map and GPS’ (4). Also two other important Menus, which give access to ‘Settings’ (5) and ‘More Options’ (6).
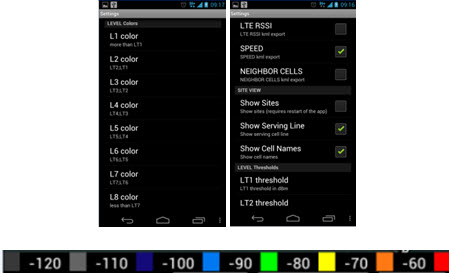
In the ‘Settings’ menu, we have a variety of adjustments that can be made. One for example is the definition of ranges and custom colors to collected data.
And a fantastic G-NetTrack function is the ability to perform a sequence of voice and/or data calls!
In this ’ settings ’ menu, can make these adjustments.
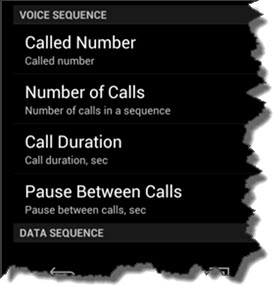
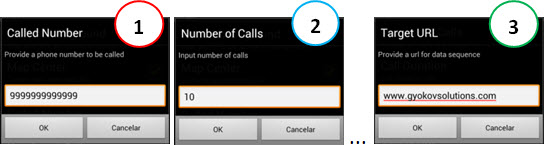
The voice or data calls are configured through each of the items according to the desired. For example we can type ‘Which the number to be dialed’ (1), ‘How many times it must be dialed’ (2), and others as the ‘Duration of each call’ and ‘Target URL’ (3), the latter in the case of Data Call.
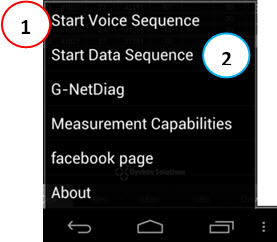
To start the sequence of calls, after the data has been configured, go to the ‘More Options’ Menu as we saw previously, and then choose the desired sequence, such as Voice (1) or Data (2).
Anyway, as you have explored all the most common functions of G-NetTrack, you can make your advanced options in this menu.
So let’s continue and see how we can insert our data in the application.
G-NetTrack CELLFILE format - Importing data of your network to G-NetTrack
You can use the G-NetTrack without any customization or other action in addition to the standard installation, but at least the importation of data from your network is recommended.
To do this, simply create a plain text file, TAB-delimited, with the information which the G-NetTrack need. Tip: you can download this sample file, on the main page of G-NetTrack, and simply replace it with the data from your network.
Note: it may be that, depending on the version/update of the application, more fields are added. But don’t worry, if the new data is missing, the new functionality will use ‘default’ values. Anyway, it is always good to keep the file as updated as possible – both in number of fields, and in the values of the network.
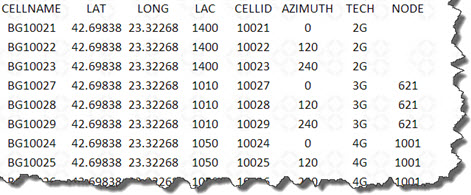
Next, we have a list of key fields:
- CELLNAME: the name of the cell (in fact, you can put other additional information here, as RNC and other information you find relevant);
- LAT: latitude in decimal format (and using ‘dot’);
- LONG: longitude in decimal format (and using ‘dot’);
- LAC: of cell;
- CELLID: of cell;
- AZIMUTH: of antenna;
- TECH: thecnology (2G, 3G or 4G);
- NODE: depends on thecnology.
- For 2G (GSM) can be left blank;
- For 3G put the RNC (can also be left blank if ‘LAC-CELLID’ is unique;
- For 4G put eNodeB ID (attention here because this field is required for 4G).
The procedure for import of data is quite simple. First, save this file (cellfile.txt) into folder ‘G_NetTrack_Logs/cellfile’, the same place where G-NetTrack was installed.
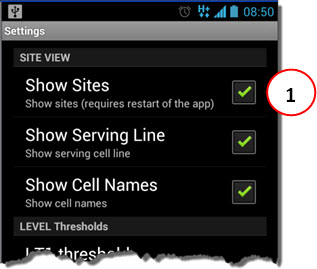
To see sites on the map in the ‘Settings’ Menu select the option ‘Show Sites’ (1). Note that in this case the application needs to be restarted - you should exit out and run it again.
Note: If you are in doubt whether your file is correct, you can do an online check, using the application that we will see next (G-NetDiag).
Other Solutions
As if not enough all the features presented on the G-NetTrack, we also have several other ‘modules’, or solutions that have been developed to facilitate the work with 2G-3G-4G networks. Let’s get to know each one of them.
G-NetDiag
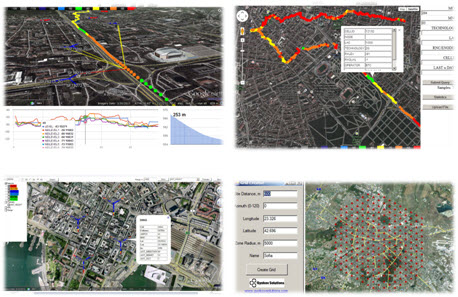
G-NetDiag is a tool for online post-processing of the data we collect using the G-NetTrack, those logs that are exported when we click the button ‘Export’. Just click on the ‘LOGFILE’ (1) and navigate to the collected log file, and click on the ‘CELLFILE’ (2), and point to the file with the network data in the format of G-NetTrack.
The data presented have a wealth of information for all the measures collected as ‘LEVEL’ (3). And you can ‘Play’ (4), move ‘Forward’ (5) or ‘Backward’ (6), with the corresponding views on a map.
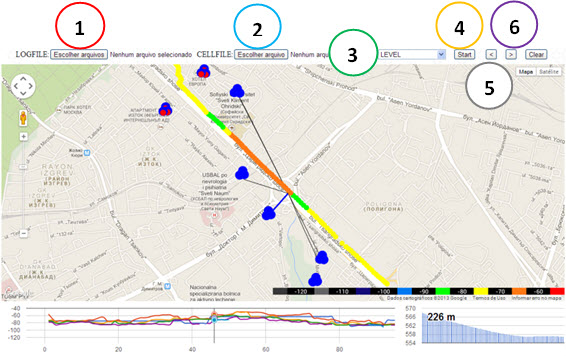
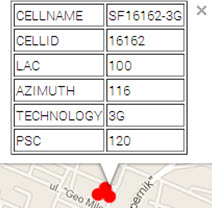
Still: with a double click on any point of the map, be it a cell or collected data, you see it’s information in a table.
At the bottom, we have a chart with the information of levels (1) of serving cell (2) and neighbors (3).

G-NetLink
A solution more focused solution on Transmission (TX), G-NetLink enables several analyses between two points (A) and (B), such as distance, loss in free space, Fresnel diagram, etc.
Its data can be seen both on the map, as in a chart with the heights information.
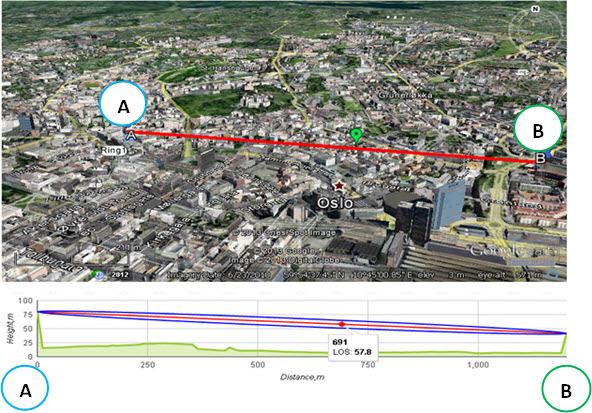
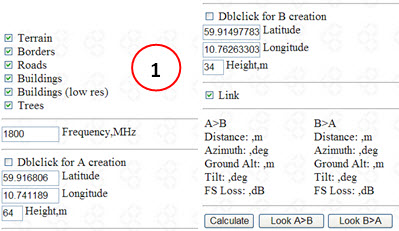
Using a graphical interface (1), the user has access to all the editing options and corresponding actions in this kind of analysis. Note: you can create the point A and point B by navigating to the desired location, and by double-clicking.
G-NetTilt
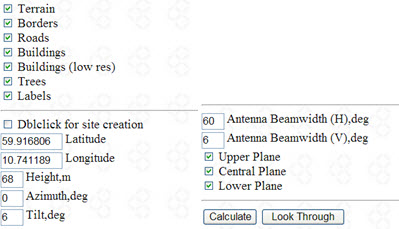
Another useful solution allows viewing (theoretical) antenna coverage area, according to the tilt applied (and also other items such as Height and Azimuth). In addition to the aerial view (1) you can have a vision through antenna (2).
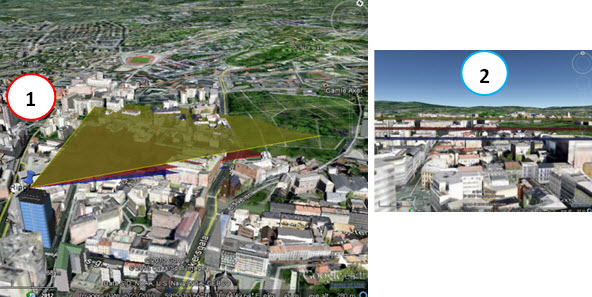
Again, all the editing options and corresponding actions are available in the side menu.
Even more solutions!
We could go on enumerating here several other solutions, such as:
- G-NetEarth: online post-processing tool like G-NetDiag described above, except that for Google Earth instead of Google Maps;
- G-NetLook: Radio Frequency Planning and Optimization tool for visualization of cell data, Neighbors and KPI Performance;
- G-NetWorld: webservice for uploading and sharing of user measures G-NetTrack;
- G-NetSpeed: measure of network speed - uplink/downlink;
- G-NetPing: statistics of ‘ping’ and ‘trace route’; among other.
However, we believe that we have reached our goal here today, which was to introduce this set of solutions that we suggest is used for you to improve your productivity in any GSM, WCDMA and LTE!
Note: If you want, you can try online many of the solutions shown above: on each page, look for the link for this purpose, with demonstration and sample data.
Hunter Updater - G-NetTrack
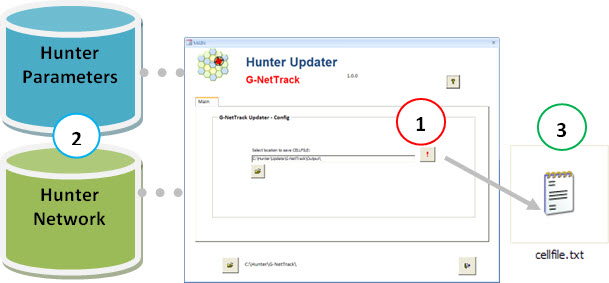
If you already use the Hunter Suite, you already use the automation of tasks. In this case, we create a specific module (very simple) that creates the CELLFILE file of G-NetTrack just by clicking a button – looking for the necessary information from other modules with information from our network.
For example, with just one click (1), the module ‘Hunter Updater-G-NetTrack’ accesses the information of other modules (2) with network information (configuration parameters, azimuths, etc.) and creates the file in its final form (3).
For you that is not Hunter User, idea is always the same – reuse data from your network (look for those information in unique locations), and create your own macro, for example using Excel – so you gain time, since you don’t need to always manually update these output data. And so do the job better and easily distribute it to all users of this file(s).
Conclusion
Today we learned about a greta suite with several very useful solutions for anyone involved with GSM, UMTS or LTE networks: the set of Gyokov solutions, especially the application G-NetTrack.
Although it is a free application, has numerous solutions that don’t miss anything compared to the most famous existing paid programs to perform these same functions in various areas such as ‘Drive Test’ collection (including possibility of call sequence), post processing, ‘Site Survey’, ‘Field Test’, Analysis and Visualization of Network Data, verification of Transmission (TX) Links among several other utilities that make this a suite of ‘must have’ in the life of everyone.
The constant updates (releases) of the application shows the dedication of the developer, making it better each day, more stable and more reliable, and deserve our recommendation (and thanks).
telecomHall Community
![]() Telecom Made Easy!
Telecom Made Easy! ![]()
(Share to your friends ![]() )
)