Introduction
We’ve already seen that two of the best programs to write our Python code are Jupyter Notebook and PyCharm – at least those are our community choices. ![]()
But I use VSCode (or another Editor/IDE), what do I do? No problem, you can follow everything here and do the same with other editors – we also like VSCode very much.
And we saw in the previous tutorial how to install Jupyter. Now let’s see how to install PyCharm, so you can build complete projects in Python.
PyCharm
In case you’ve never heard of PyCharm: it’s an IDE, which allows you to program (write code) inside it.
But what is an IDE? An IDE (or Integrated Development Environment) is how its name suggests a program for you to build applications that combines multiple developer tools in one place, the program interface (or GUI - graphical user interface ).
Basically you can write the Python code on it, and we’ll also be able to run the codes, and still see if it’s working or not. And it even gives tips on how to fill in, suggests what might be wrong etc. It’s like a smarter text editor for our codes.
And why do we recommend PyCharm? Simple, because he is very intelligent and helps us a lot to program, it is very complete – it has everything inside. For example, if you need to install something new, you can install from within itself.
In addition, it is one of the most used by professional programmers worldwide.
Again: PyCharm is just one of the existing options. If you want you can use another one, no problem.
But we will use PyCharm a lot. ![]()
Installing
To get started, let’s go to the official website:
Official website: Download PyCharm: Python IDE for Professional Developers by JetBrains (PyCharm is one of Jetbrain’s products).

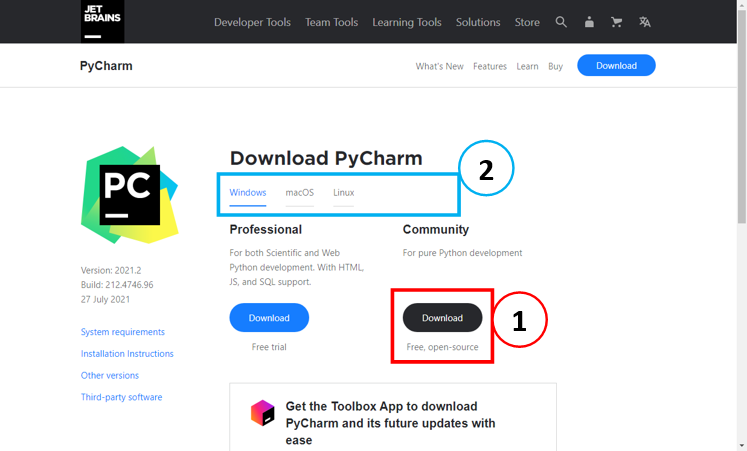
You’ll notice that PyCharm has two versions (one paid and one free).
We will install the free version (or the open-source Community Edition). To do this, we click the
Download button (1). If you are installing for another Operating System (macOS or Linux) go to the corresponding option (2).
Wait for the download to finish.
Once completed the download, you can proceed with the normal installation - run the file and basically follow that flow of any installation (next, next, next).
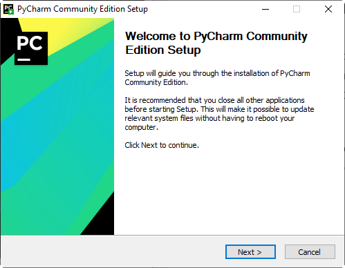
The installation of PyCharm is very easy, and we advise you not to change any of the installer’s suggestions – unless of course you know exactly what you are doing.
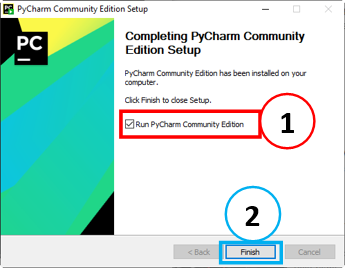
So, after the standard installation following all the suggestions of the installer, we have the final screen.
Select the “Run PyCharm Community Edition” option (1) and click the “Finish” button (2).
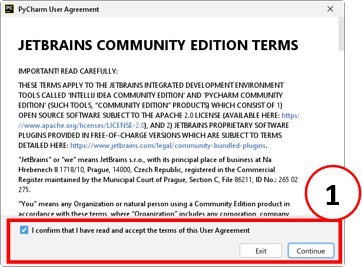
As you have selected this option, PyCharm will open. The first time it runs, you must accept the terms of use (1) to continue. There will also be another screen with a question – if you want to send anonymous data for program improvement – and then you decide. ![]()
And then (finally) PyCharm opens.

Done. PyCharm is installed on your computer!
Checking the installation
And how do I check if it is installed?
In this case - Python has already opened, so we have already proved that it is installed. ![]()
But if you want to open again later, go to Windows taskbar, type “pyc” (1). And you’ll see that the PyCharm shortcut will appear! (2)
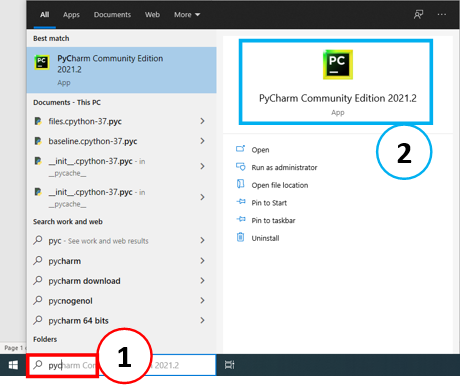
Tip: If it doesn’t show up (yet), it may be because sometimes your computer is taking too long to recognize that PyCharm is installed. If so, restart the computer.
Interface
Let’s take the most important steps to get started with the PyCharm interface.
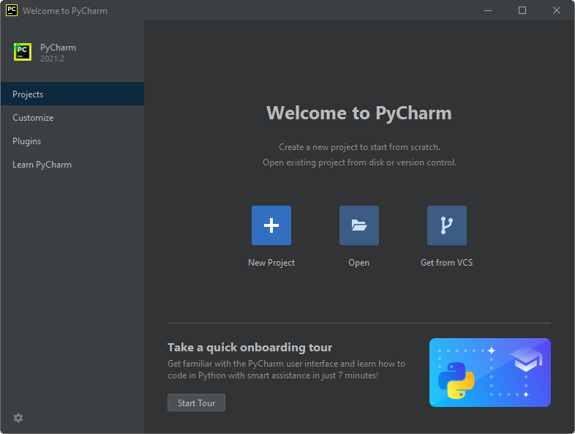
The first time you open PyCharm, it shows a welcome screen where we can create (or open) a project. (You’ll always be able to create a new project from the Menu later.)
And the first thing to do is create a Project.
Creating a New Project
To create a new project, and start creating our codes, we click the New Project button (1).
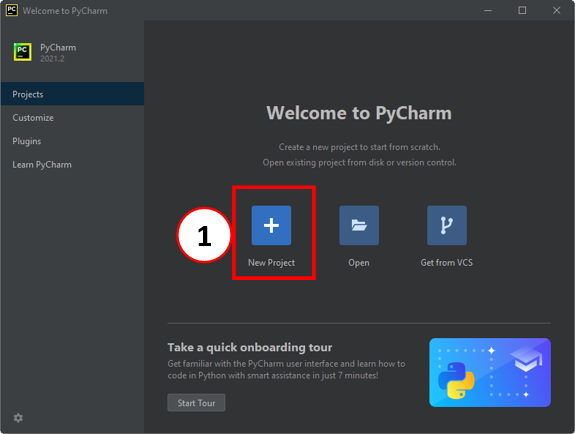
And the “New Project” window comes up.
In this window, we have some simple settings to configure. The first is to set the “Name” of our project - and also its location, where we will save, store on our computer. You define the name and location.
In our example we call the project “telecomHallPython” and saved it in the suggested default directory.
Another important option is to configure python interpreter settings.
Python Interpreter
But what is a Python interpreter?
A Python System interpreter is one that comes with the installation of Python. You can use it exclusively for all Python scripts or take it as a base interpreter for Python virtual environments.
We already have Python installed on our computer, as we did in the Tutorial Installing Python.
But when you install other programs (such as PyCharm), they need to “know” which Python interpreter they will use.
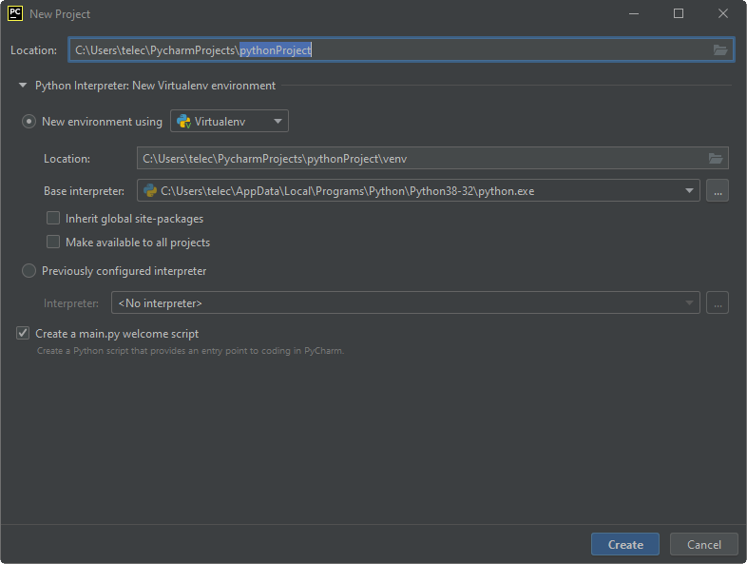
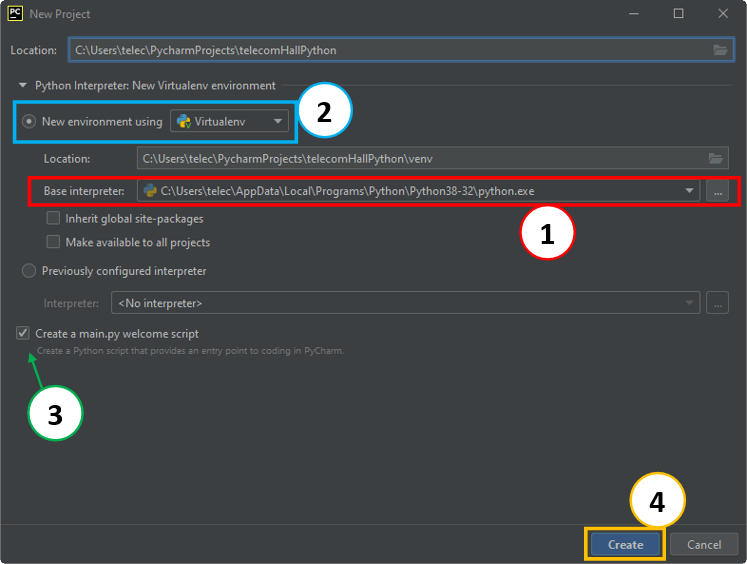
But don’t worry about understanding these concepts now, and let’s just use the suggested base interpreter (1), choosing the option “New environment using: Virtualenv” (2).
You also have the option to request that a base/sample file “main.py” (3) be created. For now, we can leave selected - let it create our first file. ![]()
So, we click the “Create” button (4) – that will then create our project “telecomHallPython” already with a “main.py” file inside.
Tip of the day
A break here: Everyone likes tips, isn’t true?
At least we at telecomHall love to discover all kinds of tips (Telecom, Utilities etc.) and share it with all of you.
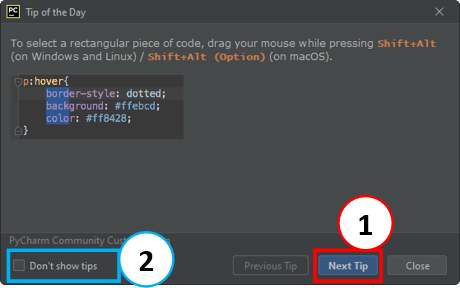
And with PyCharm every day you have a new tip being shown. Of course, as it’s still starting it may seem a little strange or complicated. But we are sure that you will enjoy in the future to see some tips. ![]()
If you want to see more than one tip, just click the “Next Tip” button (1). And if you no longer want to see these tips, select the option “Don’t show tips” (2).
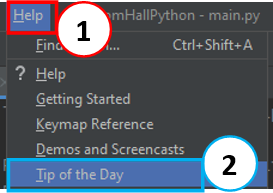
Tip: for the Tips. ![]() If you already use PyCharm and are no longer seeing these tips, and want to see them again, go to the Menu “Help” (1) → “Tip of the Day” (2).
If you already use PyCharm and are no longer seeing these tips, and want to see them again, go to the Menu “Help” (1) → “Tip of the Day” (2).
Code With Me
Of course, it’s not time yet - we still need to write our codes, and you need to learn a little bit more. But it’s good to know that PyCharm has a really cool option called “Code With Me”, where you can program with other people.
In summary you can invite others to participate in programming in your IDE or join another IDE to work together on a project. But we’ll see it later. ![]()
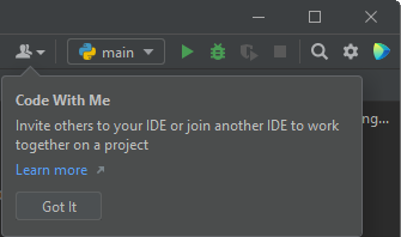
Click the “Got it” button to close the “Code With Me” dialog.
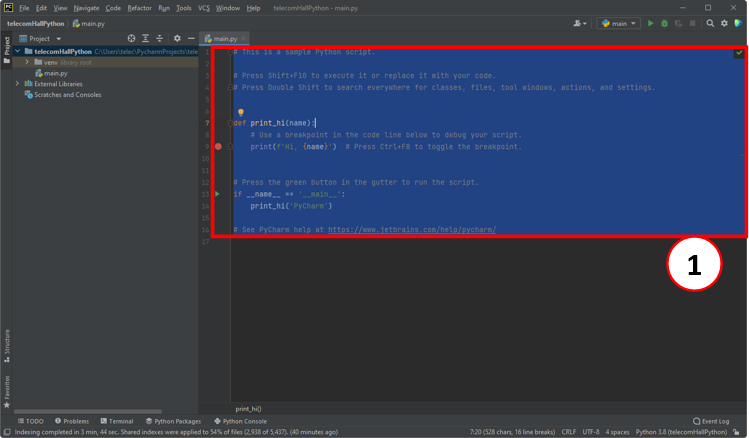
And we see the PyCharm interface, with our open project and file.
As we specified above, a file with some information / template (1) was created, ready to start writing our code in Python. But it’s already a little advanced for those who are starting, and maybe never programmed anything. Then select everything and DELETE. ![]()
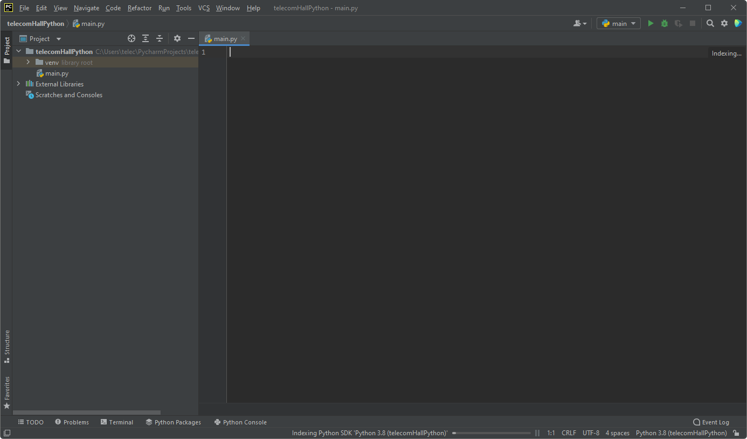
Okay, now we have our file (main.py) totally empty. And we can start writing our codes. ![]()
Writing Python Code
Using the PyCharm interface, let’s take the first steps by writing code in Python.
Create a new file
When we create our project (telecomHallPython) the “main.py” file was created by PyCharm (we selected this option).
But we can create another file, inside our project.
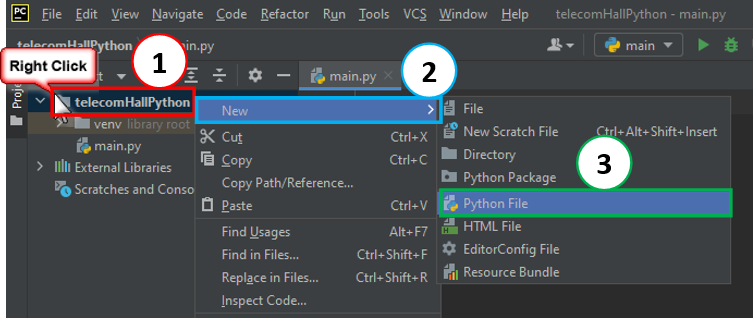
To create a file, we right-click our project (1) and choose “New” (2) → “Python file” (3).
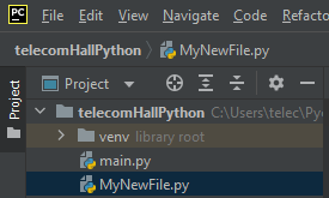
And we can create a new file, for example with the name “MyNewFile.py” (1).

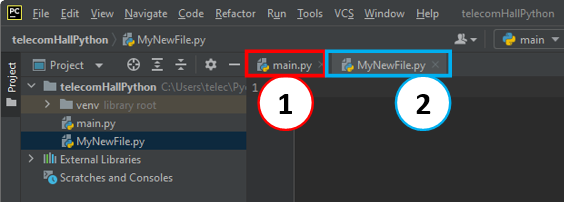
See that now, within our project we have 2 files: main.py (1) and MyNewFile.py (2).
In any of these files, our codes will work perfectly.
Now, let’s just write Python code.
And if you’ve already been following our tutorials, you already know how to create code in Python, remember? ![]()
We saw the “print” command.
Looking back, it’s a command to tell Python to show us a text.
print (‘telecomHall’)
Running Code
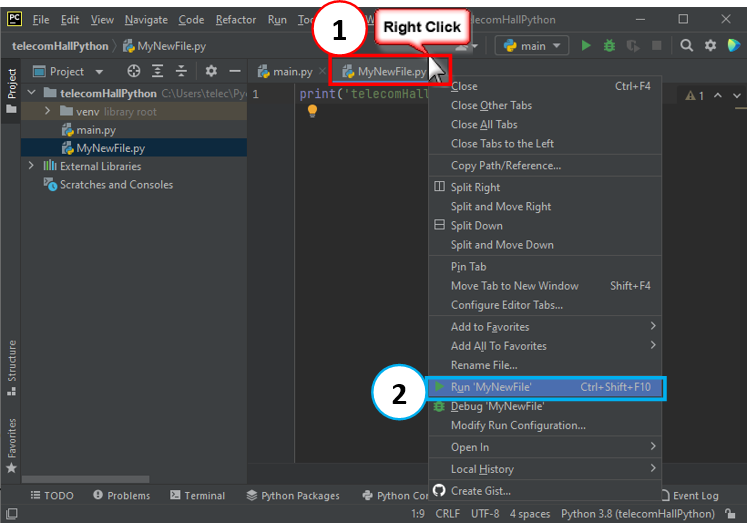
To run the code we wrote in the new “MyNewFile.py” file, right-click on its tab (1) and choose Run ‘MyNewFile’ (2).
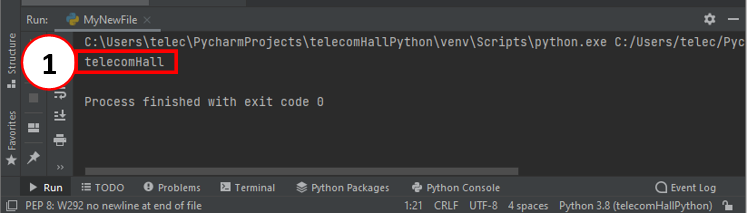
At the bottom, PyCharm informs me that the process has been completed. And the result of the executed code (1).
If we change the code for example by adding one more print (1) and we execute, the result is updated (2).

Well, that’s it for today.
You can then explore all the huge number of resources. But we leave this for the next tutorials.
Setting up the Python Interpreter
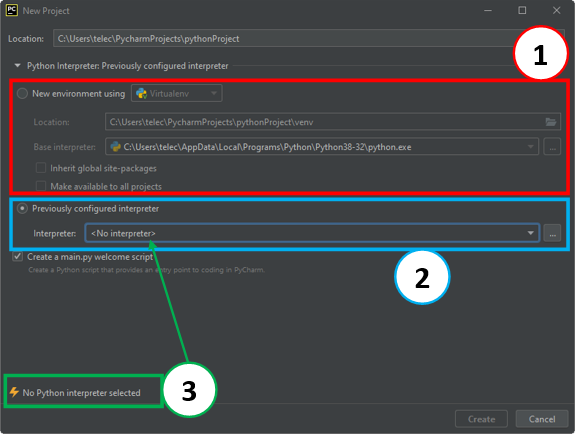
To conclude, remember that when we create a new project, we have the option to create a project based on a “New environment using: Virtualenv” (1) or “Previously configured interpreter” (2).
But notice that PyCharm informs that we do not have Python interpreter selected - When trying to create a new project we see that there is no interpreter selected (3).
That’s because we don’t have an Interpreter set up yet.
The first option is as if I created a folder completely isolated from the other things on your computer. In the second option, you point to the installed Python. And that’s the option we use, so it’s so important to set up!
In our case it does not appear this option yet.
So, let’s see how to set up a Python interpreter in PyCharm, to use in our projects.
Option to Add
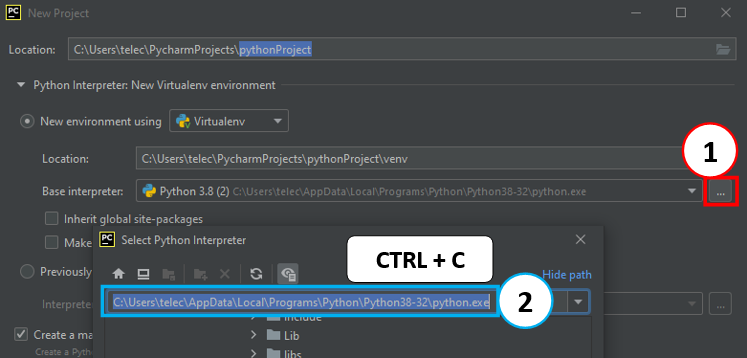
One option to add is this: In the window itself we are creating a new project, we click the 3-dots button (1) next to the “Base Interpreter” path. And in the window that opens, we copy (CTRL + C) the path (2).
And then, now in the Interpreter option of the “Previously configured interpreter” we click on the choice button with 3-dots (1).

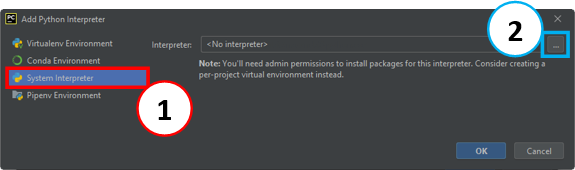
In the new window to Add Python Interpreter, select “System interpreter”(1) and again in the 3-dots button (2).
And in the window to select the Python Interpreter, paste (CTRL +V) into the text box (1) the path you copied earlier. Click the “OK” button. (And also OK in the next window).


Done: The Python Interpreter can now be selected for new projects!

Another option to add
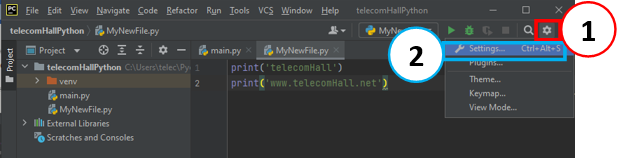
Another option to add the Python interpreter is, with the project open, clicking on the gear (1) and then "Settings… " (2).
And then clicking on the gear, choose “Show All…” (1).
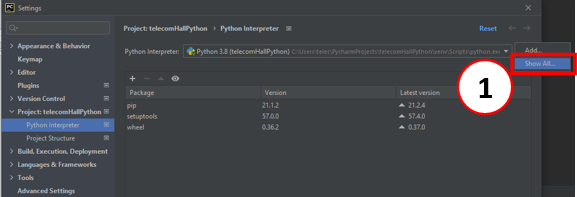
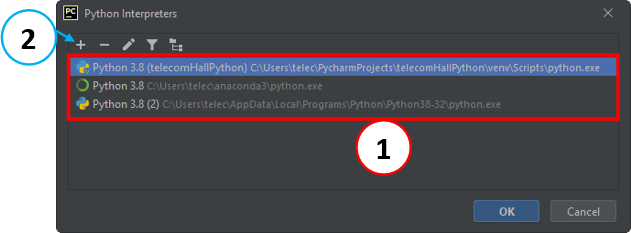
And then choose which Interpreter we want to use (1). Or even add a new one (2).
Troubleshooting
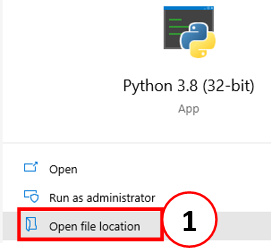
If you don’t know the path where Python is installed on your computer, and also PyCharm has not identified it, do the following: Type “Pyt” in the taskbar, and when Python appears, choose “Open file location”(1).
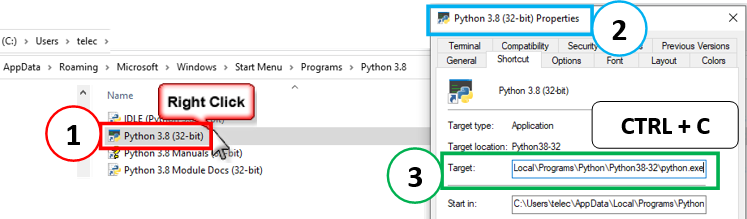
The location that will open is actually the location of the “link” to Python. So, right-click the Python link (1) installed on your computer and choose “Properties” to see the Properties (2) of the link – where the “target” is the Python path (3). Copy (CTRL + C) that path to use as we’ve seen.
Well, it’s starting to get very advanced, but we’re just trying to cover up all the mistake possibilities that might eventually occur.
But that’s it for today.
By following the basic steps suggested, you should probably find a very smooth installation of all the steps.
And of course – you are part of a community: in case of any doubt, just comment. ![]() And we’ll asnwer.
And we’ll asnwer.
Conclusion
After today’s tutorial, you are able to write code and run on your computer using PyCharm, one of the most used IDE by all the best professional programmers in the World.
Without realizing, you will slowly learn all the main features, not only from PyCharm as we saw today or Jupyter as we saw in the previous tutorial, but also from Python and its application in Data Science.
Follow along and evolve with us. Walk together with the community on this extraordinary journey, always learning more and more, and especially, knowing that you can use everything you learn to improve the way you currently work – all in an impressive way. ![]()
And of course, you have the support of the Experts of our Community. If in doubt, just comment.
Index
Back to main index: Data Science by telecomHall Community
