Introduction
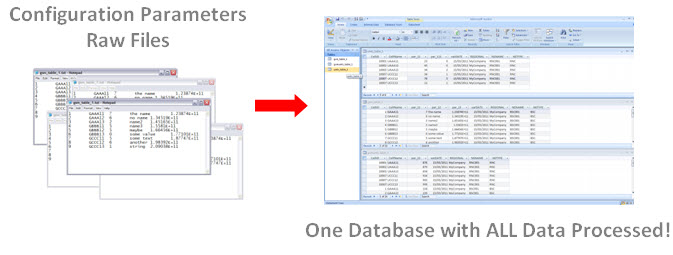
One of the keys to the success of all activities of the Network is to collect all information of the configuration parameters (GSM, UMTS, LTE …) on a single and updated database.
From this base (parameters database) we can accomplish a lot of actions, with benefits of several types: audit parameters, accurate reporting, plotting to Google Earth and Mapinfo, updating other databases and other tools such as drive test etc…
If you’re reading this tutorial, you probably already have an idea of how this process brings results. Mainly because another advantage in having a database of this type: the data are reliable because they correspond to what we have in our active network!
With Module Hunter Parameters, we began to see today in a simplified way procedures and macros in seeking the raw data of parameters of the OSS, and store it in an Access database.
And if you have followed the Hunter tutorials, also are already familiar with our simplified way to demonstrate how to develop their specific applications that bring the same result for your own network.
Objective
The objective today is show how to create a database with all parameter data organized in tables and fields.
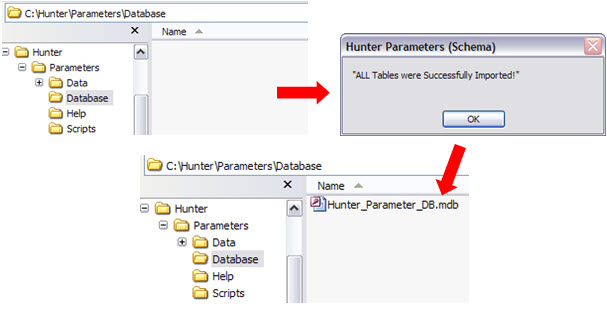
In our case, following the Hunter modularization, our database is Hunter_Parameters_DB.mdb, Access.
The network parameters are provided by different vendors in various formats (TXT, XLS, CSV, XML, etc. …) and can be dumped in various ways (FTP, downloads, etc. …).
For each specific type, we can create a ‘parser’, ie a ‘macro’ to get the files in that particular format, and group and organize them in a database.
A more common form the vast majority of vendors is the TXT format, even for being a more generic or common format.
To import the TXT data to an Access database, we use a special feature: create a file with the specifications of each table / field - the file Schema.ini.
And this is what we demonstrate here today through simulated data (fictitious). Although not specific data formats for any vendor, the concepts presented here can be easily adepted for your specific one(s).
Scenario
Our scenario is this: we have a GSM / UMTS form a Vendor X, with two BSC (BSC001 and BSC002) and an RNC (RNC001).
Through commands in the management system (every vendor has its own format), schedule the daily creation of the export of all tables of parameters in a specific directory at management system. (When the tables are exported, is also exported a file with specification - tables, fields, data types - for each exported file).
The next step is to get these raw data, and copy them to a local directory. (Although this action may also be automated, for now we’ll do this manually).
Then we can simply run a macro that will get each of these files in local directories, importing each one doing some processing* and providing everything in a single database!
- Data processing is an essential step, especially the inclusion of new fields in each table. This is simply because if we collect all the common files of all BSCs, how would we know which sector belongs to a particular BSC (for example)?
Folder Structure
As we have said, you should already be familiar with the modularição Hunter. So today let’s create some more directories and files to support this module macros Parameters (1). The new directories are shown below.
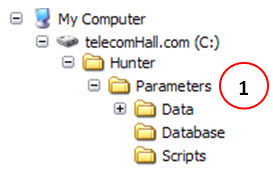
As we are used to, the directory ‘Script’ contains the script for this module. The directory ‘Data’ is the directory where the module searches the data. And the directory ‘Database’ is the directory where the database will be: Hunter_Parameter_DB.mdb, with our final data.
Note: It is very important to maintain a standardization of the nomenclature used, mainly, and at least, for the key databases. The Database parameter is one of those keys databases, and as we said, in future we’ll use it as a baseline (data source) for various other modules. If he does not have a default name - that is, change the name to any other one - we will have problems to bind the other modules. You can understand more or less making an analogy with Excel. If you use an external worksheet in a formula, and delete or rename this worksheet, you must tell Excel from where the new data will come!
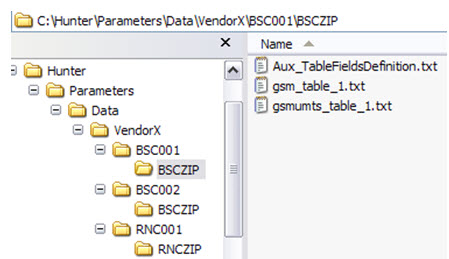
You may have noticed the sign ‘+’ in the Data directory. This is because, for this particular example, we have the data for our X Vendor arranged as shown below (almost a mirror of the raw data generated in the same directory at the OSS, and downloaded via ftp).
We have:
-
BSC001 with 3 BTS: GAAA1, GBBB1 e GCCC1 (all with 3 sectors).
-
BSC002 with 3 BTS: GDDD1, GEEE1 e GFFF1 (all with 3 sectors).
-
RNC001 with 2 NODEB: UAAA1 e UEEE1 (all with 3 sectors).
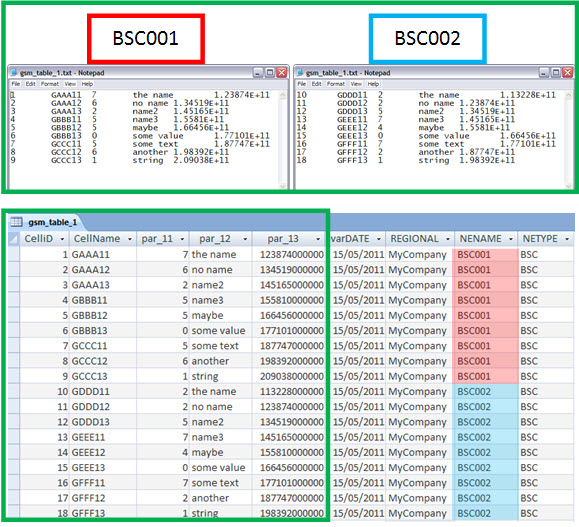
For example, raw files for BSC001 are:
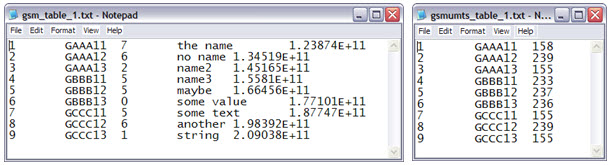
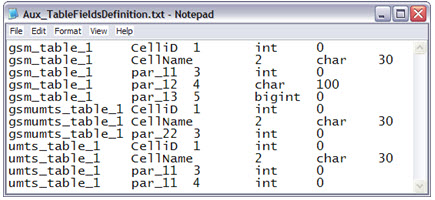
And in all directories, a file exists with the definition of data types for each field of each table:
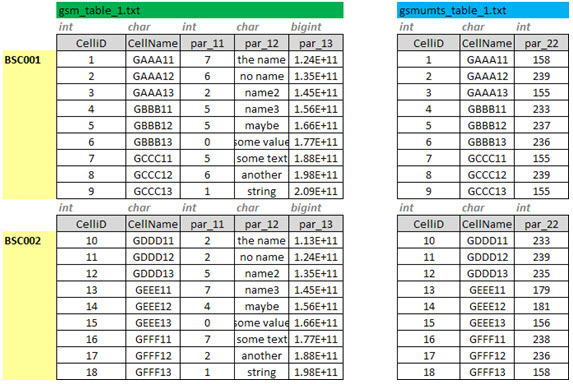
Observation 1 : note that the file ‘gsm_par_1.txt’ for BSC001 is stored in a table ‘gsm_par_1’. The file ‘gsm_par_1.txt’ for BSC002, will be stored in the same table. Now you can understand why we need to insert some fields in the processing, no? (In this case, a field to enter whether is it a BSC / RNC).
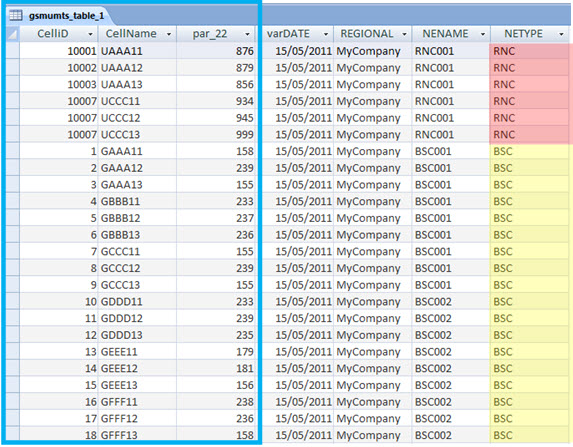
Observation 2 : following the same reasoning, and the structure presented, the files ‘gsmumts_par_1.txt’ for BSC001, and ‘gsmumts_par_1.txt’ for BSC002 and ‘gsmumts_par_1.txt’ for RNC001 will be stored in one table. Also worth inserting an additional field indicating whether the parameter is our GSM (BSC) or UMTS (RNC), does not?
Anyway, soon it will be easier to realize the importance and benefits of these fields.
Let’s continue. And enough about the dummy data in our network. Just remember that similar formats are supplied by all vendors, and you can adapt procedures learned here without problems.
Introduction to the Code Used
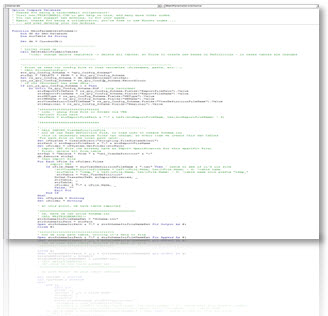
We will then present a suggestion of VBA code that you follow to create your own macro to do these tasks.
We’re talking about creating macros in Access (an auxiliary mdb file, located in the Scripts folder), so we need to add a module.
Note : until today, all the tutorials show step by step to insert each object in the database. For example, what menu to use, which item you click, etc… This methodology is good for learning, but repeating this whole procedure - that should already be assimilated - becomes unnecessary, and may even end up being a burden. So whenever indicate an action such as inserting a module or to write a macro, if you have any questions, please refer to earlier Hunter tutorials.
The macro uses some support tables and queries, so let’s talk first about them.
Auxiliary Tables
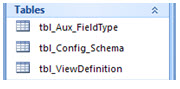
All tables we create are of type ‘tbl_*’ .
In our example today, we use three auxiliary tables, as shown below, with it’s explanation.
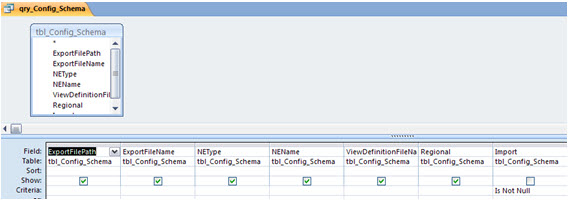
- tbl_Config_Schema : as all configuration tables that we use in Hunter, this table contains the fields that will define what our macro will do.

-
-
ExportFilePath : directory where we can find the data. Usually the data is downloaded via ftp in a single ZIP file.
-
ExportFileName : sub-directory where are all the files. In this example, extract all of them to the sub-directory with the ZIP filename.
-
NEType :field to indicate whether the element is BSC or RNC. This field / value will be appended in each table for this element.
-
NEName : field to enter the name of the element. We also append this field to each table for this element.
-
Regional : a free field, which will also be appended, and may contain information, such as the vendor or the name of your network.
-
Import : auxiliary field, indicating whether this element should be processed (imported).
-
-
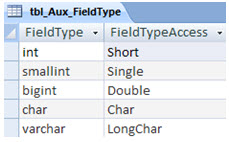
tbl_Aux_FieldType : we use the data in this table to write the file Schema.ini correctly. That’s because Schema.ini must contain exactly the kinds of data such as Access expects. And the data in our files may be different. For example, our file tells that the field is of type integer using the word ‘int’. In Access Schema, the definition of the integer type is through ‘Short’.
- tbl_Config_Schema : table with the table information and data types. We use this information to write the file Schema.ini which we speak is an auxiliary file, which allows automatic import of data. In our case, this specification is provided along with the dump, and for each element, we load via VBA the corresponding table definition.
Auxiliary Queries
All queries we create are of type ‘qry_*’ .
In our example today, we use two auxiliary queries, as shown below, with its accompanying explanation .
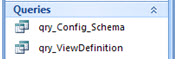
- qry_Config_Schema : practically the data for table ‘tbl_Config_Schema’, only filtering - showing - just the elements that we set up to process.
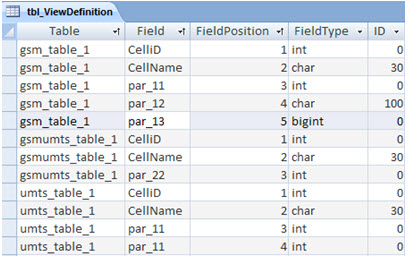
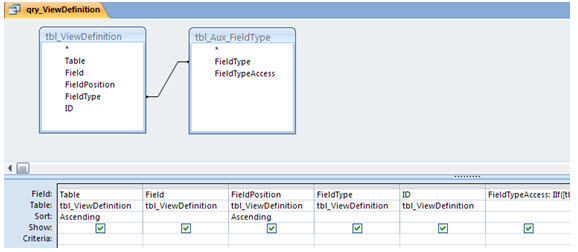
- qry_ViewDefinition : also a very simple query, with basically the table data tbl_ViewDefinition, including a new field FieldTypeAccess, who as we speak, would inform the format of the data type for the file format that Schema.ini as Access expects.
VBA Code Topics
Now that we know our data, and auxiliary tables and queries, we can assemble a topic of what the VBA code should do.
Remembering that this is only a way to do it - certainly you can do otherwise. This is our suggestion, then let’s ‘read’ the main steps of our code, making suggestions and ideas so you can create your own. For further references and possibilities presented in each statement, please see the Help for VBA or do a Google search. Anyway, the idea presented here serves as a guide for you or create your own solutions / codes.
Listing the main actions sequentially, we have a code summary:
For each row of the configuration query (which already excludes the possible elements that do not want to process)
[we use the command db.OpenRecordset to manipulate this query via code ]
Read the information, eg the directory where the files are to be searched ;
[assign values from each field of the active recordset to auxiliary variables, eg the variable ‘strExportFilePath’ contains the value of field ‘ExportFilePath’ ]
Import, before everything, the file with definitions of the tables / fields ;
[we use the command DoCmd.TransferText, because we know what is this particular file name, and we have a Text Import Specification previously saved for that specific action. To access these settings saved, you can import any text file using Access interface, and when the wizard appears, click Advanced - Specifications. Anyway, this is a simple specification ]
With these definitions loaded, writing the file ‘Schema.ini’ in that directory where the files are ;
[we use the command Open For Output - inserting the Schema.ini header, and Open For Append, to write the information for each field (loop) ]
Import each file (eg NAME1.txt) in this directory, based on the information already on file ‘Schema.ini’ we created in the root of this directory, to a temporary table ‘temp_NAME1’ ;
[WE use commands CreateObject (“Scripting.FileSystemObject”), to scan the information in the directory, and command db.Execute SELECT * INTO to insert data using the Schema.ini ]
Include additional fields with THE values that we read in the query configuration ROW, and also with other values desired, for example a field with information for Date ;
[we use the command .Createfield and .Append to insert additional custom fields to tables ]
Insert the data from this temporary table, now with our support fields, in a final table NAME1;
[we use the command db.Execute SELECT * INTO ]
Delete the temporary table ‘temp_NAME1’ ;
[we use the command db.TableDefs.Delete ]
Finally, we copied all the tables in the current (remember he is our ‘Script’) to the final database ‘Hunter_Parameters_DB.mdb’.
[we use DoCmd.CopyObject with the current and target file information ]
Results
As a result (running a macro that calls this code), we have our database with all tables and fields with information from the configuration parameters for our network.
Opening the database we have access to all data in one place!
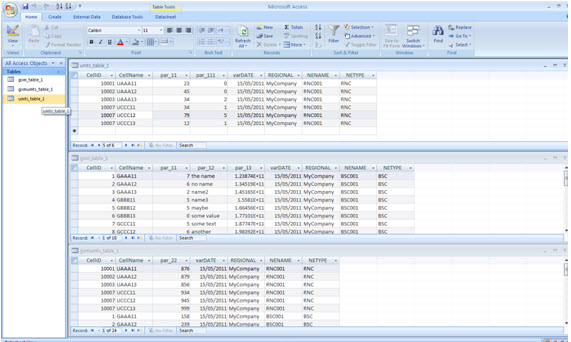
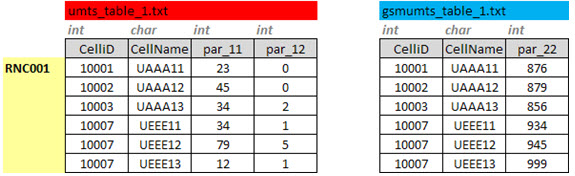
Returning to our example, we have two BSC, with a table ‘gsm_table_1’ (TXT file) exported to their specific sub-directories. After processing, we have the data from these tables (files) stored in one single table (Access), with additional fields! (For example the field NENAME - with the name of each BSC).
In our example, see that we also include a UMTS RNC, with a table of common parameters to GSM and UMTS: ‘gsmumts_table_1’. When all three files (two of BSC’s and one of the RNC) are imported into a single table, we see the usefulness of a field as the NETYPE - that allows us to filter by the parameters of BSC and / or RNC.
IMPORTANT : Note that here we use dummy data, and only a few files / tables for netwrok configuration parameters. In practice, the number of files / tables are hundreds, making the use of such macros virtually indispensable.
Conclusion
We are now in a new stage in the developments of Hunter tool. As we reported, we are focusing more on applications. The tutorials published until recently were turned over to a familiarization with the methodology, and also the use of programs, especially Access and VBA.
Today we saw how to create a database with all information of the configuration parameters of our GSM and UMTS network. Other technologies such as LTE can be added, similarly as presented.
The concentration of such information in a single file has many benefits, such as to enable rapid creation of reports, reads the parameters in Google Earth, audits of parameters, verification of network changes, updating databases and other tools, such as auxiliary files in executing drive tests. And most importantly - reliable data because they correspond to what we have in the active network!
Thank you for visiting and we hope that the information presented here can serve as a starting point for your solutions and macros .
In particular, we thank collaborators of telecomHall . The files in this tutorial has already been sent, please check. If they had any problems upon receipt, please inform.
We continue with the preparation of tutorials for various other modules, to be published in a gradual and timely.
Our search is continuing for the development of applications more simple and that allows us to improve our work, quickly and efficiently. Read all the tutorials and practice: the knowledge acquired can be your greatest difference!
Download
Download Source Code: Blog_025_Hunter_Parameters_(Schema).zip (69.4 KB)