Introduction
Let’s talk today about organization, especially the documentation of sites in a cellular network. Quite simply, let’s see how this information can work to our advantage.
We like and agree with a famous phrase used in IT: " Every non-hierarchical structure tends to become obsolete. "
But what does this have to do with me? Let’s talk a little more about it, and then you decide for yourself whether the suggested practices apply to you, or you can help.
So here we go.
Objective
Submit a proposal for the directory structure to assist in Telecom and IT professionals, to improve organization and productivity (work faster, less rework). And also learn how to create an interface with hyperlinks that allow open any of these directories dynamically.
Motivation
Imagine that the area of marketing your company made a Request for Assistance (Paper 1), requesting a new station to meet Google’s headquarters - the Googleplex.

The Planning team included this site in your process (Document 2), and once approved, it was passed to the Project team.

In turn, the team did a Site Survey Project (Document 3), indicating the candidate points, taking some photos of the sites (Document 4). After closing one of the points, also did the design of RF (Document 5), information equipment, antennas, Azimuth, etc…

Alongside the Infrastructure team made the Infrastructure Projects (Document 6), such as sketches of the work.

Also in parallel, the Transmission team also made its TX Projects (Document 7), analyzing the feasibility of each point.

Everything went well, and the site has been enabled - the Drive Testteam did the test (Document 8) at Activation.

More time passed - during which the Operation and Maintenance staff carried Maintenance (Document 9) Preventive and Corrective also on site.

One day, a Google employee complained about the quality, and Optimization team (Paper 10) made an analysis of KPI’s and changed the parameters of the station.

Leaving aside the imagination, our history has addressed several stages since the creation of a new station, to the extent that it became part of the network.
But what have we here?
At this point you may have noticed the huge amount of information - documents - that is generated for a single site!
And what happens if this information is not stored properly? Or rather, you had to use the search (F3) from Windows Explorer to find where certain document of a certain site?
Well, it is therefore very important to standardize the directory structure where information can be stored - and most accessible - for everyone! Arguably, everyone ends up winning.
And the opposite, obviously happens: When the information becomes ‘lost’, there will inevitably need to rework, or more unnecessary costs and wasted time.
Moreover, with the information known and available to everyone, all areas benefit by work already done by others.
For example, the Optimization team can use the pictures taken by the team that made the activation, to set a best azimuth. The Infrastructure team can use the photos of the team that made the deployment to see if you can install a new antenna. The marketing people can use the Drive Test to report to the client, showing the area served. And so on.
In short : a well-defined directory structure allows greater control, allowing greater integration of all areas where everybody wins. Many directories usually mean a lot of redundancy and re-work: you often can not find what you’re looking for!
For the reasons given, the directory structure to the information of the network must strictly follow the rules.
So come on and set this structure?
Main Structure
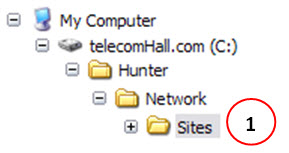
You should already be familiar with our standardization. We follow a methodology that we call the Hunter - although you can develop your own methodology. Then, following the Hunter main structure, create another directory - Sites (1), just below the Network module.
In the figure below is easier to visualize.
This will be the base directory of all other sub-standard directories.
Note: The structure shown is merely a suggestion. You can create your own structures, according to your needs. Just remember to ensure that all follow the same line.
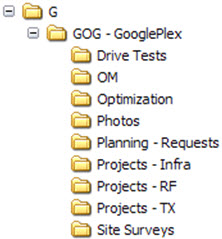
Let’s talk briefly about each sub-directory, such as sub-directory of the site GOG - Googleplex.
And what these Directories Contains?
The content is intuitive, either by the name of each sub-directory, either by the files that were generated (described) in our example above, or by defining what you will (for their own use or for the team, if applicable). Again always make sure that we give here only a suggestion of how we work. You have total freedom to create your own classifications.
But generally speaking, here are some examples of documents that can be stored in each of the sub-directories.
- Drive Tests : all tests related to the drive site. Such as drive test activation of the same in Google Earth, a drive test to answer a complaint in that site, etc…
- OM : Operation and Maintenance files. For example, reports on measures of antennas VSWR, periodic maintenance reports, etc…
- Optimization : files with optimization studies that site, as documents of parameter changes that it has, etc…
- Photos : All kind of pictures taken related to this site. This directory is a particularly important and should always be consulted whenever there are any questions regarding the site.
- Planning - Requests : information related to the reason that led to this site. Can be for example a request for a large corporation, government, or for reasons of capacity studies, etc…
- Projects - Infrastructure : All infrastructure projects involving the site, for example AutoCAD plans, documents, energy, etc…
- Projects - RF : coverage predictions, preferably in Google Earth, facilitating a quick evaluation of the designed coverage area. It also documents the project information of each BST - Coordinates, Antennas, azimuth, elevation, etc…
- Projects - TX : transmission projects, especially the evaluations of links.
- Site Surveys : supporting documents that were or are used in the abstraction of candidate points in the search for definitive point. All information should be stored, especially in the initial stage, where the candidate may have some deterrent - and then it becomes easier to locate where the documents are available from other points.
Other?
As we speak, you can create your sub-directories according to what you want. Just a tip: avoid creating a sub-directory called ‘Other’. Believe me, ends up being the most widely used directory - everyone ends up putting the documents ‘temporarily’ there. Only then will you realize that it is better to make a classification before and following the rule.
Anyway - you make your organization (or for your company)!
And how to access our structure?
Yes you can use the navigation in Windows Explorer. But there may come a time when you want a shortcut to each of the sites of their network and access them more quickly. For example, if in the Hunter KPI Charts module analyzing traffic in an cell - and want to open the sub-directory with information for that particular site: You can simply click a button and go straight to that directory!
One option is to have an Excel spreadsheet with a list of sites, and a hyperlink: clicking on the link, you open the directory you want! Can be used.
There is also another option - we prefer: using the structure of the Hunter system. In this case, we can use Access with a simple interface.
One advantage is: we already have all our sites on a table, don’t we?
So we created a simple VBA code which fetches data from sites in our database, and allows users to simply choose it, and navigate directly to where the documents are!
Let’s learn a little more?
Okay, so now we will teach how to make a simple form in Access, to be the user interface. In the tutorial Hunter UI we already had an introduction about interfaces and how they can be created using Access.
Let’s create one now - the first of many. In the future you will see that all our interfaces ‘interconnect’ to each other, thanks to the system modularity.
Note: The Hunter System part has a main interface - where we can call all other interfaces of other modules. This functionality will be better understood once you have a little more knowledge and experience with other modules. So do not worry now - at the moment, let’s do a very simple interface module Network. And of course this interface that we’re doing here is not the end - interfaces can always be updated to link it to more applications.
Note: Although it may seem complicated at first, it is not! It is more or less like a webpage, where you have a series of hyperlinks that facilitate their navigation - instead of typing each page you want manually.
But let’s continue.
Create a new blank Access file and open the menu Create -> Form Design.
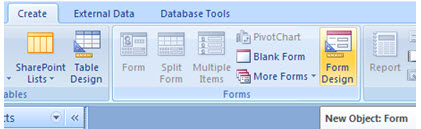
Done: we already have an interface. We just need to put controls on it that we desire.
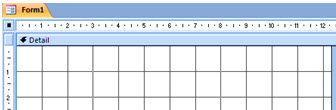
In the Design menu, you have everything you need.

Basically we have four steps:
- Add the controls we want;
- Create objects in the database that will serve as a support or used - tables, queries, VBA code;
- Assign functions and actions to the controls;
- Set some properties - for example the size of our interface.
Note: there is no ‘magic formula’ to be followed, mainly because the will and creativity of each one is going to dictate the rules.
Following the steps we will show here, end up with an interface as you’ll see at the end of the tutorial. You can use this as an example or starting point for their own interfaces, with more and better features.
Adding Controls
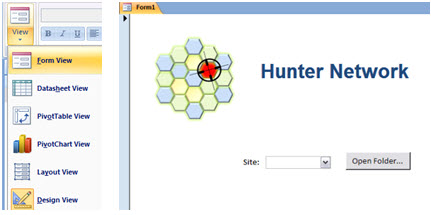
First, let’s add an image to create a visual impact. You can for example insert your company logo. Clicking the link Menu Design -> Image, which opens a dialog box to choose our image. Then we do a few more adjustments in the size of it, if any.

Then, insert a Label, and do the simple formatting.

Next, we add a Combobox by clicking on it, and then clicking on the form.
Note that Access now ask where the data of this control will come. We want it to show our sites, but do not have this ‘source’. For now, click Cancel - the control will be added to the form, even without the data source. Later we inform to that control where it should fetch the data for display.
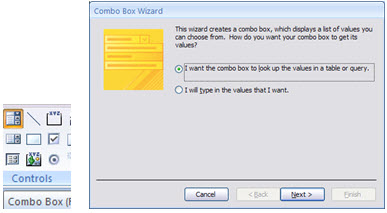
Following, we rename the default name of the control, for example for ‘Site’.
![]()
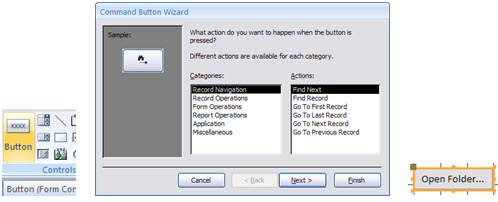
We now need at least one Button, so that, when clicked, open your Windows Explorer with documents on the chosen site. Then click on the Button, and in the same form. See Access again gives us a Wizard, this time to assign actions to this control. Likewise, click cancel, then report on what the button will do. But we have to rename the default name for a more meaningful name, such as ‘Open Folder …’ that is what he will do.
Note: Today we are creating our first Hunter ‘functional’ interface. While we can insert a few more controls, even so it looks more like a standard interface such as an Exit button, or to make it more ‘professional’, we’ll stick around a while, because now you can practice and better - to learn.
So we have an interface simple and functional - though not as functional as well, since it does nothing yet, and your only option is to close it. To view the form as an interface, and to then return to design mode - we use the Menu Design -> View.
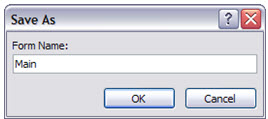
When you close the form, Access will ask what’s its name. Save this form as ‘Main’.
Now we need to assign functions to the controls. But first, we need to create the objects there are the source of them.
Creating the Source for Controls
For the data of our control, you can now use what we learned in previous tutorials.
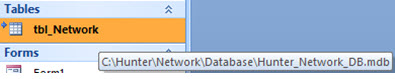
Link the table tbl_Network our database (… Hunter\Network\Database\Hunter_Network_DB.mdb). If you do not hares as doing so, read again the tutorial Hunter GE Network (Websites) .
There, we have a table available, which contains the data we need: a list of sites.
However, the table may not be a good source, especially because there may be duplicate data for the site, as in cases where we have several BTS on the same site (several rows). To resolve this problem, we make a query that ‘format’ data as we need.
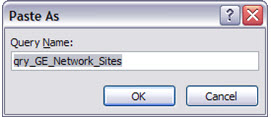
At that same tutorial you learned how to create this type of query - in the case it was ‘qry_GE_Network_Sites’. Create this same query, only now it is enough the Site field. Also, save this query as ‘qry_Network_Sites’ - since the purpose of it has nothing to do with Google Earth - GE - today.
Remember: you can create this query, as you did in another tutorial - even because this query is extremely easy, with only one field. But you can do otherwise, especially in the future, when you do have more complex databases, with even more complex queries: you can copy and paste a query from one database to another! We begin this paragraph with the word ‘remembering’ because you’ve learned in this tutorial Hunter UI , remember?
To do this, open the database that contains the information you want, select it and press CTRL + C. Then in the target database, simply press CTRL + V.
So now we have a new query - renamed ‘qry_Network_Sites’ that can be used by our Combobox! (The query shows the latitude and longitude, but we can ignore - or if you prefer, you can remove - do not worry about it).

Now they need to control the action Button will do: open the default directory in Windows Explorer for our selected site!
And for that, let’s write a VBA code to do it for us.
Again, we saw in that tutorial how to create a code and store ina a VBA module in Access. But now the code will not be stored in a module, but inside the Form object we created.
Note: we created the Combobox on the form was added with the name ‘Combo1’. We should always give relevant names to our controls, because when we refer to them in our code, it is much more organized and even easier. Just not to redo the example we will use the default name. But in your developments, treat the subject of naming controls with enough importance.
Assigning Functions to Controls
Much of what we speak here, and also detailed description of how to assign sources of data and functions to the controls, were already explained in detail in the tutorial Hunter Interfaces (UI).
The allocation of data and actions to control is exactly the way demonstrated in the tutorial mentioned Hunter UI.
The only thing new today is the code, but that is pretty simple:
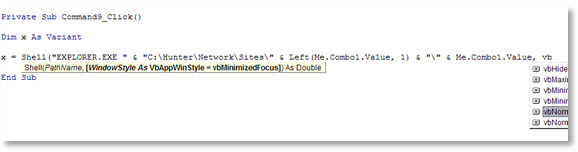
We call the Shell function to open the Explorer, at the directory of the site: We concatenate up the complete directory, with the first letter ‘Left (Me.Combo1.Value, 1)’ and the name of the site ‘Me.Combo1.Value’ variables - according to our directory structure.
Defining some Properties
Finally, we set some properties - for example the size, border type, etc. - especially as shown in the tutorials mentioned. If you have questions about this, please read again.
So we have our form ready. Simple but functional.
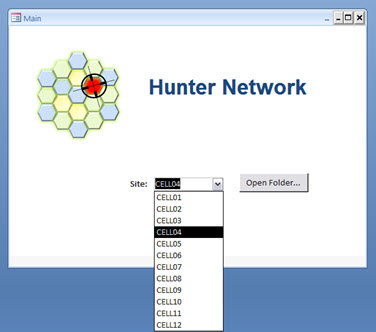
Now just click to choose a site, click ‘Open Folder …’ e. …

You are in the directory you want!
Conclusion
This was a brief tutorial on the importance of organizing the storage of documents on the network. A suggested directory structure that can be used, facilitating the concentration of all documents in the right place where they should be stored - and thus more easily searched and accessed. Over time, you will realize that this is a measure that brings large benefits.
We also show how to create a simple application of the Hunter which allows open-standard directories, going straight to the desired location without the need for repetitive navigations.
IMPORTANT: In the next modules to be published, we will be progressively increasing complexity. In other words, make sure that the concepts of System Hunter presented here today are well understood by you. If you need, please read some tutorials again. We will focus more on applications (test drive, kpi, audits, charts, predictions, etc. …), involving queries and codes MUCH more complex. But rest assured, we’re always listening to your feedback, because you are our focus. Otherwise, why would we write, if you do not learn?
And even if you are not a telecomHall collaborator, be sure you can still learn a lot. If you already have your own macros and applications, you can learn tips and tricks to further improve your work. In addition of course to learn in other sections as Exclusive Course, Jobs, fantastic Tips Section- the best in the area without speaking telecomHall communities - Groups and Social Networking.
To collaborators: please check that you already received the files related to this tutorial - we already sent you. In case of any doubt, or did not received it, please contact us directly.
And everyone in general, much thanks for your company, and until our next meeting.
Download
Download Source Code: Blog_024_Hunter_Folder_Structure.zip (197.9 KB)